If images aren’t loading on your WordPress website, you need to act fast. With website images being such an integral part of engagement, it can be frustrating when they don’t load properly.
It’s not a good look and can impact the authority and perception of the quality of your website.
Did you know?
- 90% of information transmitted to the brain is visual
- Visuals are processed in the brain at 60,000 times the speed of text
(Source)
Images are incredibly important to user engagement. Nobody wants to read a wall of text and most of us want a little something nice to look at while we’re surfing.
If you notice images aren’t loading on your WordPress website, or even worse, a user alerts you to the fact, here’s how to fix them.
15 Ways To Fix Images Not Loading on Websites
As the causes of pictures not loading on websites are many and varied, you may need to work your way through the list until you fix it.
We use all the following methods when troubleshooting images and each of them works in their own way.
Usually, it’s simply a matter of reinserting the image into the page or post, but sometimes it’s a little more involved.
The first 4 steps are about fact finding and trying to isolate the root cause. The 11 steps that follow are all reliable ways to fix images not loading on websites.
- 1. Check To See if It’s Some Images or All of Them
- 2. Force Refresh Your Browser
- 3. Check Using Different Browsers and Use Incognito Mode
- 4. Switch Between Desktop and Mobile View
- 5. Clear Your Cache if You Use a WordPress Caching Plugin
- 6. Check You’re Not Using a New Caching Plugin and Have Minified CSS
- 7. Check Images Are Present and Load in the WordPress Image Library
- 8. Check Image Paths and Add Them Again if Required
- 9. Check File Compression and the Extension
- 10. Upload Images Through WordPress Rather Than FTP
- 11. Check the Media Folder Is Accessible
- 12. Check Image Hotlinking Prevention in cPanel
- 13. Make Sure Your WordPress Theme Isn’t Interfering
- 14. Check Your CDN if You Use One
- 15. Disable Lazy Loading
1. Check To See if It’s Some Images or All of Them
Your first task if images aren’t loading on your website is to see if it’s one, more than one or all images.
If it’s just one or a few, you can troubleshoot individual images. If it’s all images not loading, it could be something more widespread.
Load your website in a browser and check. If you run a small website, check all pages. If you run a larger website, check as many as you have time for.
If you run an online store, check your main page and random product and category pages.
Look for a pattern to give you a clue as to what’s up.
2. Force Refresh Your Browser
If everything looks fine to you but not to users, you may be viewing a local copy of pages saved by your browser.
Browsers keep copies of web pages you have already visited in the browser cache so they load faster next time. Pages are refreshed regularly to keep them up to date, but you won’t always see a fresh copy every time you open a page.
A forced refresh forces the browser to fetch a new copy of the page to make sure it’s the latest version.
Use one of the following combinations in your browser to force refresh the page:
- Chrome: Ctrl and F5 (Windows) or ⌘ Cmd and ⇧ Shift and R (Mac)
- Firefox: Ctrl and F5 (Windows) or ⌘ Cmd and ⇧ Shift and R (Mac)
- Safari: Option + ⌘ Cmd and ‘E’
- Microsoft Edge: Ctrl and F5
You should now have the same experience as your visitors and can troubleshoot properly.
3. Check Using Different Browsers and Use Incognito Mode

WordPress is very compatible with browsers and most themes and plugins are too. With most browsers except Safari and Firefox using a version of Chromium, compatibility is easier than ever.
It’s no guarantee though.
We recommend using multiple browsers if images aren’t loading on your WordPress website.
Also try each browser in incognito mode.
If you see images on one browser and not another, it could be browser compatibility. Clear the browser cache and try again.
If you see images in ‘normal’ mode but not in incognito mode, it could be a WordPress plugin, browser plugin or your CDN if you use one.
4. Switch Between Desktop and Mobile View
Another quick check is to visit your site on desktop and again on your phone. It may be that one is rendering images and one is not.
It’s useful to regularly check like this any time you make a change, install a new theme or plugin. It’s better that you detect an error rather than a visitor!
If images are working on desktop but not mobile, it could be a theme, plugin or page builder issue.
Check for updates for your theme and plugins and make sure everything is up to date.
Open the post or page in the page builder and use responsive view. If the image loads okay, check any image optimization plugins, re-run optimization or clear your WordPress cache.
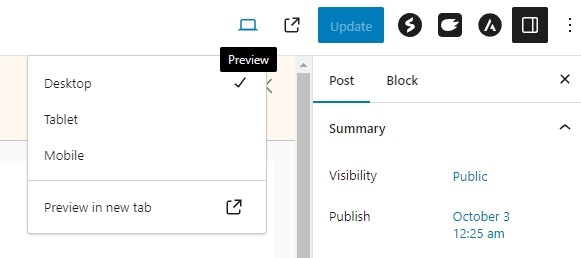
You can do the same within the WordPress post or page editor by selecting the small screen icon by the blue Update button.
Don’t worry, we’ll show you how to do all those things in a minute.
5. Clear Your Cache if You Use a WordPress Caching Plugin
WordPress caching plugins are great at speeding up page loading but can occasionally cause issues. If you use one, clear the cache and see what happens.
A WordPress cache, like your browser cache, keeps copies of pages to send to visitors. This speeds up the process and gives the user a much faster experience.
Clearing the cache empties it and forces the plugin to rebuild every requested page.
Exactly how you clear the cache depends on the plugin you use:
LiteSpeed Cache – Hover over the LiteSpeed icon at the top of any page and select Purge All.
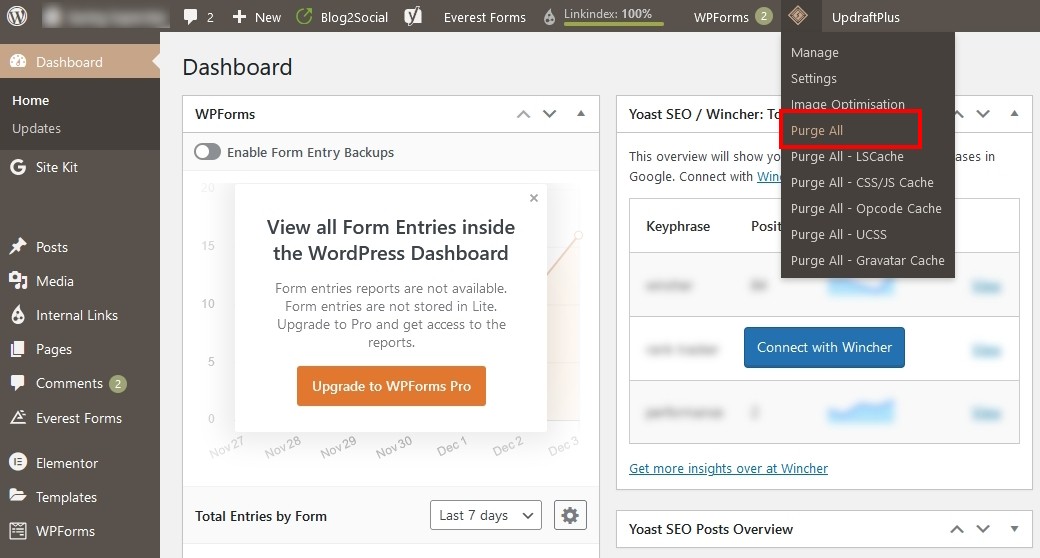
WP Rocket > Dashboard > Clear cache.
Other caching plugins will have something similar.
Once cleared, force refresh a page with an image that wasn’t loading and check the results.
6. Check You’re Not Using a New Caching Plugin and Have Minified CSS

Staying with WordPress caching for a minute, are you using a new plugin? Have you changed any settings recently?
If you’re using a new caching plugin, disable it and retest.
If you’re not using a new plugin but have recently minified your files, that’s a likely suspect for images not showing on websites.
Minification is the process of removing anything unnecessary from CSS files to help pages load faster.
For example, developers will leave comments and markup to help them, and anyone that follows, to highlight key areas of code.
WordPress doesn’t need that so minification removes it all. There’s much more to it than that, but that’s basically how it works.
Minification doesn’t always get it right, so if you’re using a new plugin or have tweaked minification settings, disable the plugin or undo the changes and retest.
7. Check Images Are Present and Load in the WordPress Image Library
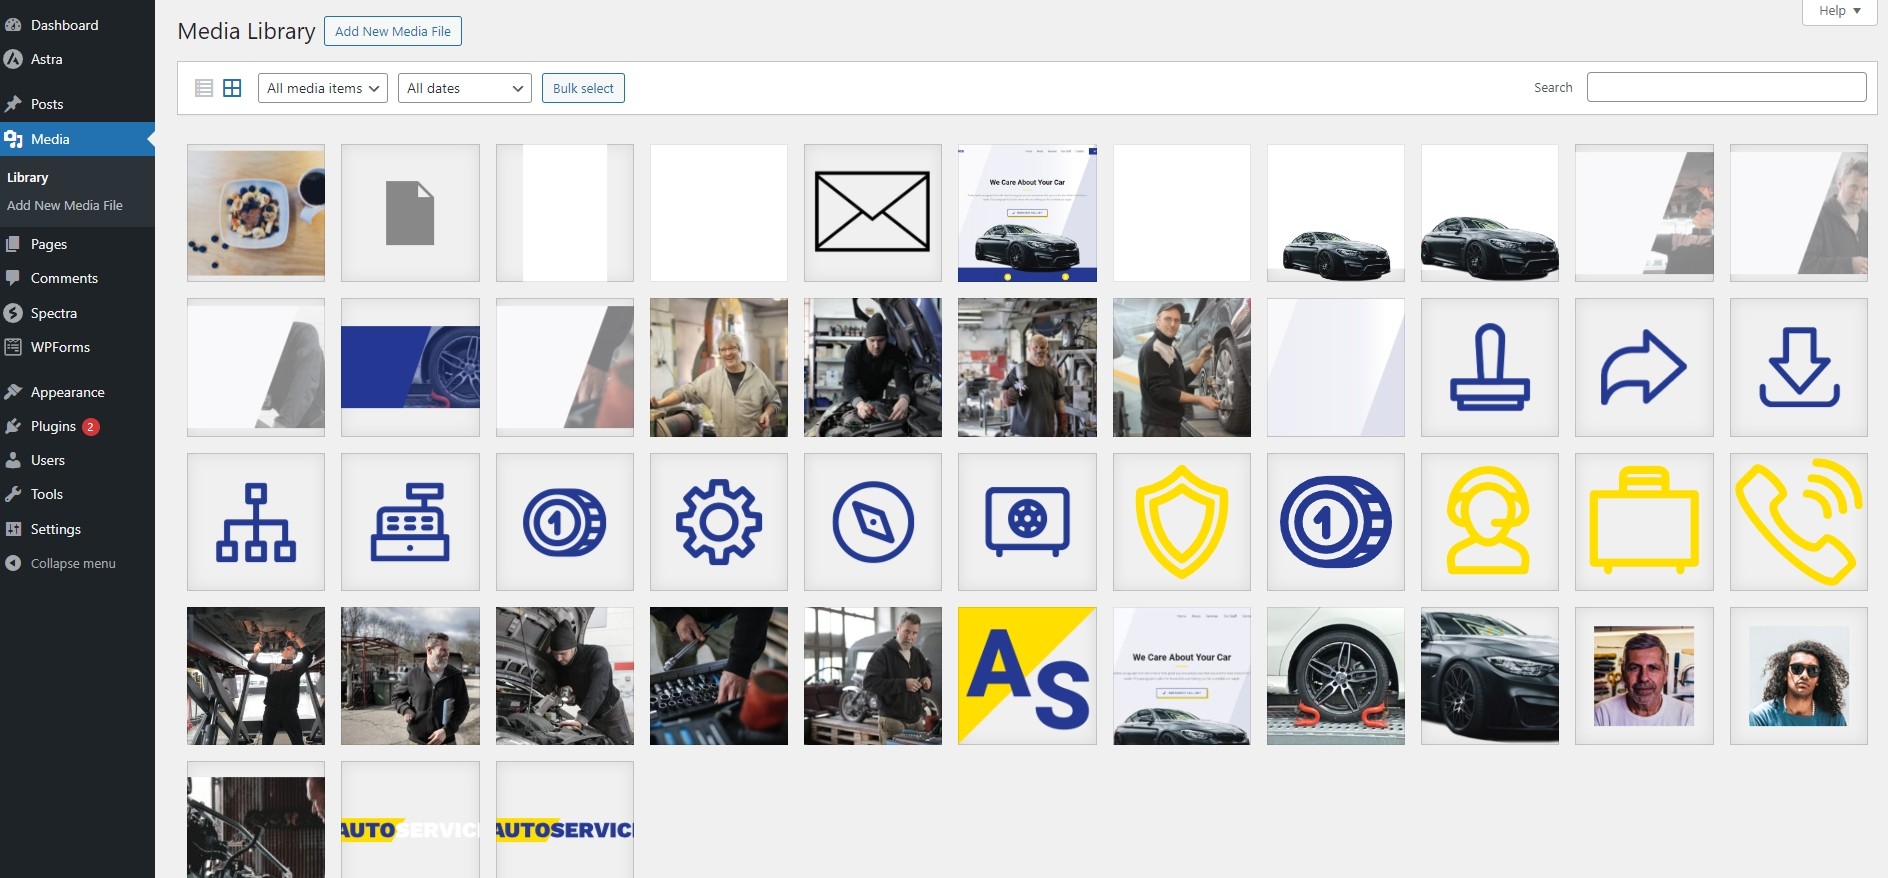
Let’s now check if the images are present in your WordPress image library.
Log into your WordPress website and select Media from the left menu.
Navigate the image library to find the image that isn’t loading or use the search function if you know the filename.
If the image is there and looks okay, make sure it’s an acceptable file format (JPEG, PNG, GIF, WebP).
Click the image and check the image URL on the right is correct and points to your Uploads folder.
Optionally: Upload the image again and reinsert it into the page or post. We cover reinserting the image in a little while, but you can do it now if you like.
If you’re still troubleshooting, keep the image library open in a browser tab as you may need it again later.
8. Check Image Paths and Add Them Again if Required
Checking image paths means making sure the URL of the image actually points to it in the media library.
Open the page or post in edit mode and select one of the images that isn’t loading.
If it looks okay on the page, select the image to bring up the customizer.
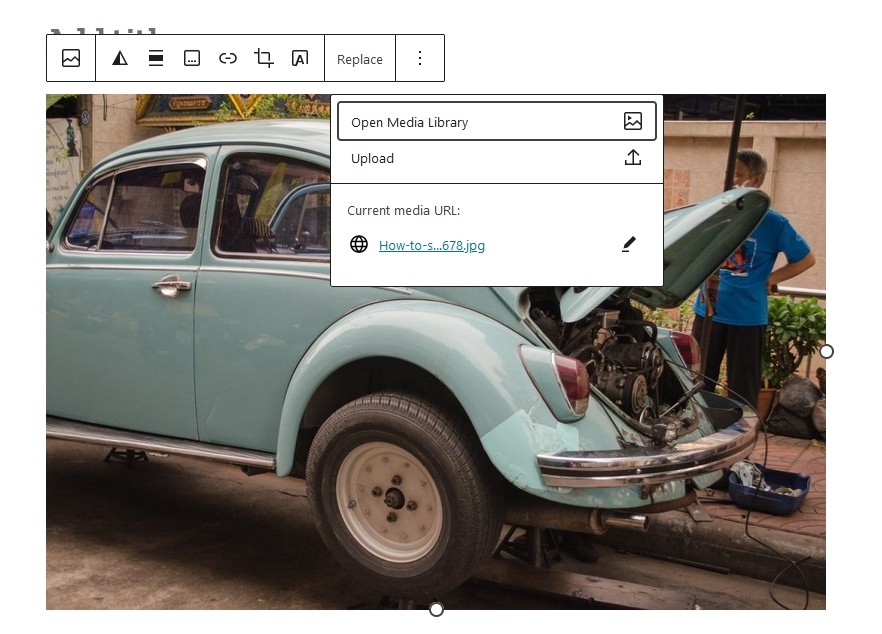
Select Replace and you should see the Current media URL in the popup box.
Make sure that URL matches the one in your media library.
If the image is showing up in the editor, the URL should be okay, but it’s worth checking and only takes a second.
9. Check File Compression and the Extension
If you’re using an image plugin to compress images or have begun switching from JPG to WebP, that may be causing issues.
You should see a pattern:
- If it’s image compression, the images not loading will be those that have been compressed.
- If it’s WebP conversion, those not loading will be the ones that have been converted.
If compression is the issue, many compression plugins allow you to undo it and revert back to normal.
For example, WP Optimize makes a copy of images before compression and you can restore them if you need to.
Select WP Optimize > Images > Show Advanced Options > Restore Compressed Images.

If you use Smush, you’ll first need to enable image backups in Bulk Smush > Tools. If you don’t have that option, you’ll need to upload new images.
Other compression plugins may have similar tools.
If you’re gradually switching to WebP images, your PHP version may need an update or you may have to check for WebP (libhelp) support from your web host.
WebP is supported by default from WordPress 5.8 upwards, but it’s worth checking.
It’s also worth checking your .htaccess file. Even though WebP is supported, your .htaccess file may need updating.
You can test by adding the following code to your .htaccess file, saving it and force reloading a page with a failed image.
<IfModule mod_rewrite.c>
  RewriteEngine On
  # Check if the browser supports WebP images
  RewriteCond %{HTTP_ACCEPT} image/webp
  # Check if the WebP version of the requested image exists
  RewriteCond %{DOCUMENT_ROOT}/$1.webp -f
  # Serve WebP image instead of the original image
  RewriteRule ^(.*\.(jpe?g|png))$ $1.webp [T=image/webp,E=accept:1]
</IfModule>
<IfModule mod_headers.c>
  # If the browser sent an HTTP_ACCEPT header containing "webp"
  # and the environment variable "accept" is set, add "Vary: Accept" header
  Header append Vary Accept env=REDIRECT_accept
</IfModule>
<IfModule mod_mime.c>
  AddType image/webp .webp
</IfModule>
If the image loads, you could leave the code in place. If it still doesn’t, remove the code and continue troubleshooting.
10. Upload Images Through WordPress Rather Than FTP

Even though the WordPress media library is pretty good, sometimes it’s faster and easier to upload using FTP. This is especially true if you’re uploading bulk images.
But sometimes WordPress doesn’t properly detect images uploaded through FTP.
If you have uploaded images to your uploads folder and they aren’t showing on your site, it’s an easy fix.
You can either upload them again through WordPress or change file permissions. We’ll cover file permission in the next step.
If it’s only a few images not loading, we would recommend just uploading them through WordPress and adding them to your page in the usual way.
This should fix images not loading on your website!
If it doesn’t move on to the next fix.
11. Check the Media Folder Is Accessible
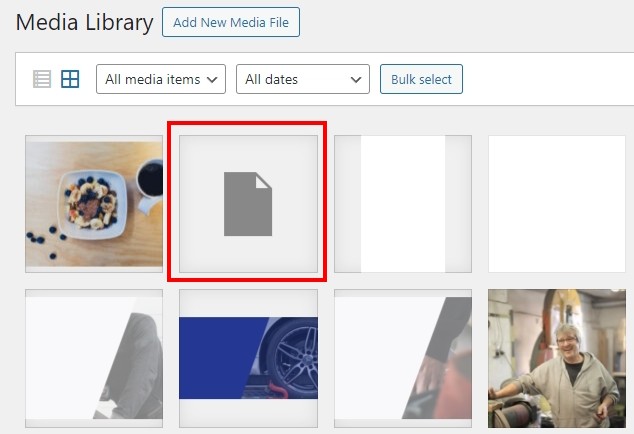
The relationship between WordPress and FTP works 95% of the time but it’s that 5% that can cause the most issues.
If you bulk upload images, FTP is the fastest, easiest way to do it. But it can also cause issues with images displaying properly.
If there is an issue, you’ll usually be able to spot it in the media library as the image won’t show there. You’ll see a gray file icon or a box with a question mark.
However the issue manifests, checking file permissions will usually fix issues with images uploaded through FTP.
Open your FTP client and navigate to your uploads folder.
Right click the folder and check file permissions. It should be ‘644’
Check the box by Recurse into subdirectories and select Apply to directories only.
Then hit OK.
Recheck your images. If FTP was the cause, they should now load properly.
12. Check Image Hotlinking Prevention in cPanel
Image hotlinking impacts most website owners that use original images. It’s where another website uses the same image but links to yours rather than the original source.
This uses up your server resources to help someone else’s site, which isn’t great as you can imagine.
Image hotlink prevention is a way to prevent that, but it can occasionally cause its own issues.
If you use cPanel, it takes care of managing hotlink prevention but it doesn’t always get it right.
You can test by disabling hotlink prevention, clearing your WordPress cache and retesting the page.
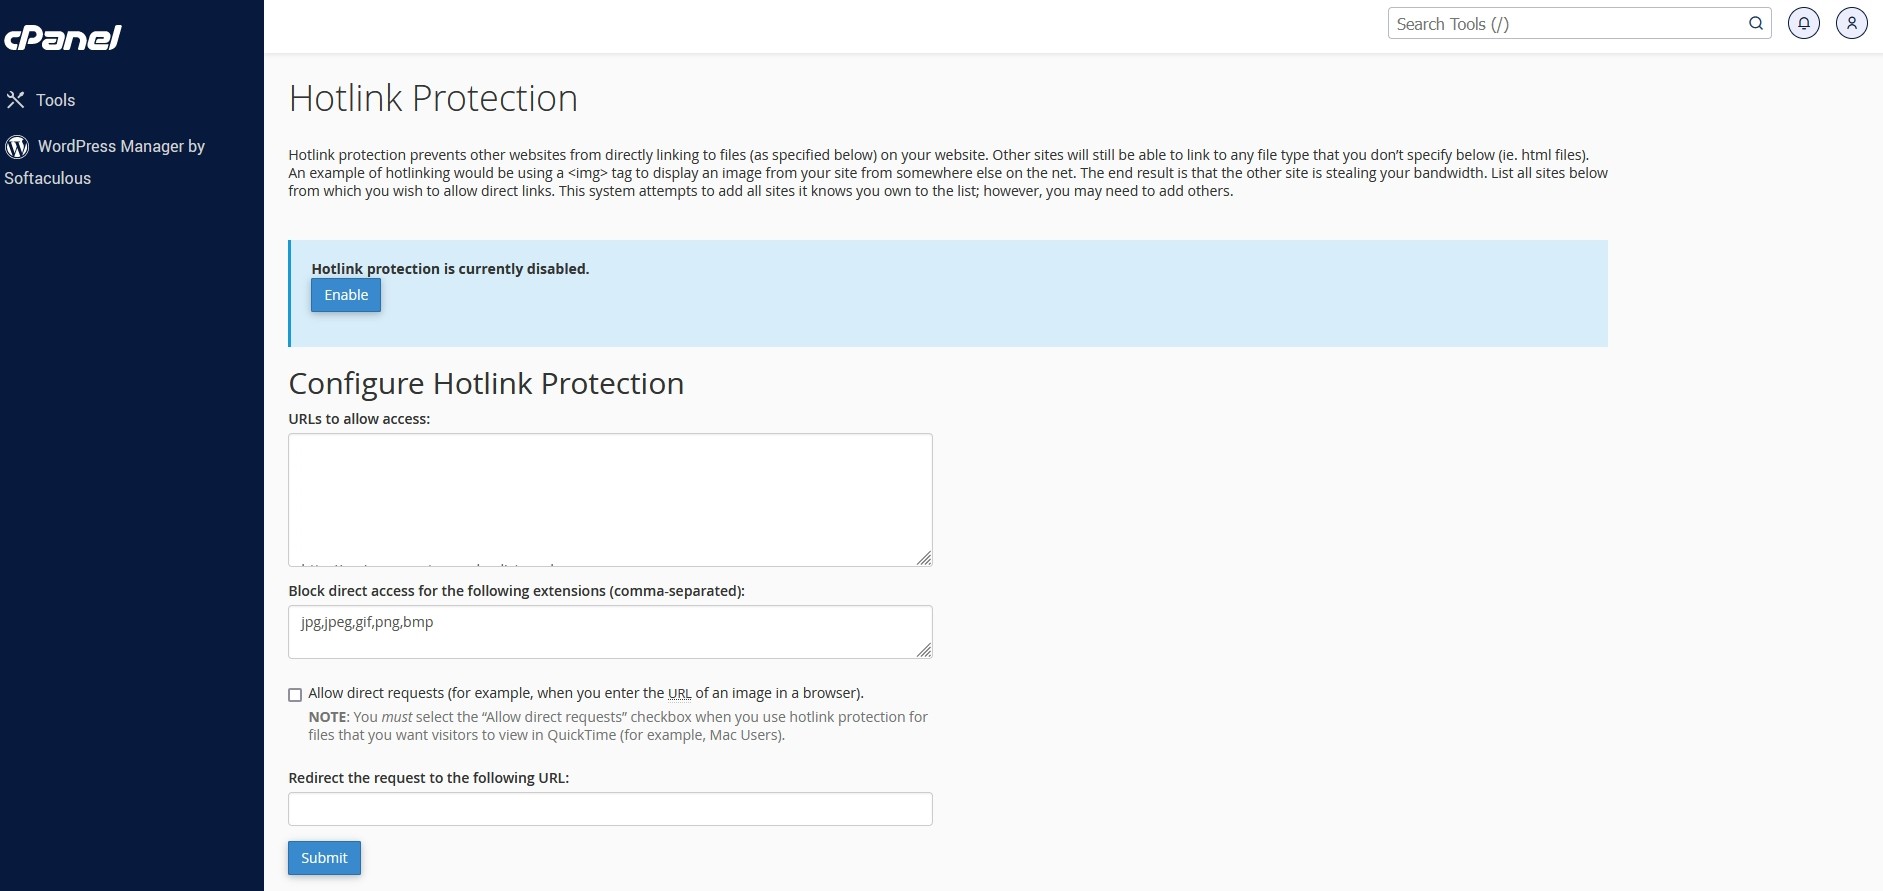
Here’s how to disable hotlink prevention:
Log into cPanel or your host’s alternative.
Find Hotlink Prevention and select it (usually under Security).
Select the blue Disable button.
Clear your WordPress cache, force refresh the page and retest image loading.
If the image loads, re-enable hotlink prevention and retest. If the image fails again, contact your web host and request assistance as it’s likely a server configuration issue.
13. Make Sure Your WordPress Theme Isn’t Interfering
Most good quality WordPress themes play nicely with images. It’s rare to find one that doesn’t, but it is still a possibility and something we have experienced ourselves in the past.
It can come about when you either try a new free WordPress theme or when your theme updates to a new version.
Either can introduce unforeseen compatibility issues that can result in images not loading on a website.
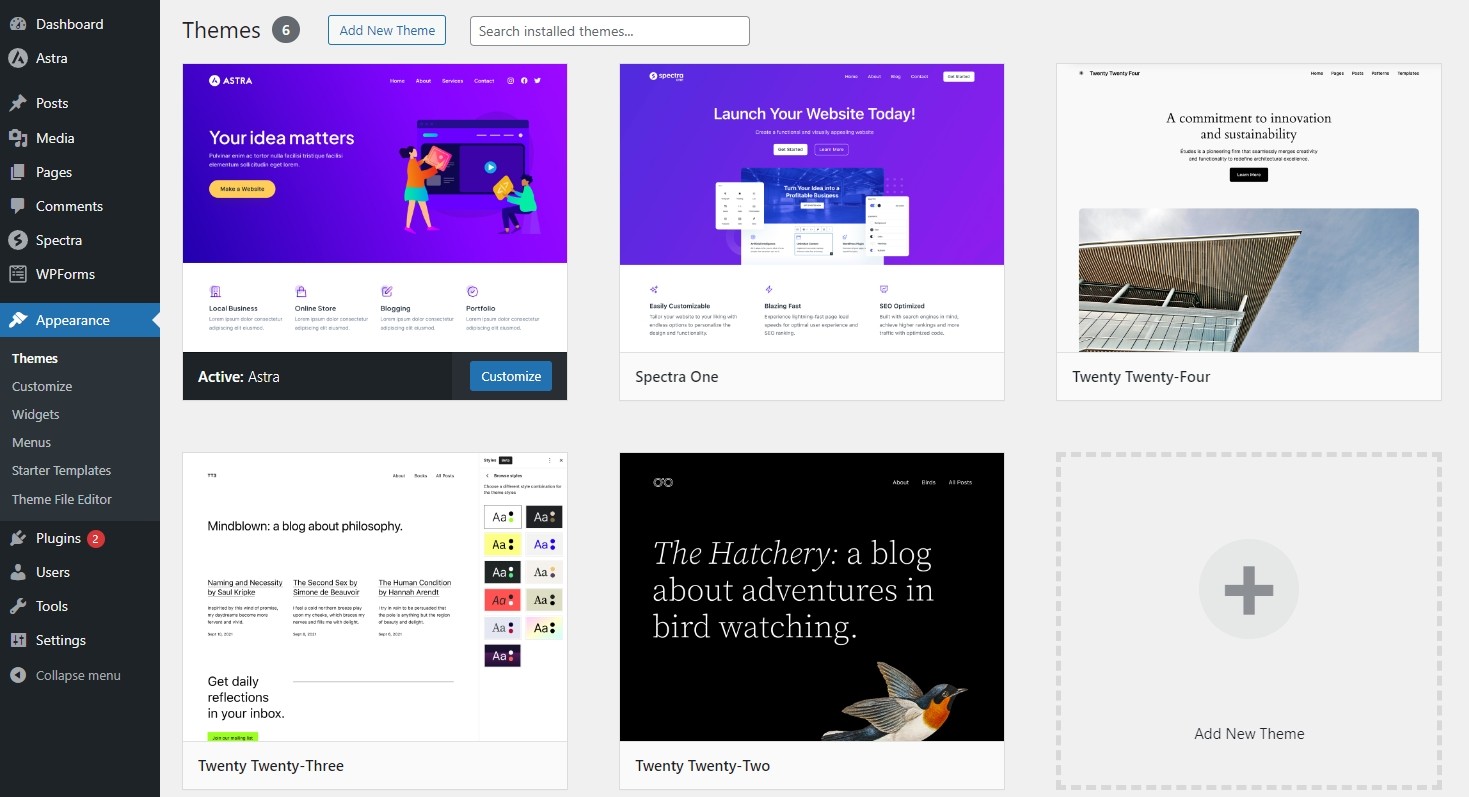
It’s easy to see if it’s your theme or not.
You might like to take a backup now, just in case. Once you’re ready, do the following:
Select Appearance > Themes in your WordPress dashboard.
Switch from your current theme to the default Twenty Twenty Four theme and retest.
You won’t see the same layout or design but your core pages and posts should still be visible. Check one that wasn’t showing the images and see what’s happening now.
If the image is showing, it’s something to do with your theme.
If the images are not showing on your website, it’s not the theme and you can switch back.
14. Check Your CDN if You Use One
A CDN, Content Delivery Network makes copies of your site and distributes them across multiple servers. The idea is to speed up load times by delivering from the closest server to the visitor.
CDNs work well and can provide extra security as well as speed improvements.
Until they don’t.
If you use a full CDN or image CDN, it may be causing the issues. If you have gotten this far without fixing the issue, it’s worth a try.
What you do depends on the CDN provider you use.
If your provider provides a WordPress plugin, disable it in the usual way. If your host has a cPanel control for a CDN, disable it through that.
If your provider uses another method for managing CDN, use that to stop or disable the service.
Refresh your WordPress cache, force refresh your browser and retest a page that wasn’t working to see if it’s your CDN stopping images loading.
15. Disable Lazy Loading
Lazy loading used to require a plugin but WordPress added it as a core function in WordPress 5.5.
It works the vast majority of the time but we have seen comments online citing lazy loading as a possible cause of images not showing in WordPress.
That makes it worth checking out.
The fix is simple, you just need to add a line of code to your functions.php file.
If you haven’t done this before, don’t worry, it’s simple and can be undone in seconds.
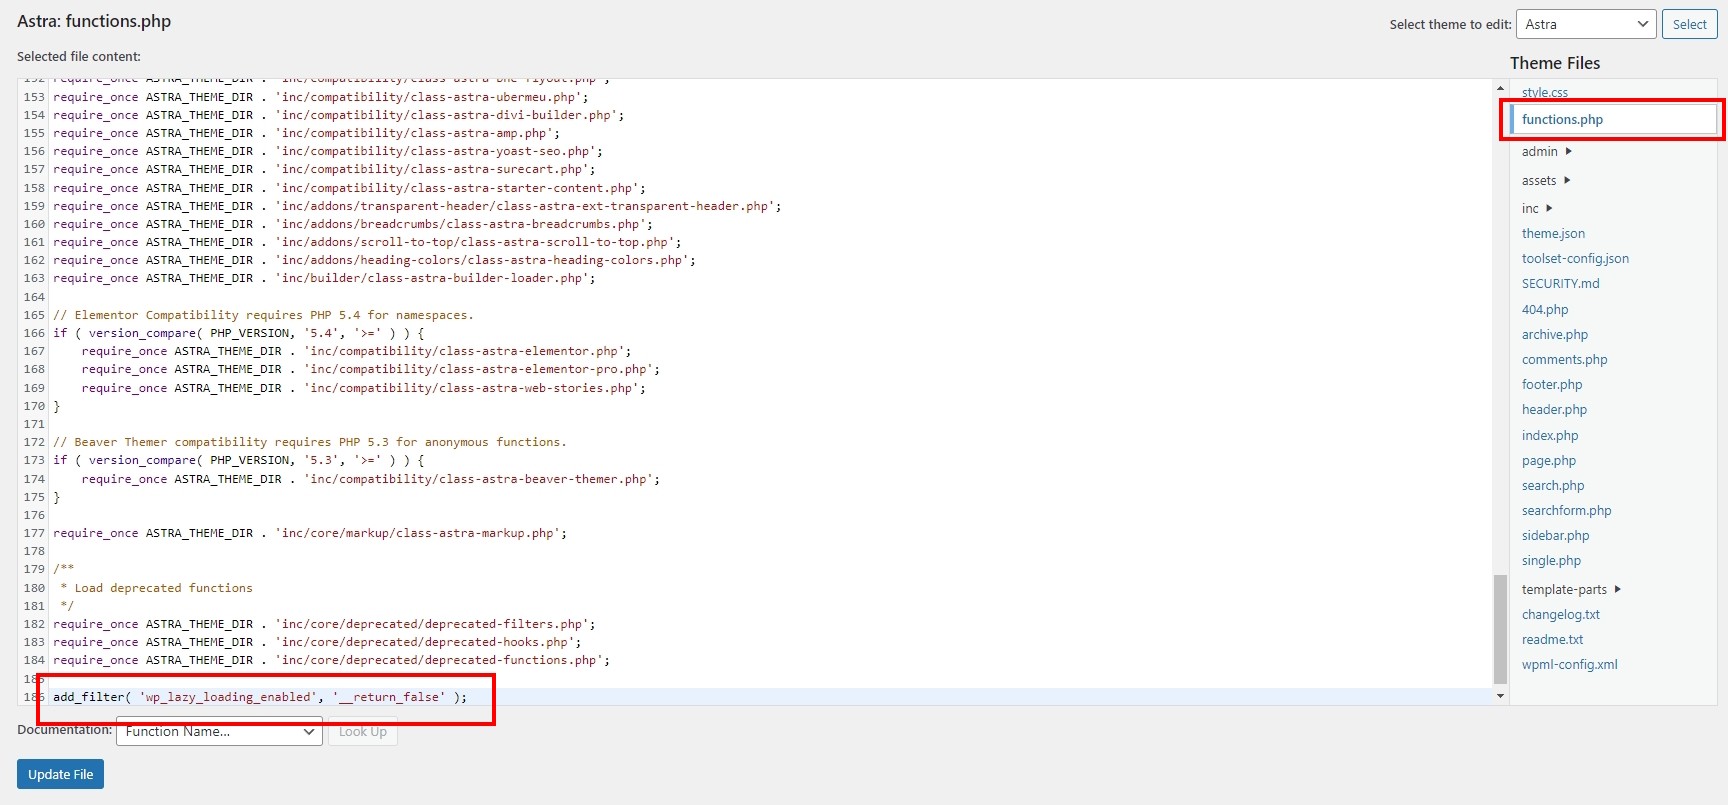
Select Appearance > Theme File Editor from the WordPress dashboard.
Select functions.php from the Theme Files menu on the right of the next screen.
Add the following line of code and select the blue Update File button to save.
add_filter( 'wp_lazy_loading_enabled', '__return_false' );Retest an image that wasn’t working. If it appears,
If you don’t want to edit your files, there’s a plugin called Disable Lazy Load you can use instead.
Conclusion
So there you have it, every conceivable way we can think of to fix images not loading on your WordPress website.
The vast majority of the time, you’ll just need to reset the image in the post or page. But, if it’s something more complex, you’ll find the answer here.
Did we miss a fix? Have you used other fixes for images not showing on your website? If so, tell us about it in the comments below!
Disclosure: This blog may contain affiliate links. If you make a purchase through one of these links, we may receive a small commission. Read disclosure. Rest assured that we only recommend products that we have personally used and believe will add value to our readers. Thanks for your support!
