A picture is worth a thousand words, which is why it can convey a message with much more power than text alone.
If you are a photographer, model, or artist, you can create a photography website to convey your message to a broader audience.
Your website will showcase your best work and increase opportunities for future engagements.
You can also create a photography website for selling imagery to different types of clients, including media houses, bloggers, agencies, photo hobbyists, NGOs and corporate companies.
This article guides you through the easy process of creating a photography website in 7 simple steps.
Before we get down to the nitty-gritty of building a site, it’s essential to know what makes a photography website really stand out.
Essential ingredients of a photography website
We consider the following ingredients essential to making a great photography website.
1. Lightweight and responsive
Users appreciate fast-loading websites, which saves a lot of time. Attention spans are short and the list of competitors is long, so it’s best not to keep people waiting.
A lightweight and photography WordPress theme can load quickly on any device and deliver a great user experience.
2. Image options
A photography website is all about images so you need to have a lot of options to display them beautifully.
We believe a good website would provide multiple image layouts, such as galleries, image sliders and hero image options.
The more options the better!
3. Minimal design
As a photographer, you want your images to shine. So you could benefit from a design that highlights your work in the best way possible.
Many photographers prefer to use minimal website designs with lots of whitespace to highlight their photographs as much as possible.
4. Ease of customization
You should be able to change your website design without touching a line of code. The easier it is to customize, the more time you have for your work.
WordPress themes that integrate nicely with page builders like Elementor, Beaver and Gutenberg can provide easy to use drag and drop editing features for simple customization.
5- Easy to locate menus
Your potential clients should be able to reach out to you without getting lost on your website. The easier you make it for them to find out about you, the more likely they are to engage.
Your website should prominently display menus to provide clear direction to help promote that engagement as much as possible.
7 steps to create a photography website with WordPress
Now that you know the ingredients to create a photography website, it’s time we take you through the process.
Step 1: Get a domain
The first step is to claim a domain name for your website. A domain is your website address, or URL.
It’s the www. name that all websites need to have.
For example, you will type https://www.wpastra.com/ in the browser’s address bar to open our website.
Typically, you buy your desired domain name from a domain registrar such as NameCheap, Godaddy or Domain.com.
It’s up to you which domain name you think is best for your photography website. If you already run a photography business, you will likely want to use your business name as your website address.
If your business name or preferred domain name has already been taken, we advise using different combinations if a specific name is unavailable.
If you want to know more about domain names, check out this complete guide on domain names.
Step 2: Buy web hosting
Hosting is crucial as it is responsible for delivering your website to visitors from around the world.
Your main priorities when choosing web hosting are speed and support. You want your website to load fast and may benefit from support when you’re first starting out.
We can suggest some great hosting options ideal for a photography website, such as Cloudways, Siteground, and GreenGeeks.
You can use any web host for your project, but Cloudways is our favorite.

They provide an easy to use admin area ideal for users with all experience levels.
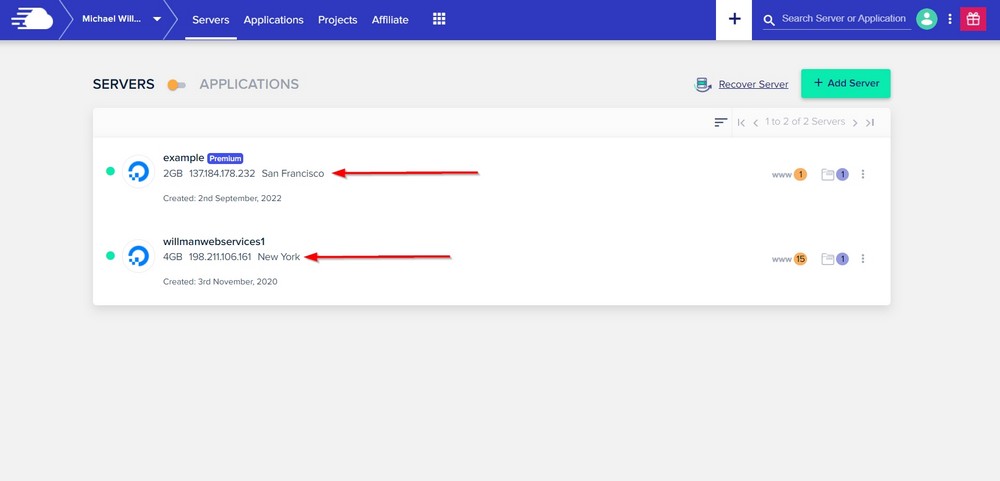
We suggest selecting server locations near your target audience to give them the fastest loading speed.
For example, if your market is US, selecting US servers should result in faster page loading. If your market is the EU, a European server would offer the same.
Their intuitive design makes the entire process extremely simple.
The image below shows two different server locations to cater to different audiences and project types.
As your traffic grows, Cloudways provide the option to scale your resources from the admin panel without experiencing downtime.
We will highlight a few more helpful features in a minute.
Step 3: Install WordPress
Once you have bought the domain name and the hosting, it’s time to install WordPress.
WordPress is the most user-friendly content management system (CMS) available. It’s the perfect choice for both beginners and advanced users.
Want to learn more about how to build a WordPress website?
You can use WordPress to set up any website you want.
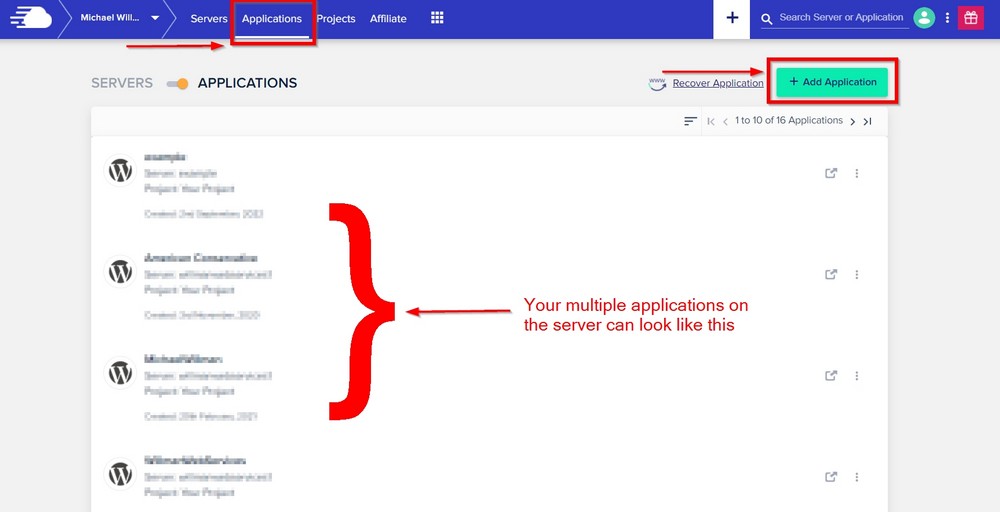
If you use Cloudways hosting, navigate to the Applications page and press the Add Application button to install WordPress.
Note: Cloudways refers to each website you install as an application.
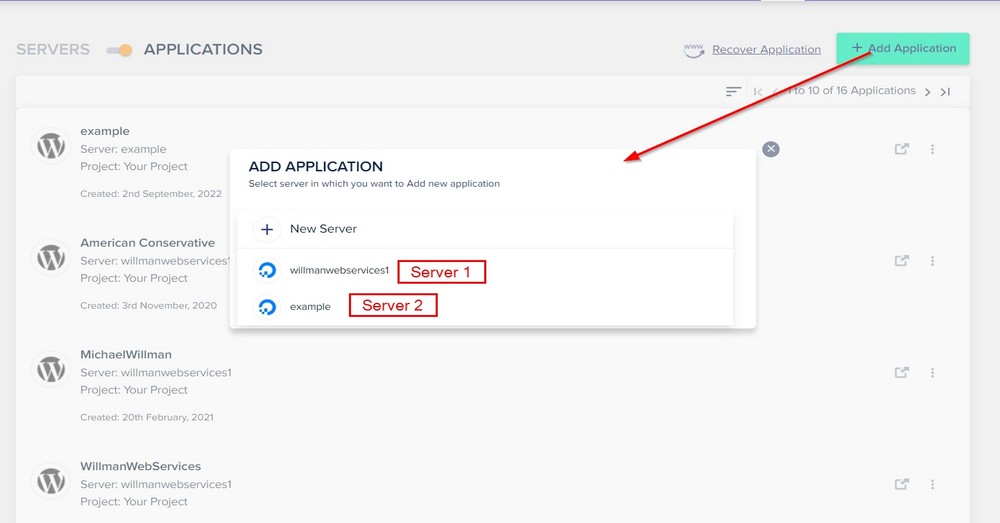
A window will pop up asking you to select the server to host your application (website).
Select a server and press the Add Application button underneath.
The wizard will take you to the next page for choosing the type of application you want to install on your server.
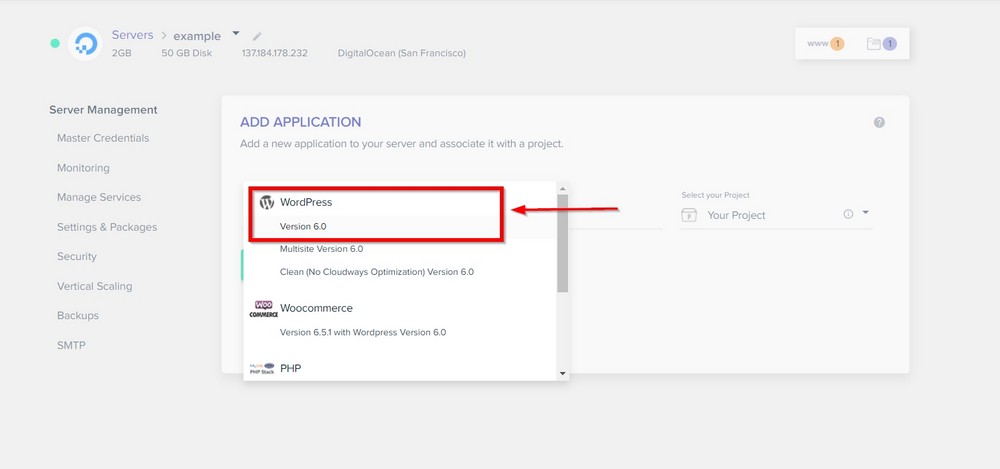
Cloudways servers allow you to install multiple application types, such as WordPress, Laravel, WooCommerce, PHP, and others.
Since we want to install WordPress, we will select this option from the drop-down list.
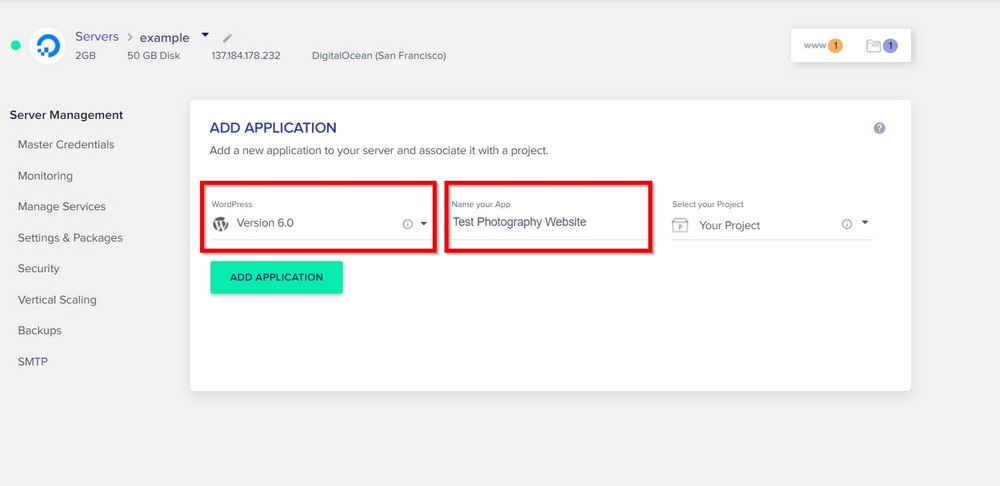
Next, you’ll need to give your application a name.
It can be the name you chose for your domain or it can be anything you desire.
Then press the Add Application button.
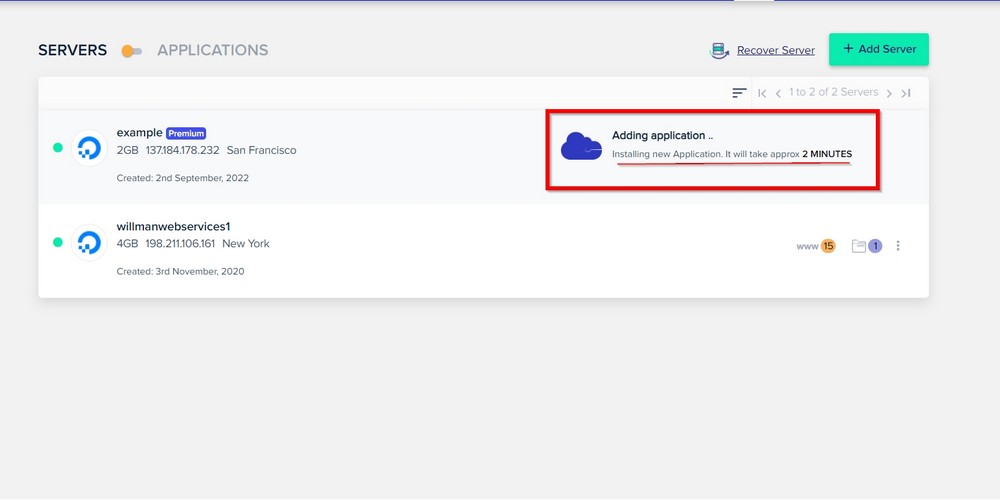
The next screen will show you the status of the installation process.
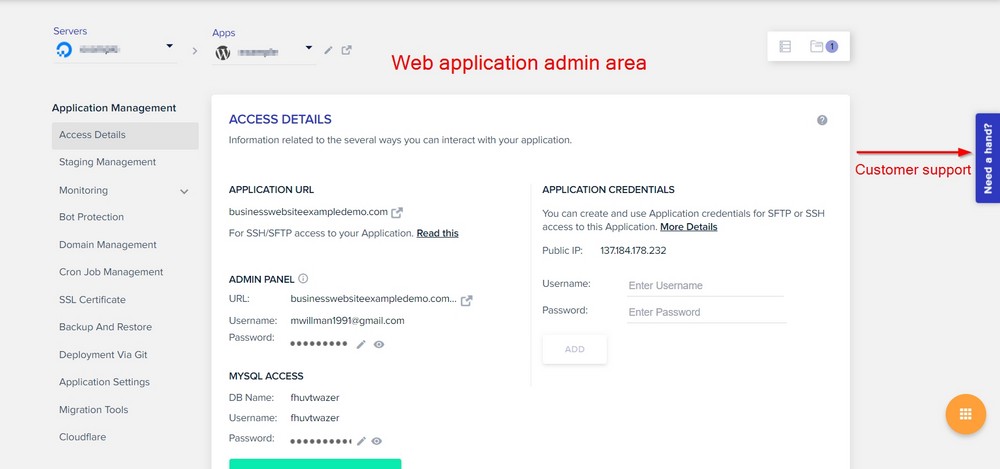
Once installed, the wizard will take you to the application page. It should show your application has been installed successfully.
Click on the blue icon parked at the extreme right of your admin page where it says ‘Need a hand?’ to get help with anything related to the installation.
Next, we should log in to our WordPress admin area.
Step 4: Explore the WordPress admin area
WordPress is an easy to manage and robust CMS. If you haven’t experienced a WordPress admin area before, it’s very easy to learn.
You will need to type in https://www.yoursite.com/wp-login.php to access the admin panel.
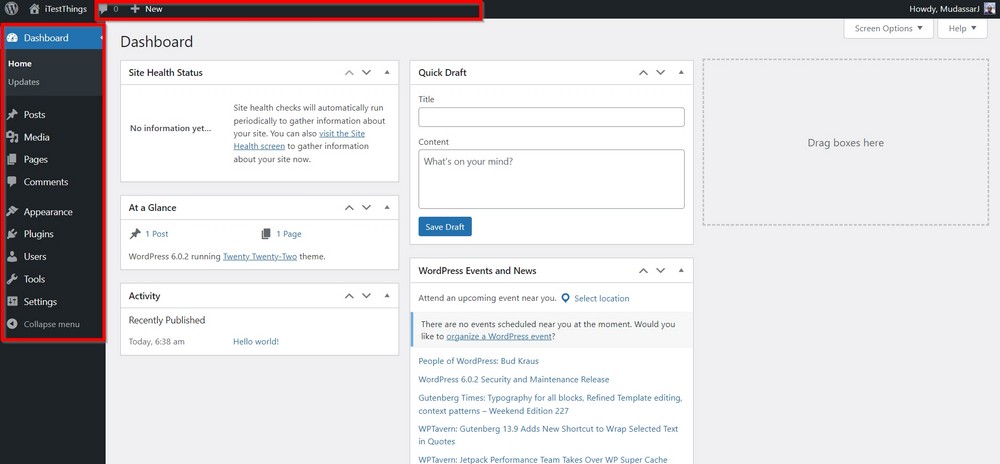
The admin area is divided into a number of sections.
The left side panel is a menu bar we use to perform different actions such as adding a new post, plugin or theme.
The toolbar on the top offers various shortcuts to the most common functions.
You might like to spend some time exploring the admin panel to familiarize yourself.
Step 5: Install the Astra theme
We are using the Astra theme because it’s our theme and we have a couple of photography website templates.
Some of the benefits of using Astra include:
- Astra is exceptionally lightweight. It’s just 50KB in size and very well coded, it can load incredibly fast.
- It is responsive so will provide a similar user experience across every screen size.
- It can display images in different styles.
- Astra integrates nicely with popular page builders so you customize very easily.
- It is WooCommerce compatible, which is a helpful feature if you plan to sell images and provide an exceptional shopping experience.
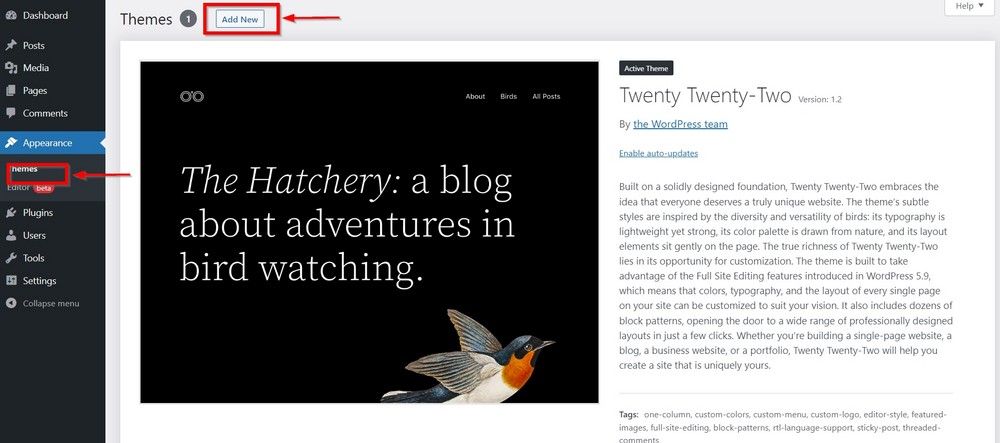
To install Astra, go to Appearance > Themes in your WordPress dashboard and press the Add New button.
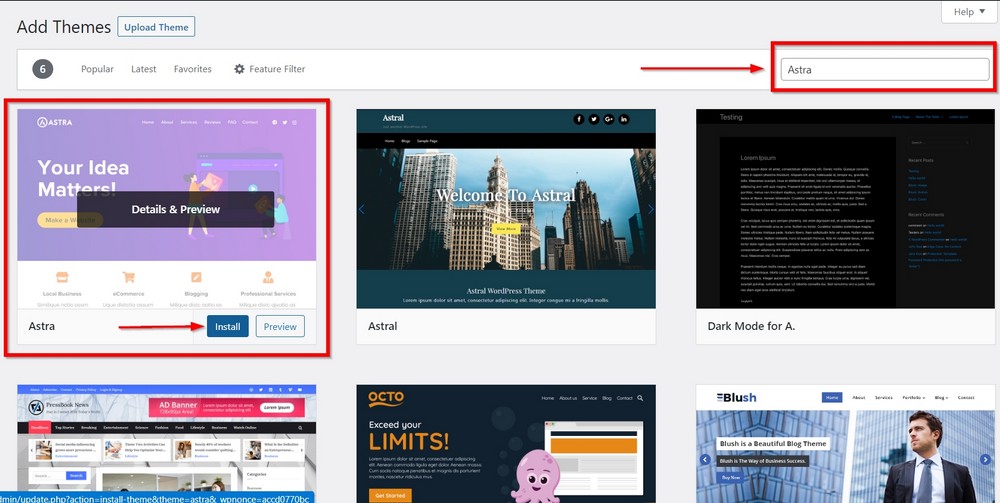
Type Astra in the search box and select the Install button.
Select the Activate button when it appears.
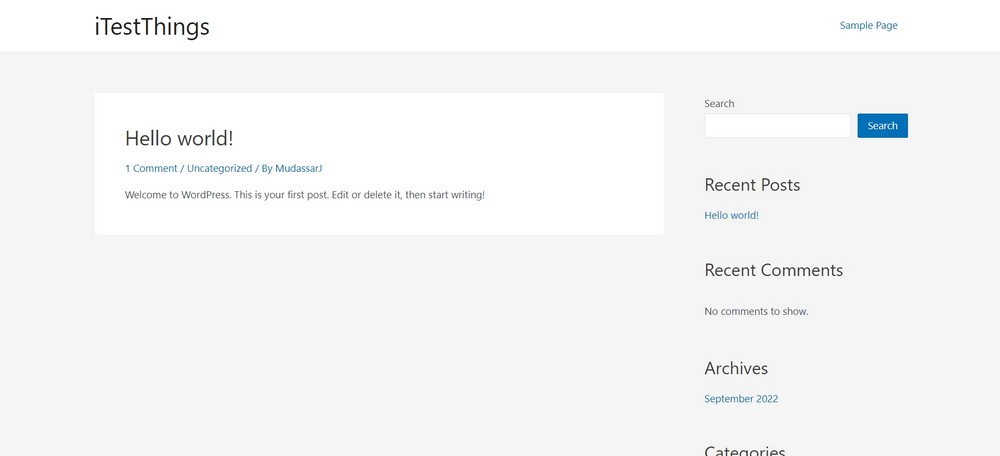
After activating the theme, you should see a homepage similar to the following image.
Step 6: Install a Starter Template
Astra is a free theme that can help you create impressive websites. You can quickly import your desired template from over 230 predesigned website templates.
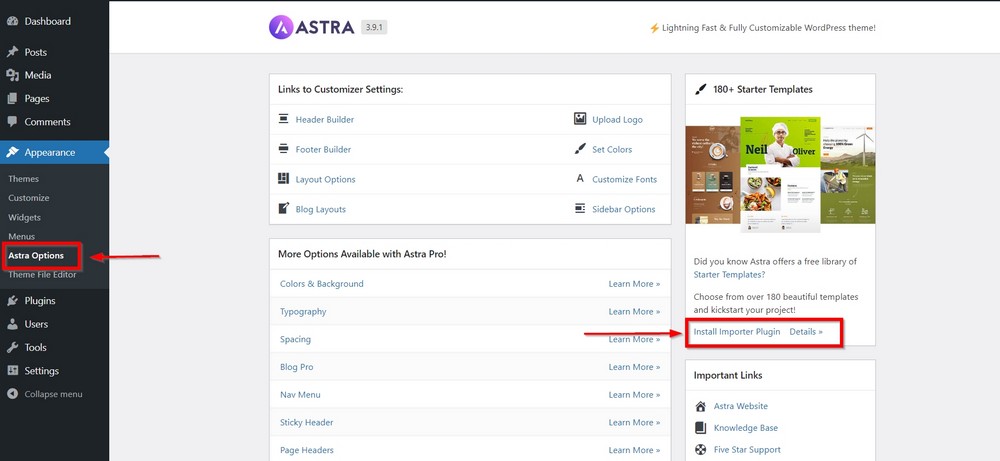
Installing Astra on your website adds specific menu items in the left side menu bar.
Go to Appearance > Astra Options to load the options page.
You will find Install Importer Plugin on the right sidebar. Click on it, and it will install and activate itself.
Note:
Alternatively, you can locate the plugin on the WordPress repository by selecting Plugins > Add New and looking for Astra Starter Templates.
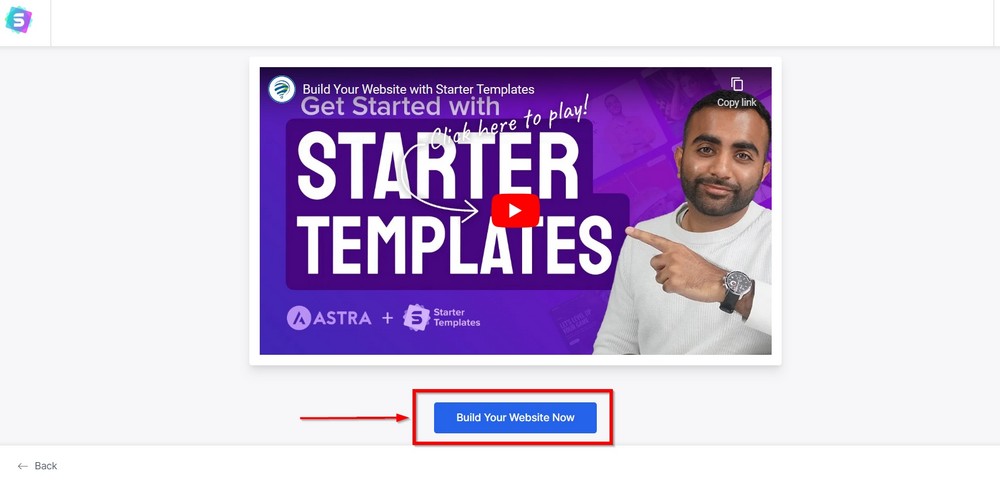
As the plugin is activated, it will launch a theme importer wizard. Press the blue Build Your Website Now button.
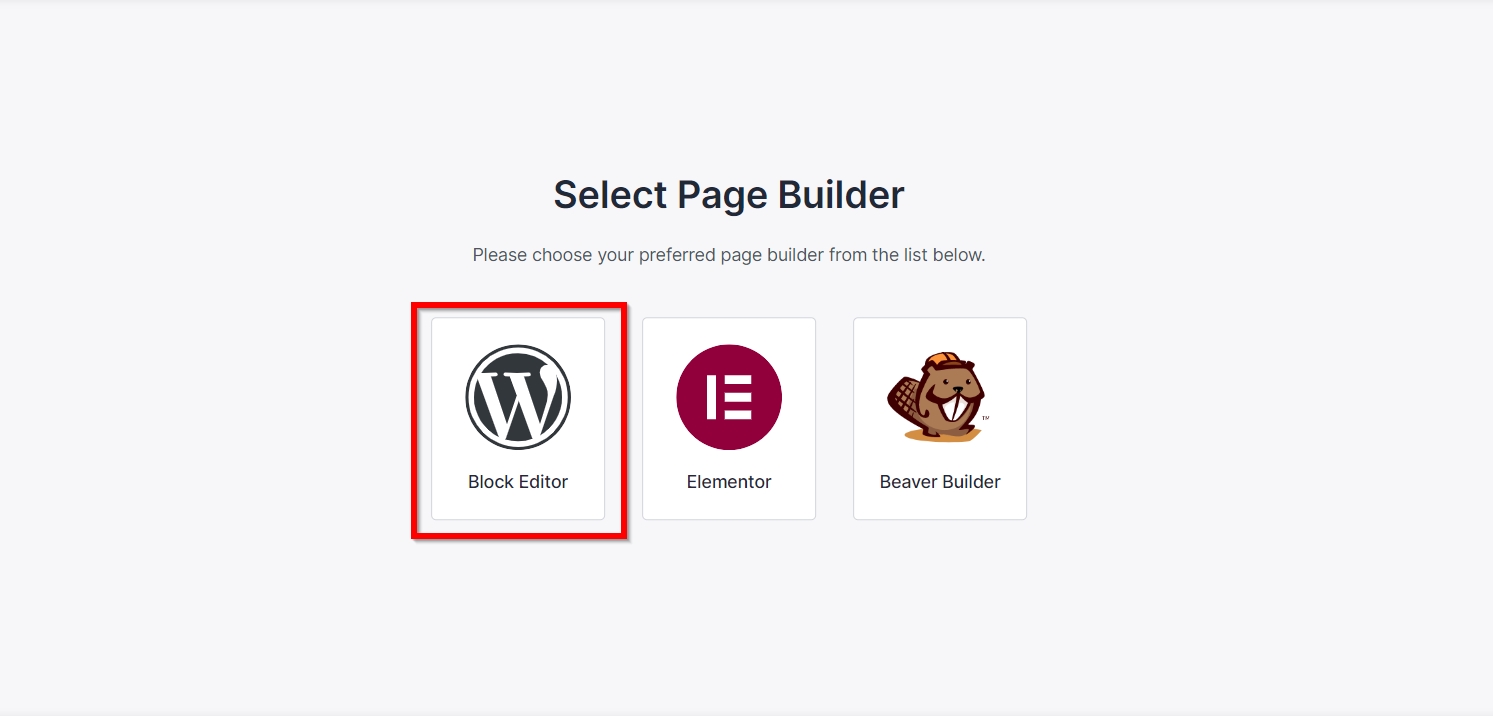
The next screen will ask you to choose a page builder. Astra integrates with Block Editor (Gutenberg), Elementor, and Beaver Builder.
We will select the Block Editor for the next step.
The next screen will show the Starter Templates library where we will search for something related to photography.
Type Photography in the search box, and the library will present some related templates.
We like the Photographer template.
Recommended starter templates:
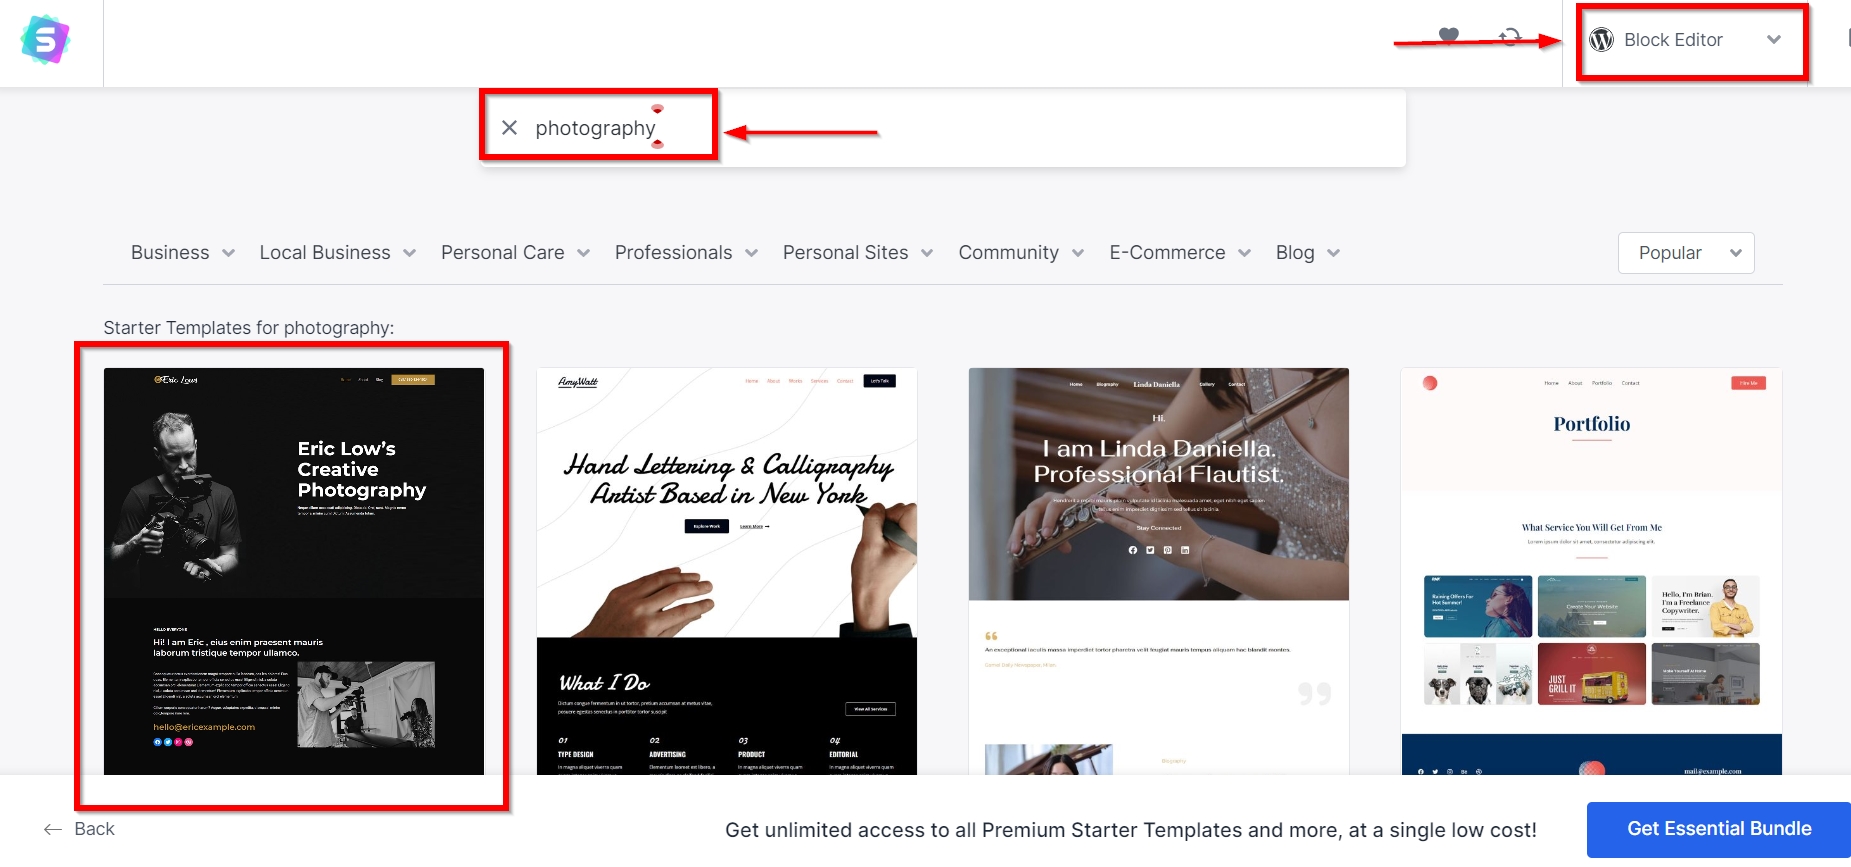
It’s a photographer-focused theme where you can show your profile on the homepage showing all the essential details and how to contact you.
You can also display some of your best work underneath.
If this free template doesn’t match your style, you can select any template you like.
This time, your search will bring a set of different templates with several minimal layouts ideal for highlighting your work.
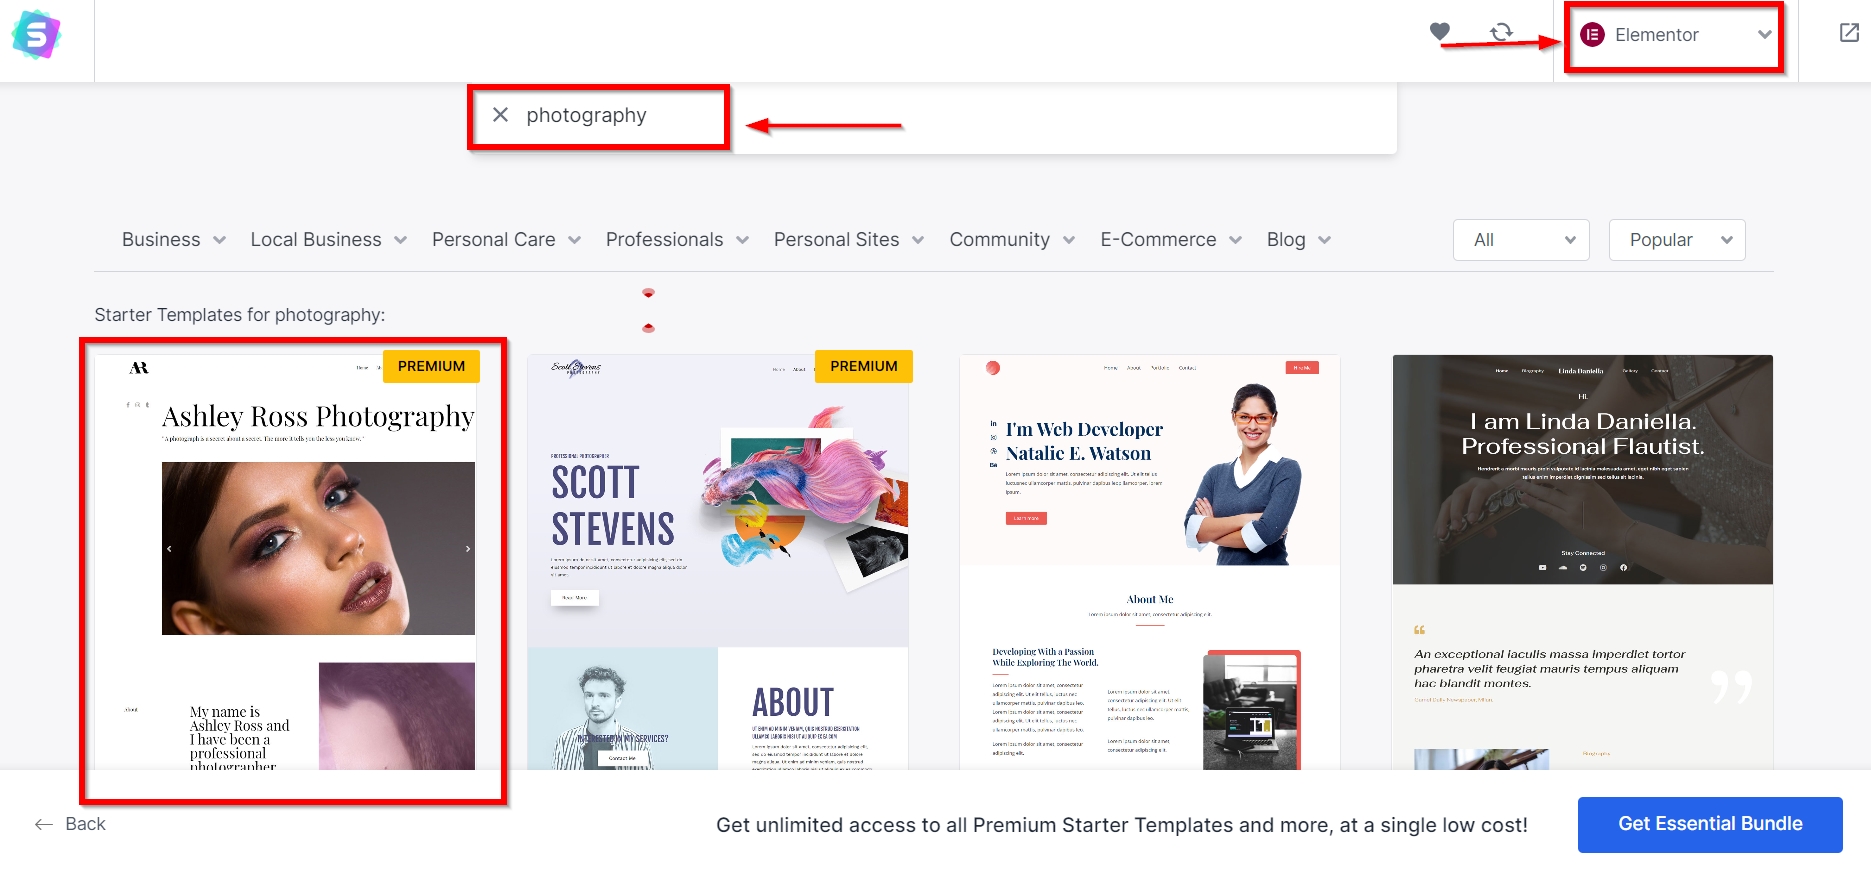
As you can see in the image, the highlighted template is the easiest way to create a photography portfolio that speaks to your audience.
You can use the hero image slider to show your stunning work, there are plenty of options to describe yourself and showcase your work on the homepage.
Read more: Check out the best themes for photography portfolio.
It’s a premium template you can use with the Essential Toolkit pack that also includes the Astra Pro version.
Let’s continue with the free Photographer template option we found earlier.
You can always plan to buy an Astra Pro or Essential Toolkit pack later if you like.
Click on the template to begin building.
The next screen will ask you to upload your logo. If you don’t have one yet, you can always add it later.
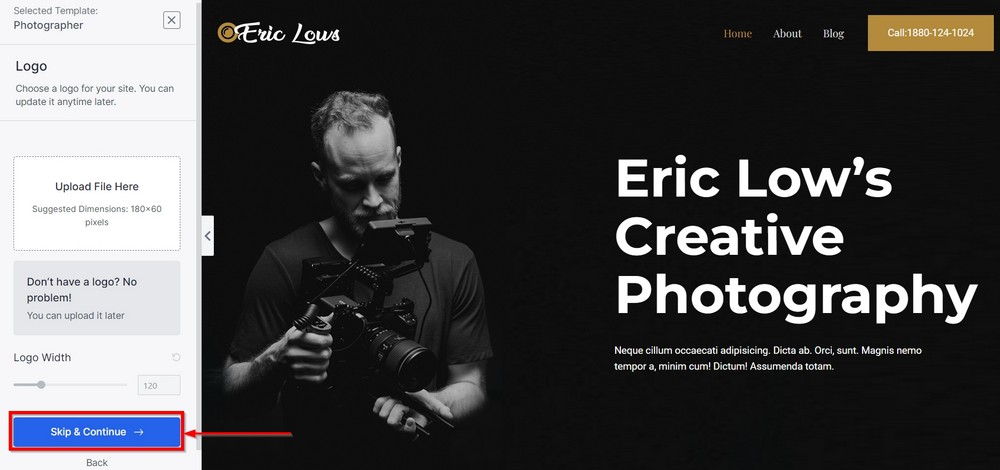
Press the Continue button at the bottom.
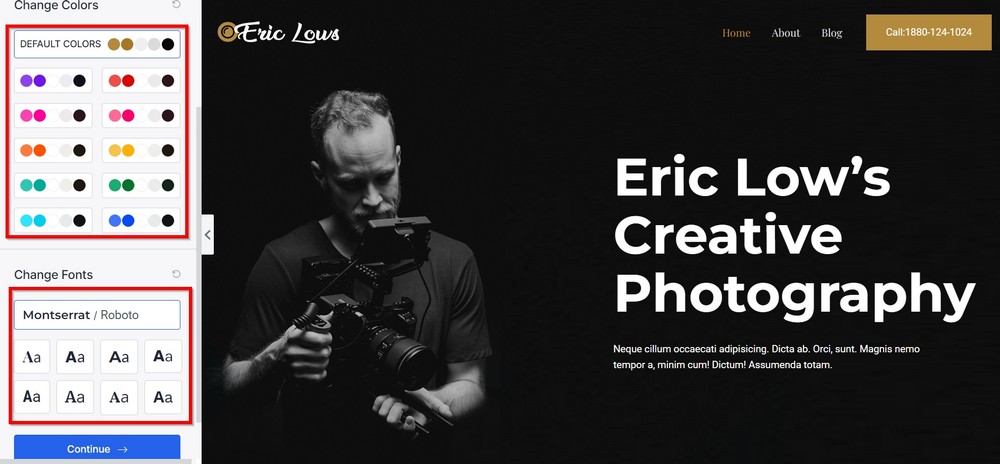
The next screen will give you option to change your site’s color theme and font style if the pattern doesn’t suit you.
Click on Continue when you are done.
Okay, the last step!
Enter the requested information on the next screen.
We recommend keeping the checkboxes checked to fully import the template.
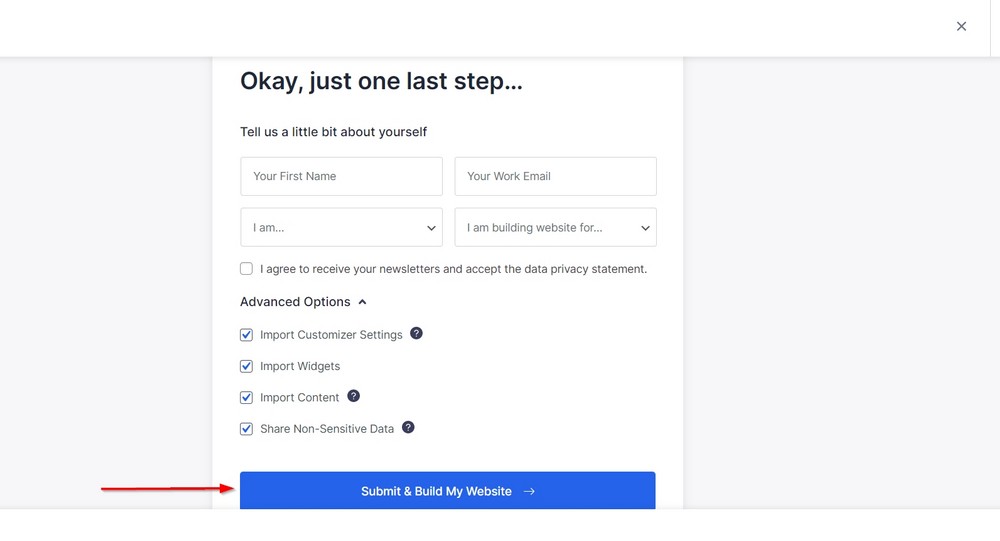
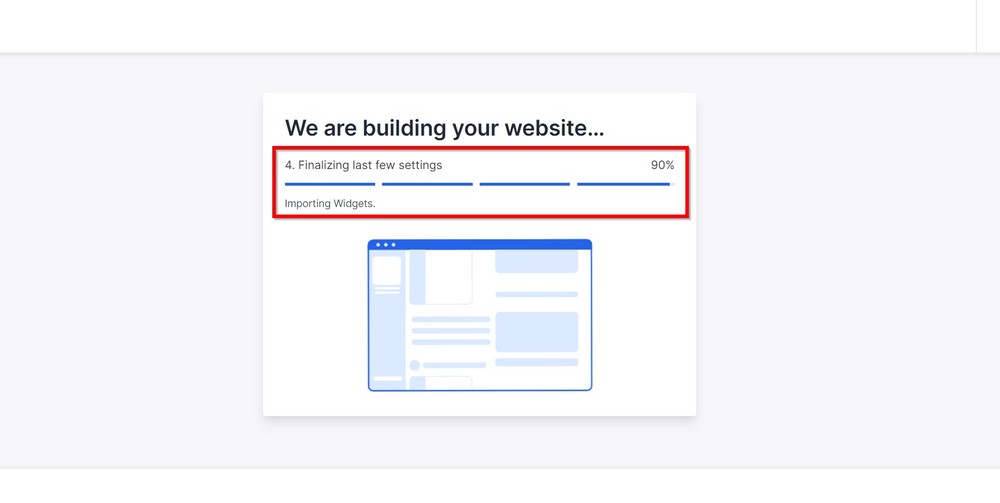
Press the Submit button. You will notice through a progress bar on the next screen that everything is being prepared.
The next screen will congratulate you and show you a button to View Your Website.

That’s how you can create a photography website with the Astra theme for FREE in just a few minutes!
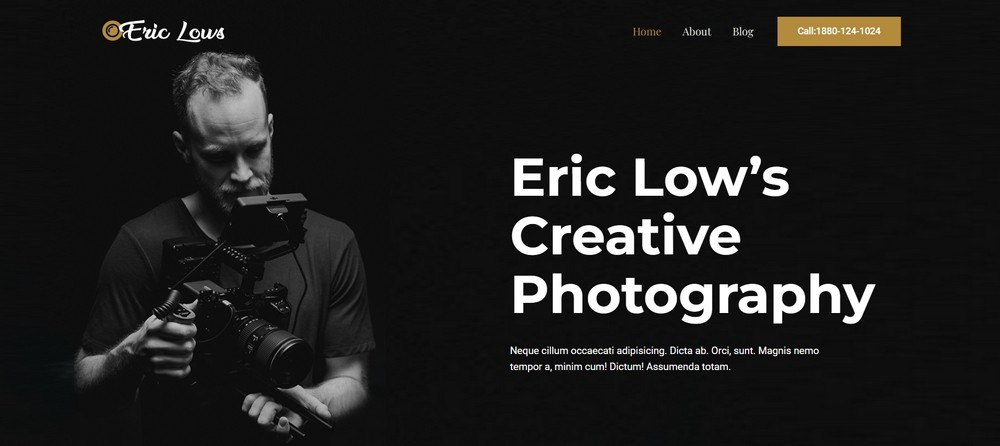
Open your homepage, which should look like the image below. We will edit it to personalize it in a minute.
Note:
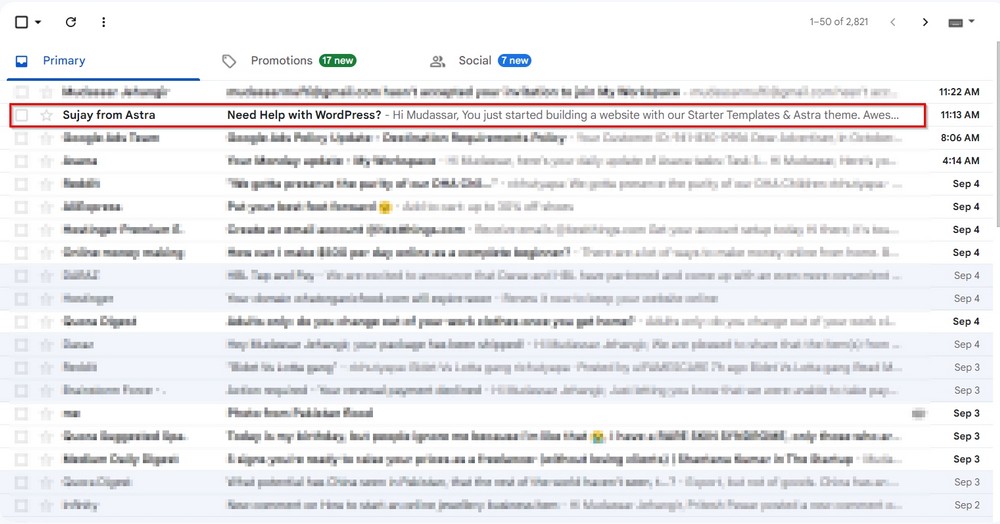
Soon as your site is ready for you, don’t forget to check the email you entered while importing the starter template. You should find an email from Astra theme with the subject, Need Help with WordPress?
That’s how caring the Astra team is. They will never leave you to figure anything out alone, even if you have installed the free version.
Step 7: Personalize the Astra template
Astra is extremely easy to customize. You don’t need to write a single line of code for editing pages.
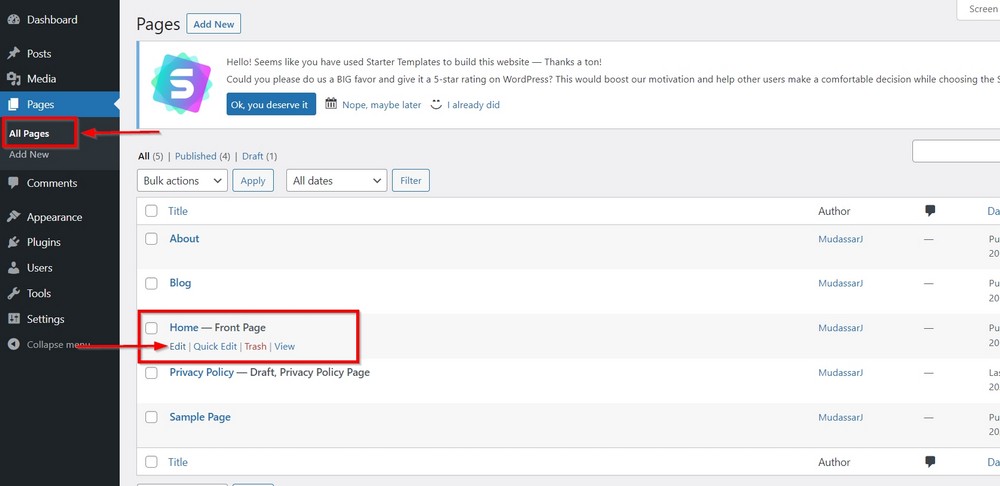
Go to the WordPress admin area to find Home – Front Page under Pages > All Pages and press Edit under the desired page.
It will show the homepage in edit mode.
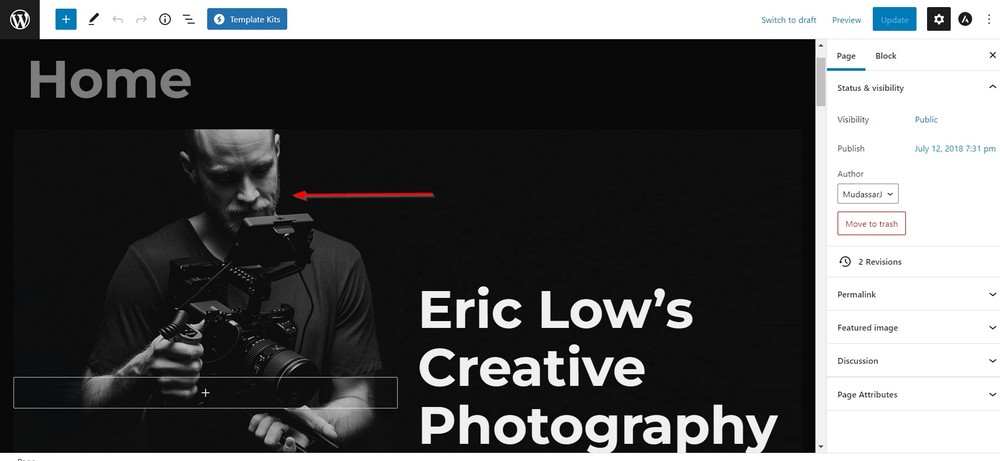
Click on the desired image if you want to replace it with your own picture and you will see menu items appear on top and in the right sidebar.
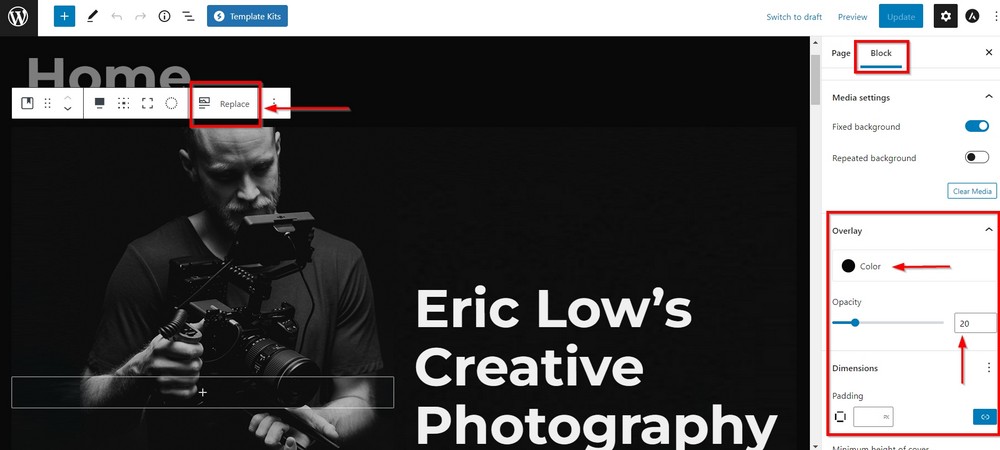
You can change image opacity, overlay color, height, and padding from the sidebar.
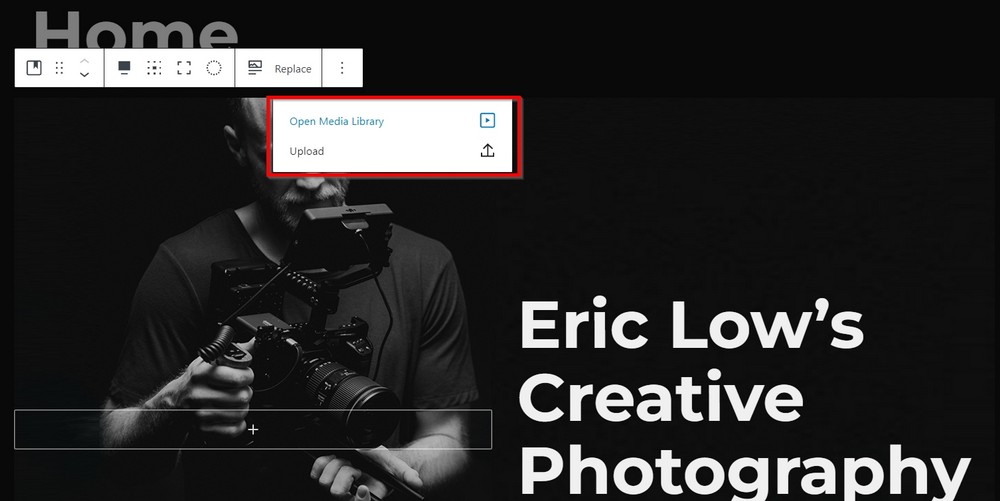
Use the Replace button inside the small toolbar to replace it with your desired image.
You can upload an image from your computer as you usually would.
Similarly, you can easily replace other images and edit text blocks.
You can have a website showing your work and everything about you in less than an hour!
Create an image portfolio with the WP Portfolio plugin
While the Astra theme is a fast way to set up a photography website, the WP Portfolio plugin is another option.
With the help of this premium portfolio plugin, you can transform any theme into an impressive portfolio website.
The process is straightforward. Install the plugin with any WordPress theme of your choice, go to the plugin setting area, and build your portfolio through an intuitive interface.
Here are three essential elements of setting up a portfolio website:
- Import a Starter Template from the library of over 48 ready to use portfolio layouts. Alternatively, you can add your own demo website, videos, or images.
- Select the portfolio type you wish to display. It could be a website, images, videos, or a single page you want to show clients.
- If you need, customize the website you just built.
WP Portfolio demo types are loaded with what a portfolio website really needs.
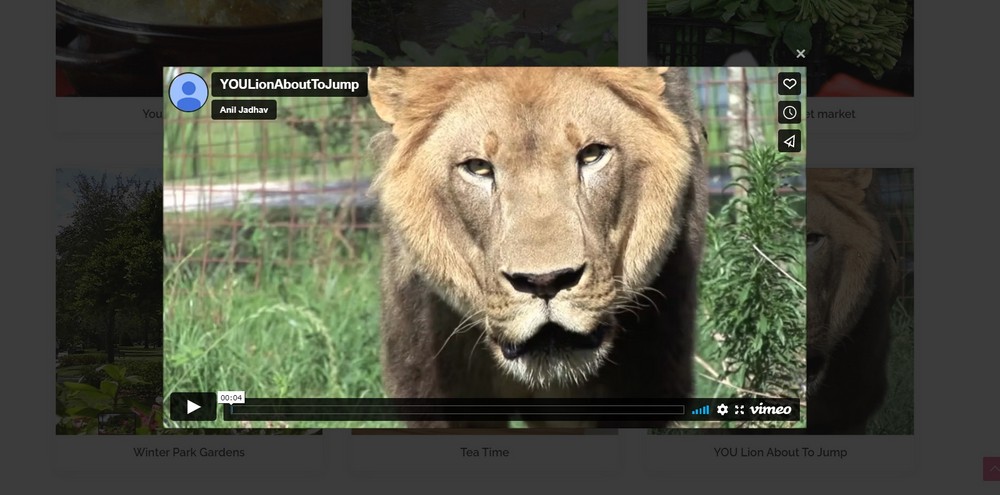
Here are some samples for pages, images, and videos you can consider for your portfolio website:
Webpage

Picture gallery

Video gallery
Selling pictures on your website
Many photographers like to sell pictures, and start blogging on their websites to generate a revenue stream.
To enable the facility on your website, we need to install the WooCommerce plugin. It is the best eCommerce plugin for WordPress.
Our test site with the Astra theme is a perfect platform.
1. Install the WooCommerce plugin
Installing the plugin takes seconds and an intuitive setup wizard will get you started.
Go to Plugins > Add New and type WooCommerce in the search box.
Click on Install and Activate to activate the plugin.
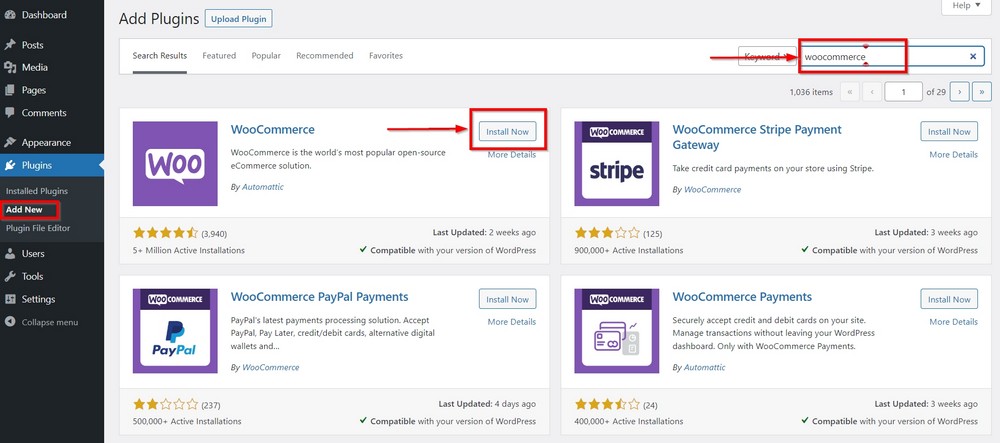
The activation process will trigger an easy to use setup wizard that will walk you through the basics of setting up an online store.
You can skip the process for now and come back to it later from the plugin setting area. It’s up to you.
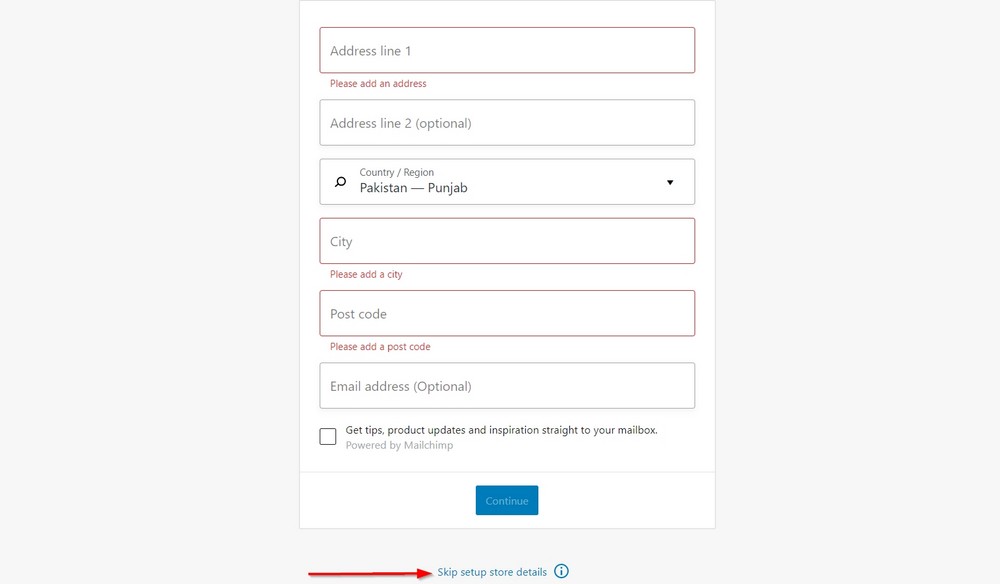
The wizard will also ask you a few things through setup, such as:
- Your industry
- Whether your product is a downloadable, a physical item, booking, subscription-based, bundle, or anything else
- The number of products you plan to display
- Are you selling your products on another platform?
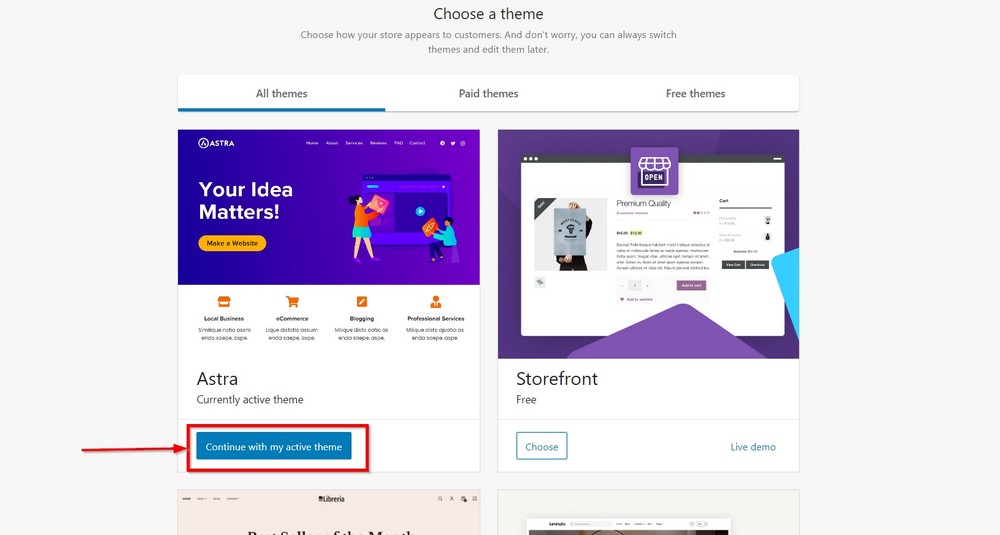
In the last step, the wizard will ask you to select the theme for your store. It shows a couple of paid and free themes, including the existing one on your site.
It’s your choice to pick any of them. We recommend going with the default Astra template we just installed.
Press the Continue with my active theme button.
2. Add products
Your images are your products and we need to add them to WooCommerce so you can sell them.
Go to the WordPress admin panel, Products > Add New.
Give your product a name and brief description. Then add one or more images from the right and create a gallery to showcase your images.
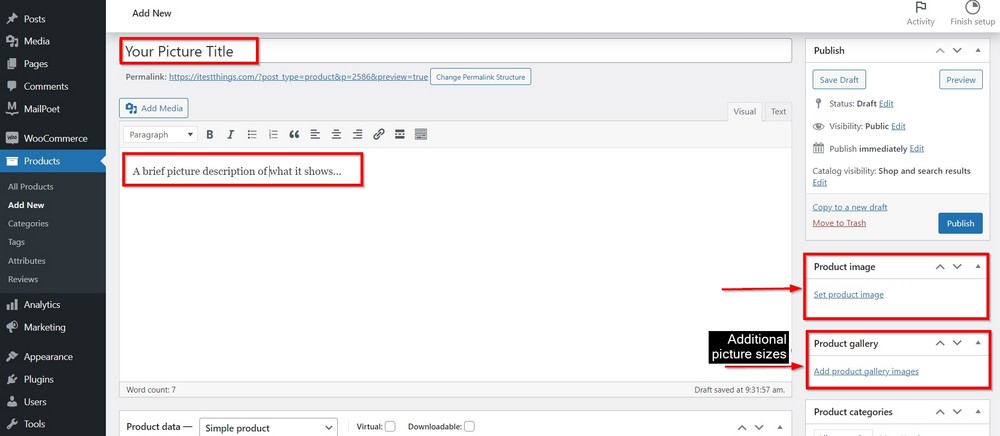
Press Publish once done to list your product.
You will see a product page similar to the following image with an added facility to shop.
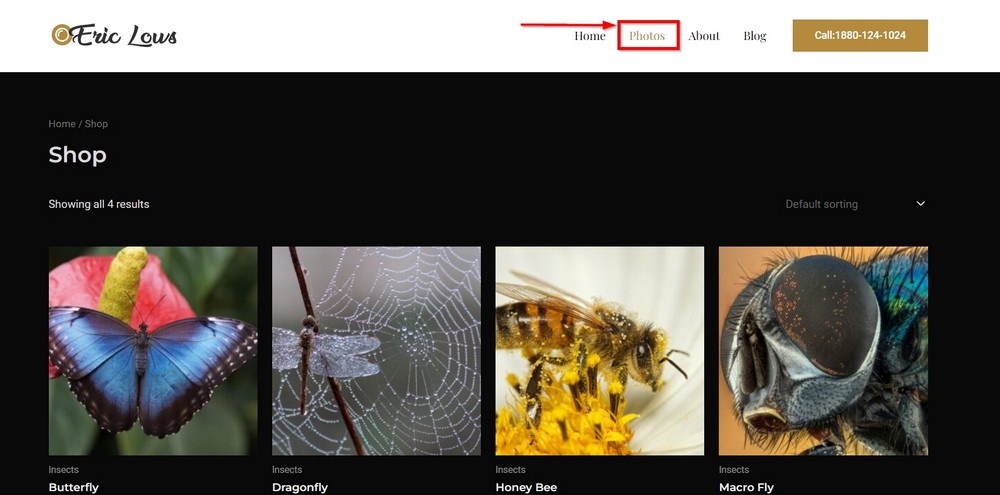
You should see a product page listing your product(s).
Select one to access the product page.
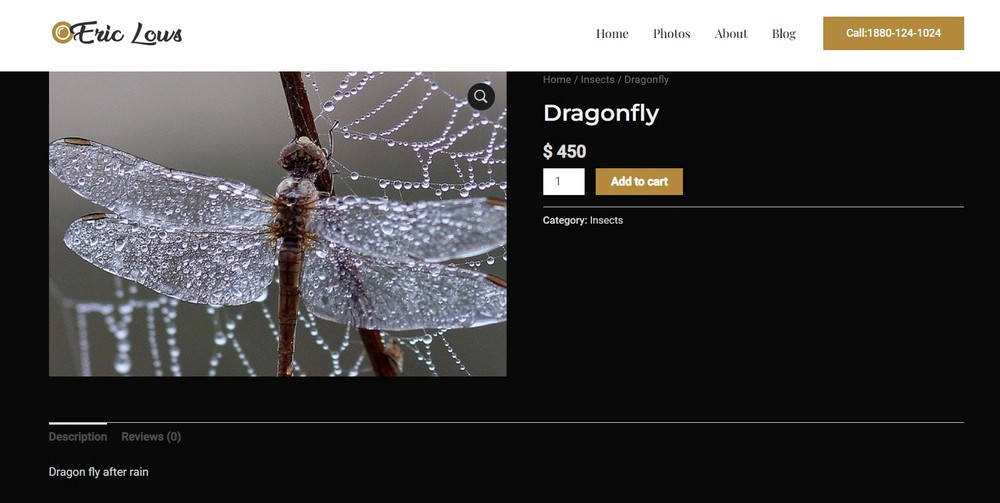
You can customize this page in any way you want and add features that suit your requirements.
Repeat this final process to add as many products as you like to your store.
Asta and WooCommerce make a solid combination. They contain everything you need to build a fully operational website and eCommerce store. All for free.
Note:
You will use the following plugins to make your eCommerce page fully functional and more user-friendly – Variations: Variation Swatches for WooCommerce and Checkout Plugins – Stripe for WooCommerce
Creating a photography website
This tutorial guides you through the simplest ways of creating a photography website.
You can use any of the techniques here to build a website that is a true reflection of your personality.
Whether you are into photography or are an emerging model passionate about showing the creative side of your personality with a stunning portfolio, you need a unique website.
Are you a photographer? Have any tips to share with us? Or do you need our help to assist you? We would love to hear from you in the comments below.
Disclosure: This blog may contain affiliate links. If you make a purchase through one of these links, we may receive a small commission. Read disclosure. Rest assured that we only recommend products that we have personally used and believe will add value to our readers. Thanks for your support!


