Nonprofits and good causes rely on their ability to engage an audience and encourage them to donate.
Having a website is a key part of that.
While a nonprofit may have a core of regular donors, the ability to reach out to the world at large, communicate a message and tell your story is essential.
It encourages awareness of the cause, it shares the motivation behind the nonprofit and gives visitors a reason to donate.
A nonprofit website can also update donors on how their money is being spent, share information on upcoming events and convince new visitors to be generous.
With the advent of page builders and the availability of free WordPress themes, building an engaging website is now easier than ever.
Anyone can build a website. You don’t need specialist knowledge, expensive tools or a developer on staff.
We’re going to show you how anyone can build an engaging nonprofit website using free tools.
We’ll walk you through every step, including setting up WordPress, installing a theme, using a donation plugin and creating your first blog post.
We’ll even share some tips on promoting your website once it’s finished.
By the end, you’ll have a fully operational nonprofit website ready to engage with the world!
- How much does it cost to build a website?
- What you need to build a nonprofit website
- How to build a website for your nonprofit in 7 simple steps
- Install Astra and Starter Templates
- Setting up donations for your nonprofit
- Write your first blog post
- 5 Examples of nonprofit websites for inspiration
- Marketing your nonprofit for free or for cheap
- Building a nonprofit website FAQs
- Create an engaging nonprofit website
How much does it cost to build a website?
There are two inescapable costs when building a website. Everyone has to pay for a domain name and hosting.
The domain is the URL, the www.mynonprofit.com name every website needs. Hosting is server space rented so your website is accessible to the world.
Fortunately, costs are relatively low. Domain names cost between $10-20 per year. Web hosting can cost anywhere between $50-500 per year.
Everything else can be done for free.
Optional costs can include a WordPress theme and WordPress plugins, but we’re going to show you how to use free versions of both.
What you need to build a nonprofit website
You now know you’ll need a domain name and hosting to build your nonprofit website.
You’ll also need:
WordPress and a theme
WordPress is the framework that supports your website. It manages content and makes everything work as it should.
A WordPress theme adds the look and feel to your site. It’s the simplest way to create a beautiful website and can be available for free.
Donations plugin
The Astra Starter Template we’re going to use includes a free donations plugin called GiveWP. It includes everything you need to begin accepting donations and installs automatically alongside some templates.
You can use this plugin if you like, use your own plugin if you already have a favorite, or you could use SureCart.
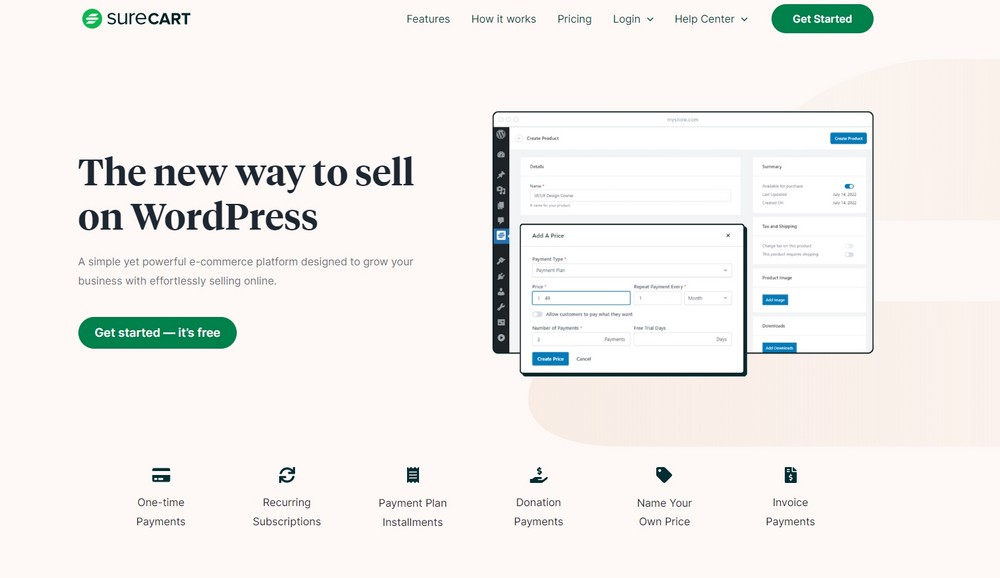
SureCart is an eCommerce plugin. It adds the ability to manage payments to a website, which you can use to accept donations. If you’re planning to sell merchandise online, it’s even more useful!
It ‘plugs into’ WordPress and adds a huge range of features often used by online stores. SureCart is also free.
We aren’t going to use SureCart in this guide but it’s definitely a viable option.
Free plugins
We’ll also use some other powerful free plugins to provide some essential features to your website.
We’ll use a security plugin to keep your site safe, an SEO plugin to help visibility in search engines and a caching plugin to provide the fastest user experience.
Time
You’ll also need some time to set everything up, test it and create content to tell your story.
Setting up the website should take less than an hour. Creating content and telling your story is a job you’ll probably start and never stop!
How to build a website for your nonprofit in 7 simple steps
There may seem like a lot of information on this page, but we assure you, it’s all very easy to follow.
Buy domain and hosting
First, we recommend you secure a domain name and web hosting.
Domain naming is a competitive business, with most of the good names either already taken or very expensive.
If you don’t have one already, come up with something meaningful and buy it as soon as you have settled on the name.
There are hundreds of companies out there that offer domains and hosting and all charge varying rates.
We recommend SiteGround, Cloudways or Hostinger, but you can choose whatever web host you like.
Check prices, disk space, any visitor limits and reviews and make an informed decision from there.
Set up WordPress
WordPress is the best content management system out there. Not only is it free, it’s also easy to install and to use.
It also has thousands of themes and plugins available to make it better, including our own Astra theme and range of excellent plugins.
The good news is that most web hosts will install WordPress for you when you buy hosting.
If you would prefer to install it yourself, we have a complete guide to installing WordPress that can help.
Install Astra and Starter Templates
Once WordPress is installed, you’ll see the default Twenty Twenty Two theme. It looks good but isn’t ideal for a nonprofit website.
Installing the Astra WordPress theme is simple.
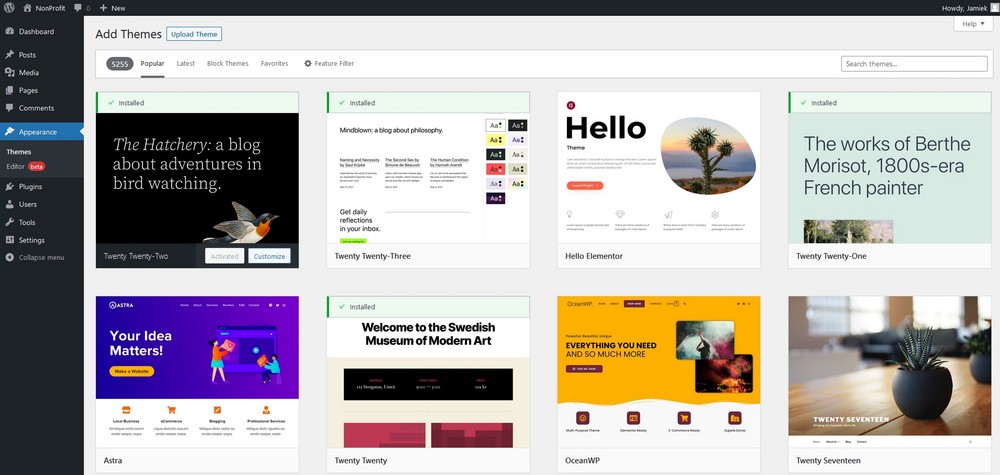
Log into your new WordPress dashboard and select Appearance from the left menu.
Select Add New at the top and Astra from the options in the center.
Hover over Astra and select Install, then select Activate once the option appears.
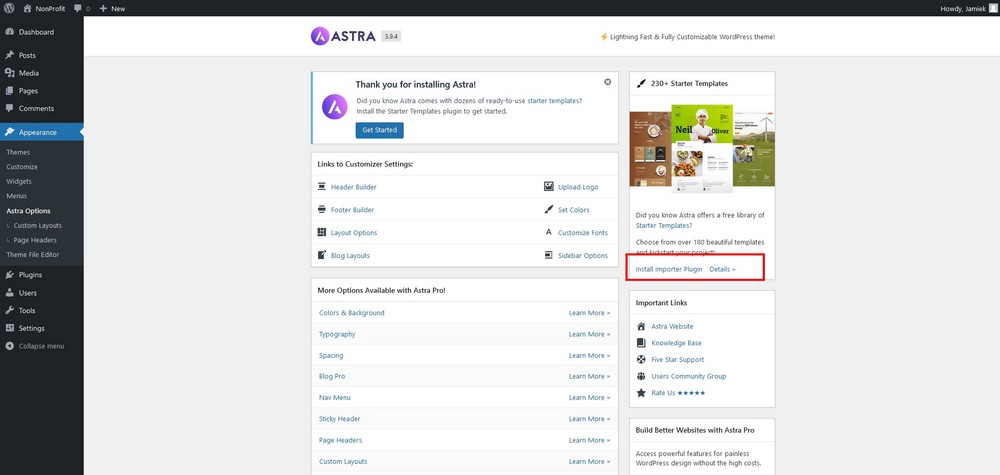
Select Astra Options from the left to access the theme options and activate options as you see fit in the center.
Select the Install Importer Plugin on the right to install Starter Templates.
Select Build Your Website Now when the installer screen appears.
Select your page builder to load the template options.
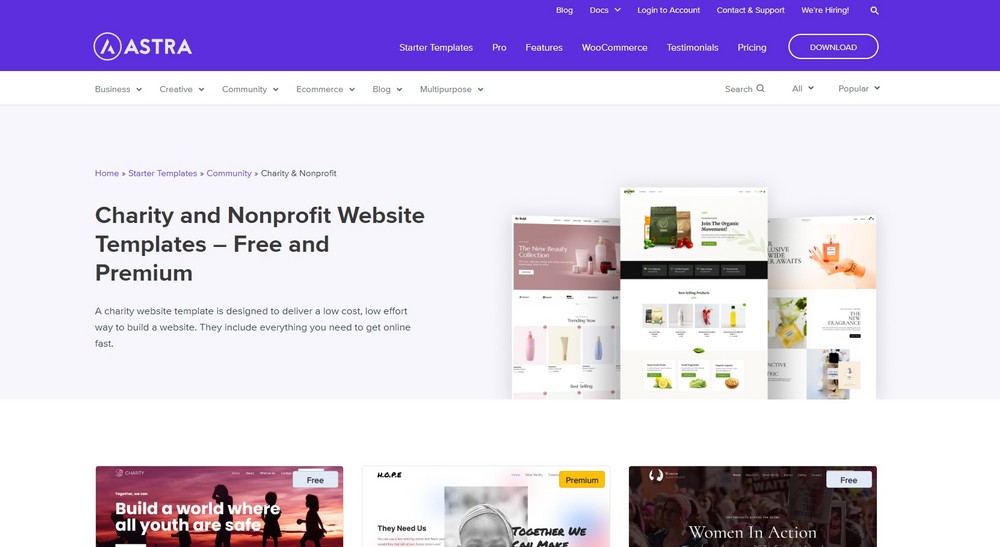
Browse all templates or select the Community and Non Profit filters at the top and select the template you would like to use.
Add a logo if you have one or select Skip and Continue.
Set your default colors and fonts on the next page (you can change them later if you like).
Select Continue when ready.
Select Submit and Build My Website on the next page.
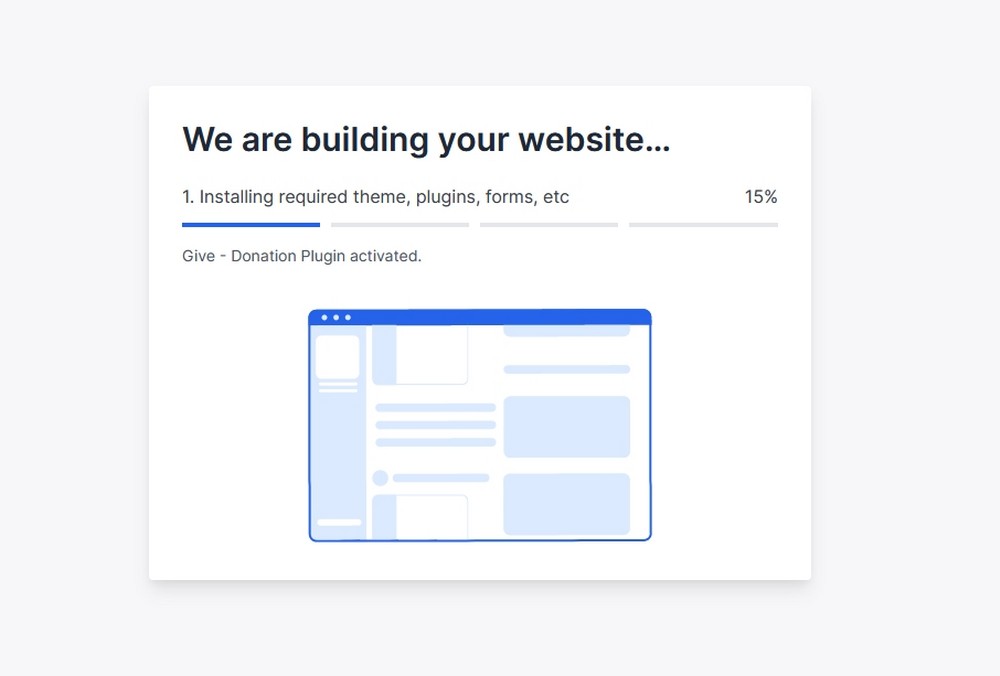
The template installer will set up your selected template and install the free version of Elementor for you to use.
Once complete, you’ll be presented with a congratulations screen, select the blue View Your Website button to proceed
You should now see the template you chose, complete with pages, menus, images and all the core website features.
Non profit website templates
Astra has a few website templates for nonprofits.
They include:
- Charity and nonprofit website templates
- NGO website designs and templates
- Pet and animal website templates
- Donation website templates
Animal Welfare
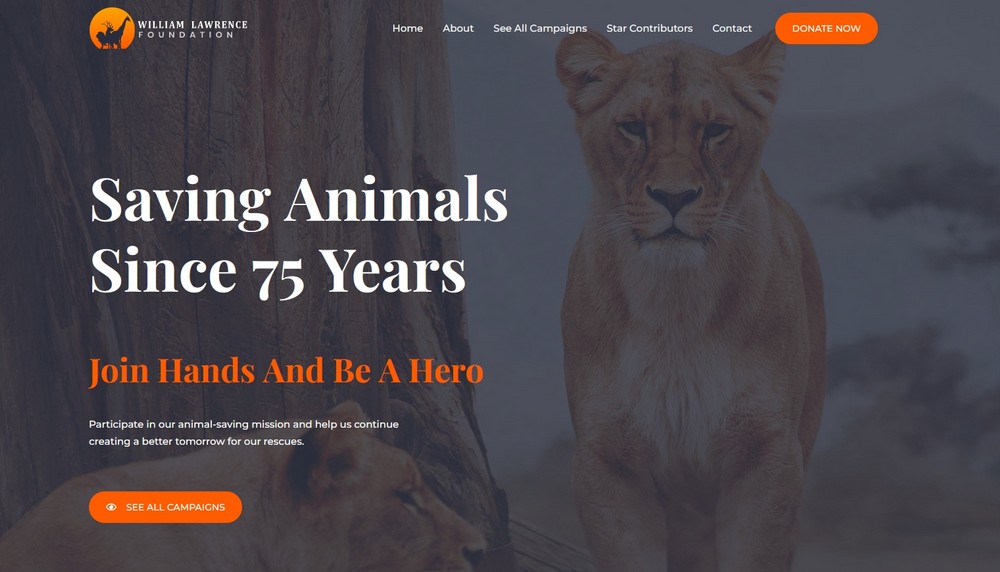
The Animal Welfare template is a dark fullscreen template with bold orange contrast color that instantly grabs attention.
It flows well and helps you tell your story to help engage visitors and hopefully encourage them to help. It’s a modern design with emotive imagery and lots of space to add content and any extra features.
Charity
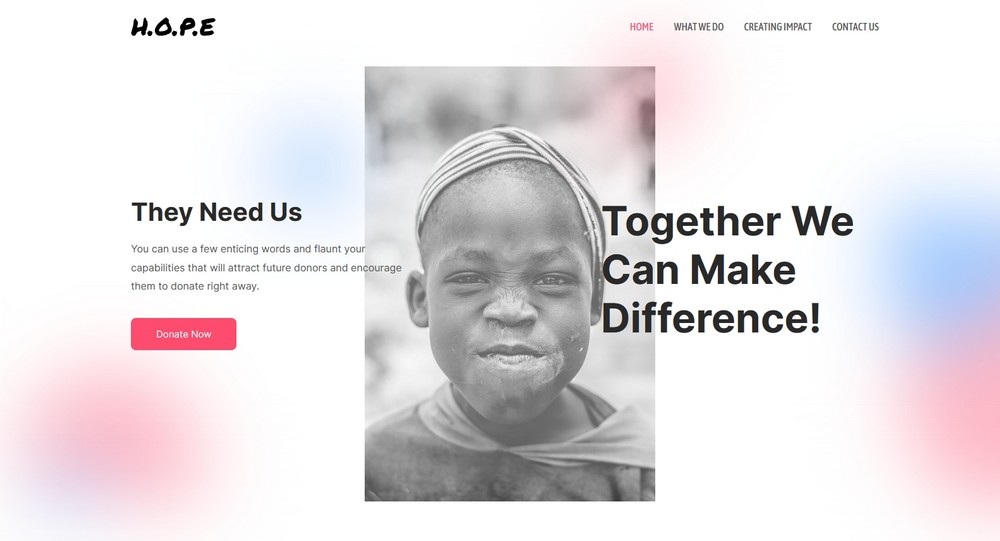
Charity is a free template ideal for nonprofits. It’s a rich, colorful theme with flat design, modern fonts and impressive imagery throughout.
There’s a mixture of light and dark design, lots of options to add content, features, a donation plugin and anything else you want to add.
Church
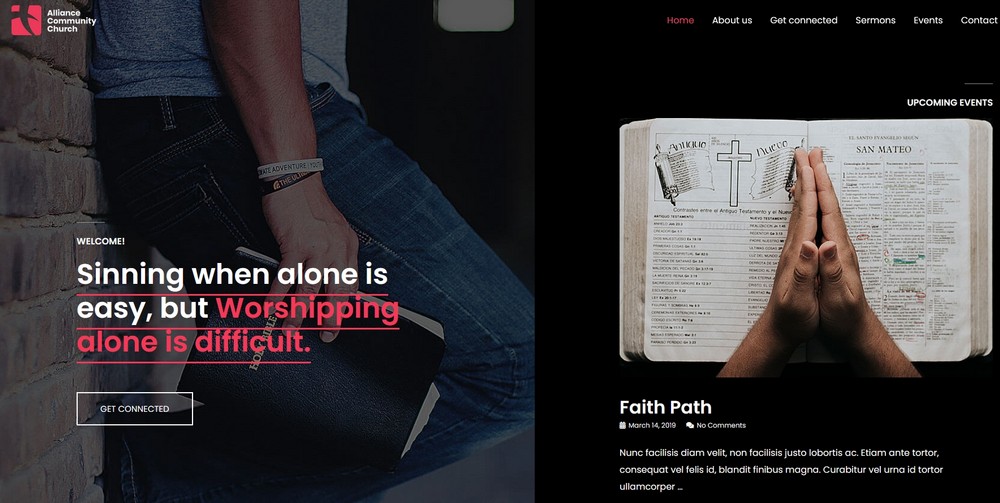
The Church template is a dark fullscreen design with relevant imagery in the header section and lots of blocks to add features, content, donation plugins and anything else you might need.
Like all Astra templates, Church scrolls smoothly and delivers a professional appearance with minimal effort.
Charity
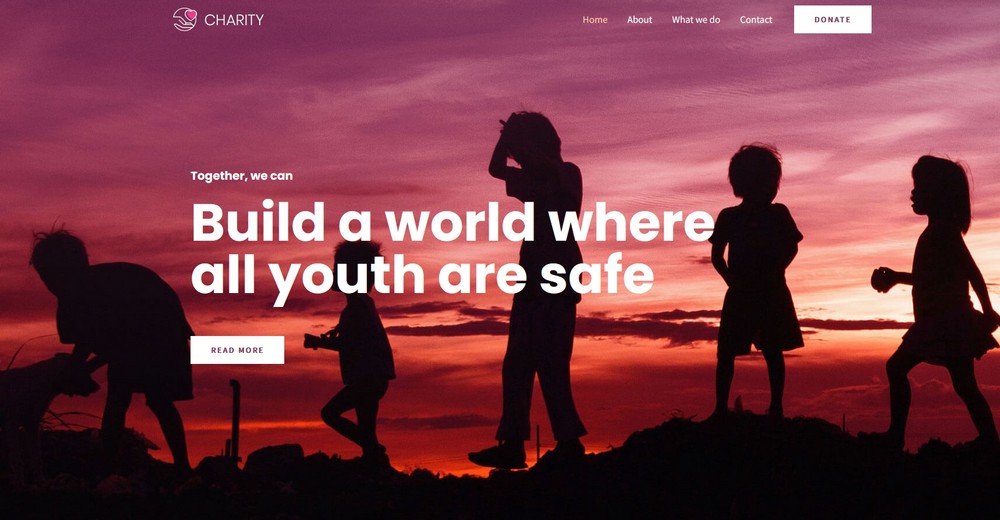
The Charity template is lighter and brighter than the preceding two but no less appealing. It’s another fullscreen design, this time with emotive imagery and messaging front and center.
The rest of the page unfolds to showcase what you do, why and how you do it. There’s plenty of opportunity for customization using your favorite page builder to minimize effort.
Adding features to your website
So far, we have installed WordPress, via your host or manually, installed the Astra theme and the Charity Starter Template.
Now we need to add some plugins to add extra features to the site.
While the Starter Template delivers the basics, a nonprofit website would definitely benefit from being able to accept donations.
Fortunately, the free version of a donations plugin called GiveWP was installed along with the Charity Starter Template.
This is enough to begin accepting donations right away on your website.
There are other options available for taking payments online but we wanted you to be able to begin accepting donations immediately.
That’s why we include the plugin with the template.
Installing essential plugins on your nonprofit website
Another reason we like WordPress so much is plugins. They make it so easy to add new features or improve existing ones, often for free.
We’re going to install the free versions of:
- Wordfence for security
- W3 Total Cache to keep everything running as fast as possible
- Yoast to give a head start to your website SEO
Let’s get started!
Select Plugins from the left menu of your WordPress dashboard.
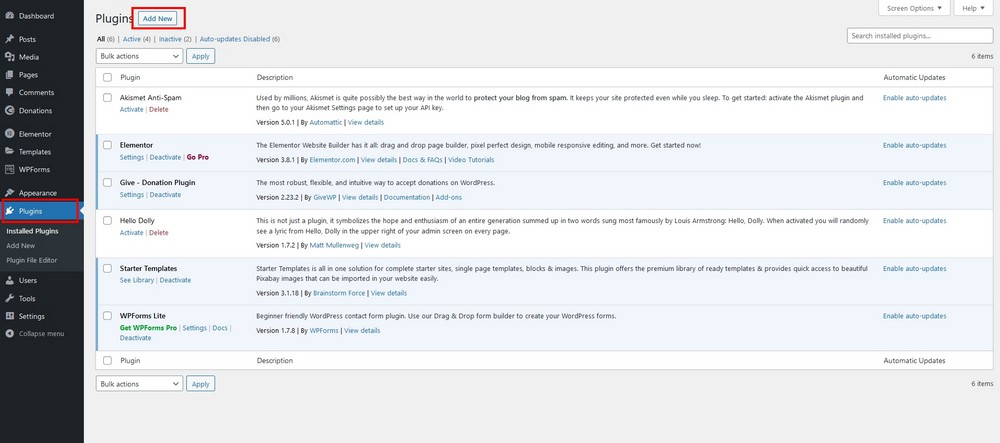
Select Add New at the top and type ‘wordfence’ into the search bar at the top right of the screen.
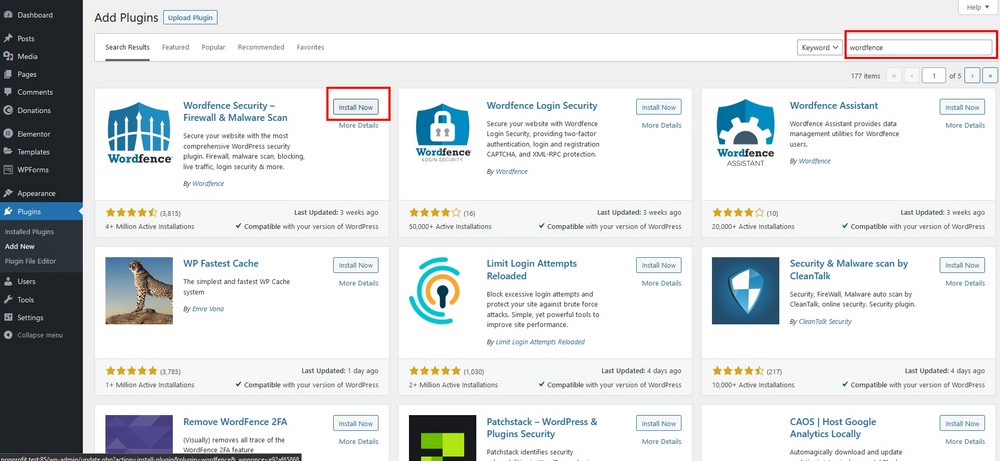
Select Install Now by the Wordfence Security plugin and select the blue Activate button once it appears.
That’s it for installing WordPress plugins!
Some plugins will take you to setup screens or confirmation screens but that’s all that’s required to add a plugin to WordPress.
Now repeat the above process for W3 Total Cache and Yoast. Once complete, all three plugins will appear in the Plugins window and be ready to use.
Setting up donations for your nonprofit
We mentioned earlier that the Charity Starter Template comes with the GiveWP plugin already installed. This lets you accept donations immediately and gets you started right away.
Let’s configure it so you can begin accepting donations.
Setting up GiveWP
Setting up GiveWP is very straightforward. It even comes with a test mode so you can make sure everything works.
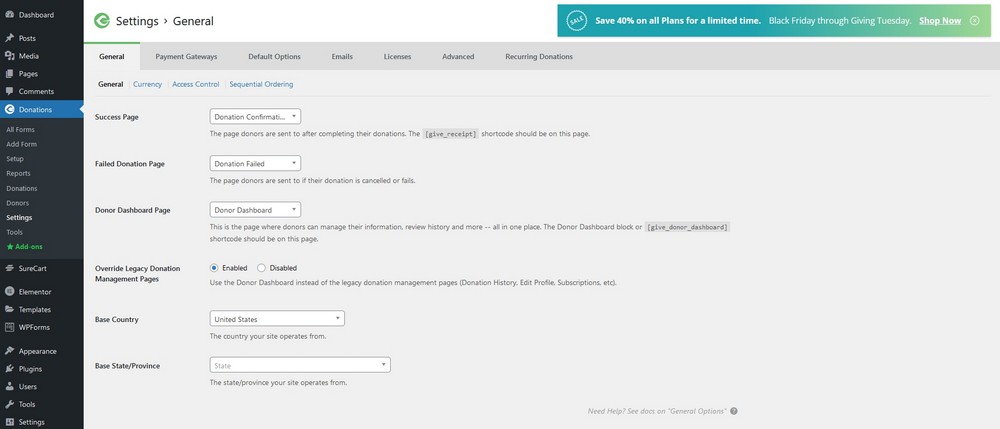
Select Donations and Setup from the left menu of your WordPress dashboard to access plugin settings.
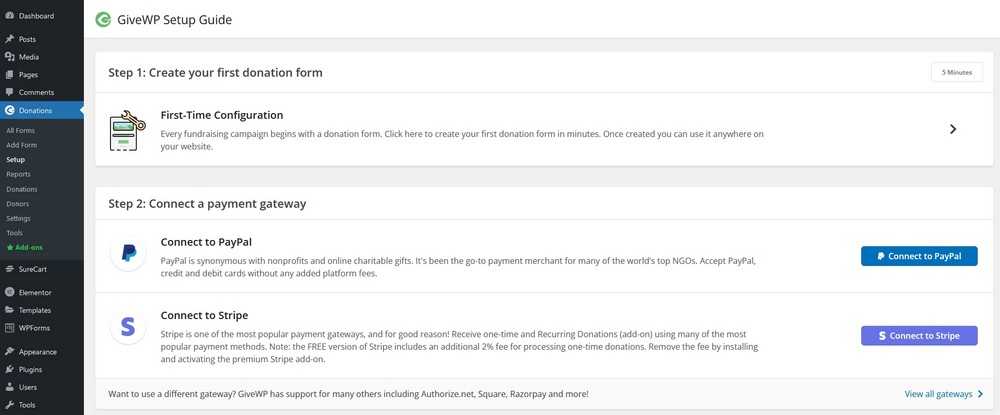
Select the First-Time Configuration option on the page to follow the setup wizard.
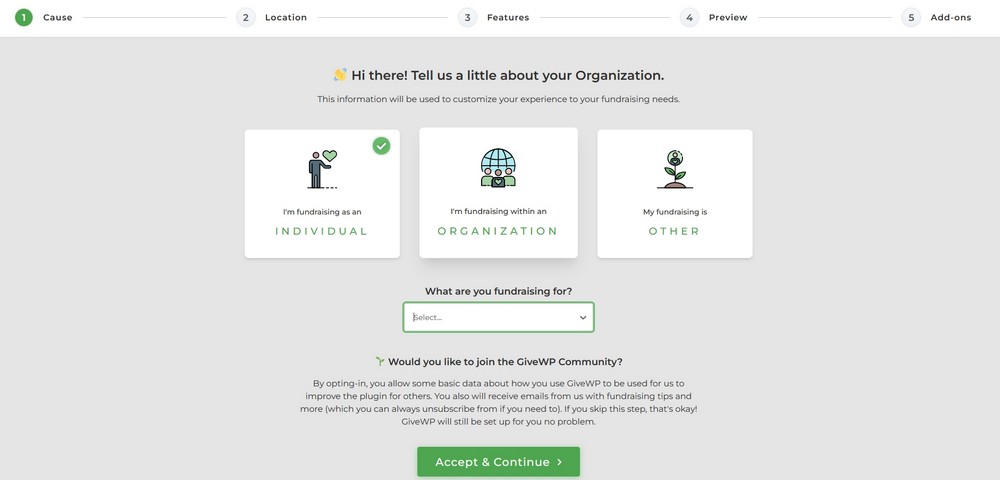
The setup wizard will set up the plugin for your good cause. It will ask you about the type of organization you have, what you’re collecting for, how you want to collect and some other options.
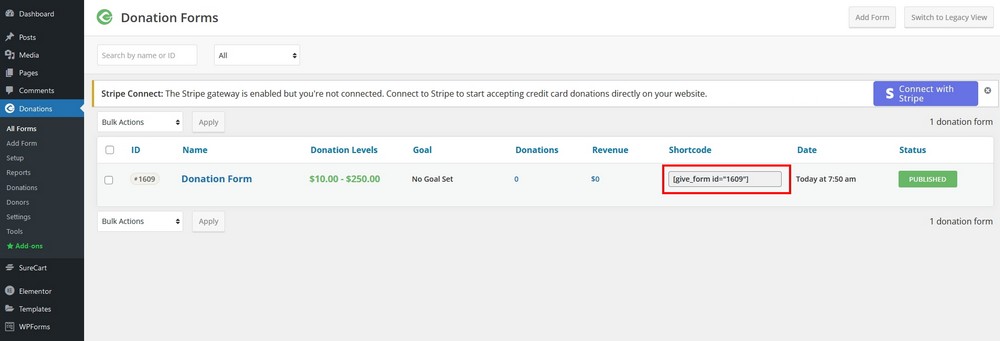
Once complete, select All Forms from the left menu and copy the shortcode for the form that was created.
Select Pages and Edit with Elementor under the page you want your donation form to appear on.
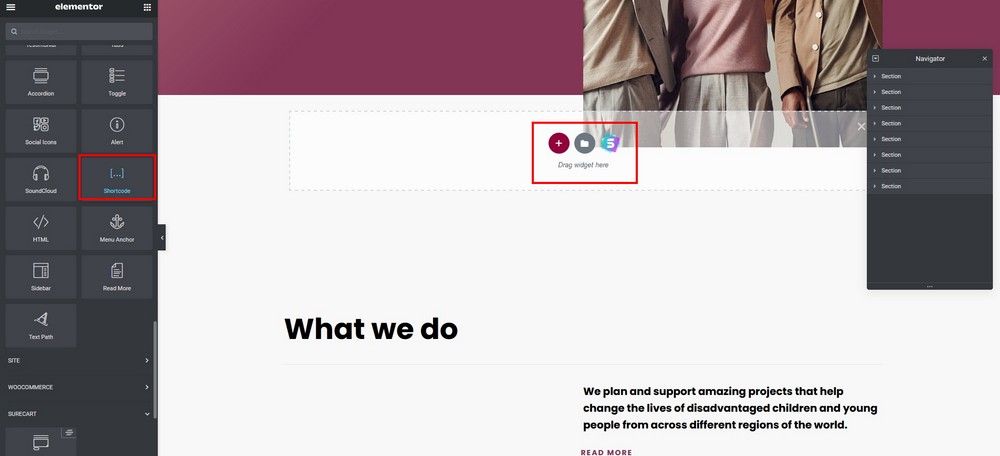
Select an area of the page, select the Shortcode block from the Elementor menu.
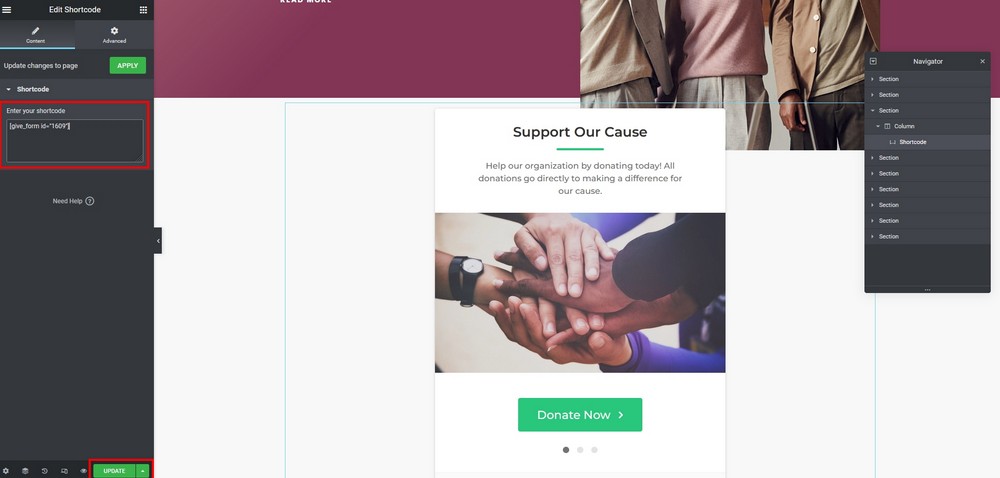
Paste the shortcode into the shortcode menu item on the left and select the green Update button at the bottom of the page.
You should see your form in the main pane of the Elementor window. You can leave it there or move it anywhere on the screen as you need.
Next, we recommend working through the tabs at the top customizing all the settings you need.
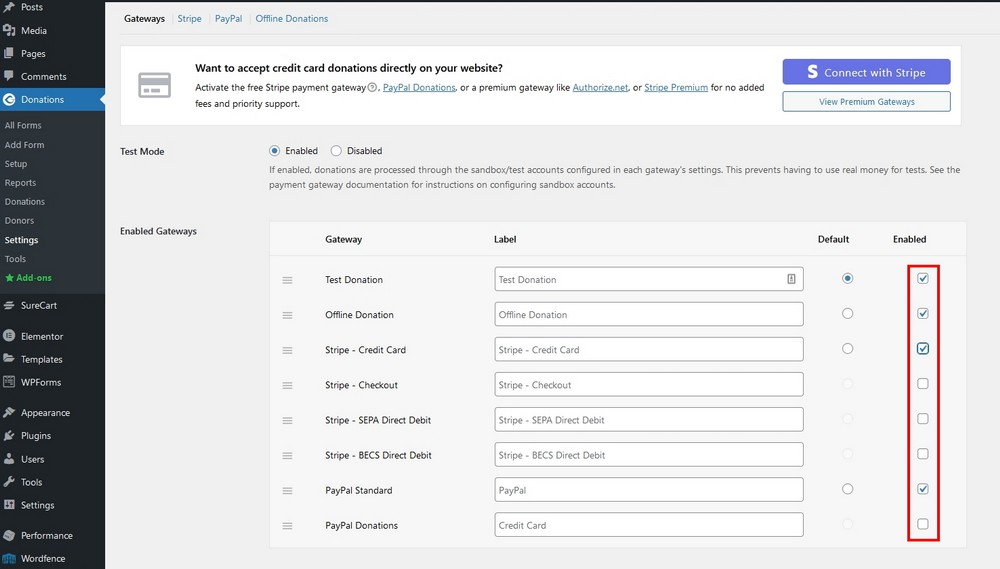
Select the Payment Gateways tab and select the types of payments you want to receive in the center.
Check the box next to each option you want to enable and set a default option beside it.
If you want to accept credit or debit card payments, you’ll need to link GiveWP with Stripe. Select the blue Connect with Stripe button at the top and follow the setup wizard for that.
Save your changes once finished.
Complete setup or make any other customizations as you see fit.
That’s the basics of setting up the GiveWP plugin. There’s a lot more you can do with it. We recommend checking the documentation to learn more.
That’s it for the setup of your nonprofit website!
But your journey is just beginning. Let’s now create a blog post to tell the world about your new website.
Write your first blog post
Having a great looking nonprofit website is great, and the ability to use it to accept donations is amazing.
But, it’s all for naught if nobody knows you exist.
Let’s change that by writing a blog post announcing the arrival of your website.
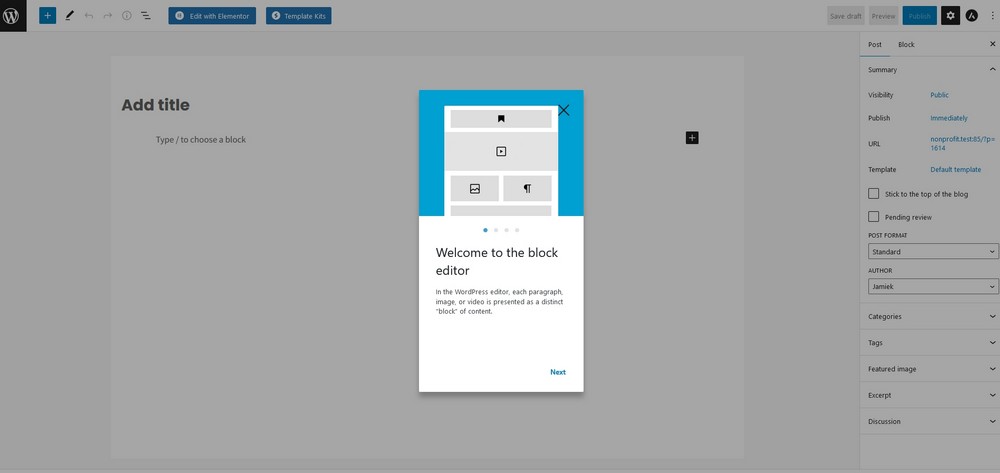
Select Posts and Add New from the left of the WordPress dashboard.
You’ll see the WordPress posts screen and a welcome to the block editor popup. Close or tour the popup to begin writing your first blog post.
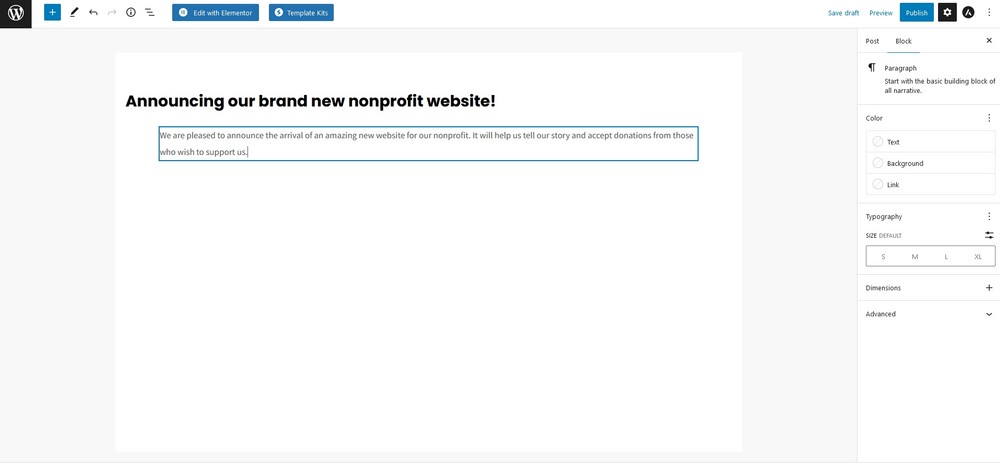
Add a compelling title where you see Add Title.
Add page content underneath to build out your post and hit the blue Publish button at the top right when you’re finished.
That’s it, you have published your first post. It will probably be the first of many!
Learn more about writing your first blog post here.
5 Examples of nonprofit websites for inspiration
The Charity template has everything you need to set up a nonprofit website, including an amazing design.
If you want to customize it or are looking for inspiration, check out these five real life examples of nonprofit websites in action:
World Wildlife Fund
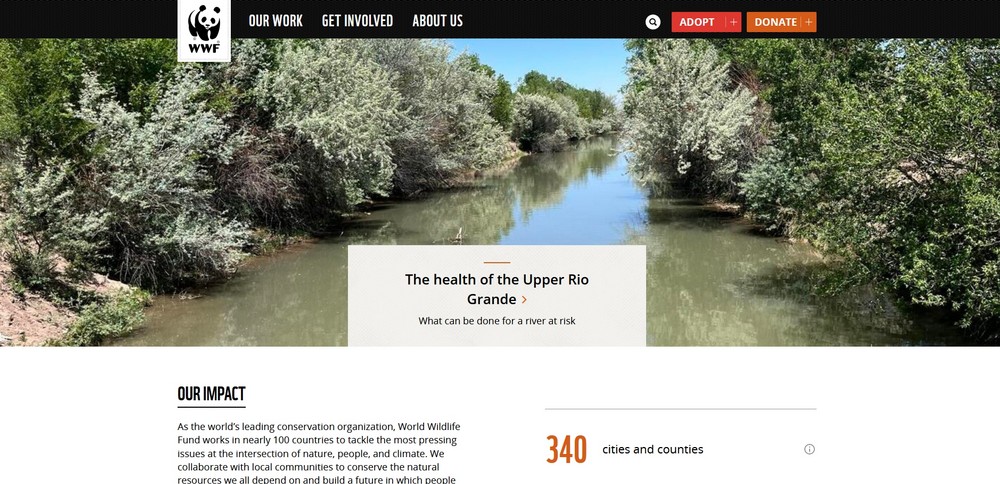
We love the World Wildlife Fund website. It’s full of amazing photography and images that showcase that the charity is all about.
There’s also a lot of engagement and advice on how everybody can make the world a better place.
Direct Relief

Direct Relief has a very clean design that works incredibly well. Combined with that orange contrast color and modern fonts, it encourages you to browse further and engage with the website. That’s great design in action!
Guide Dogs
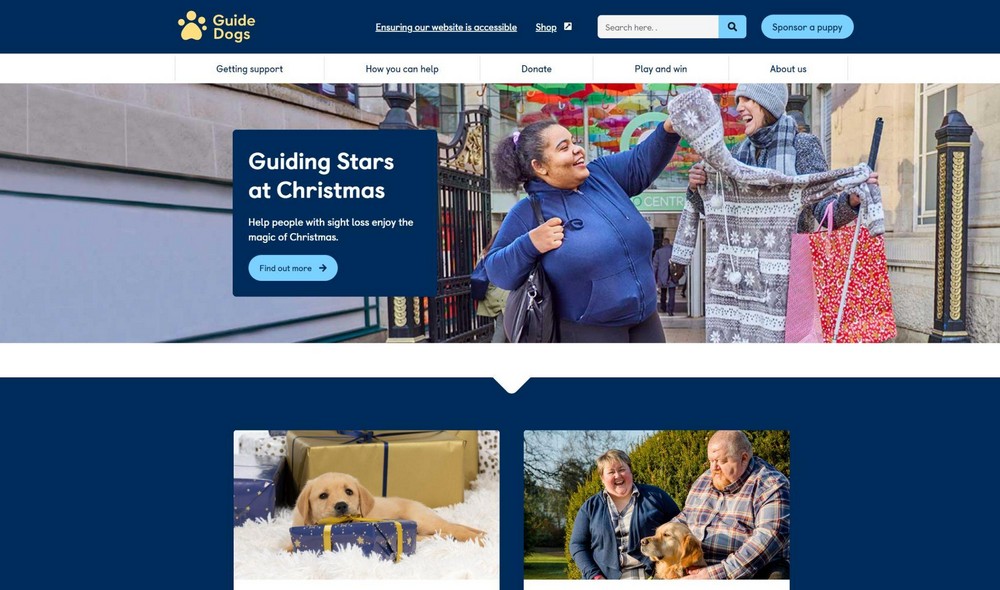
The Guide Dogs website is a lesson in how to engage. It’s all about storytelling and telling stories that show you what the charity is about, how they help others, the impact of donations and anything else you might want to know.
Acumen
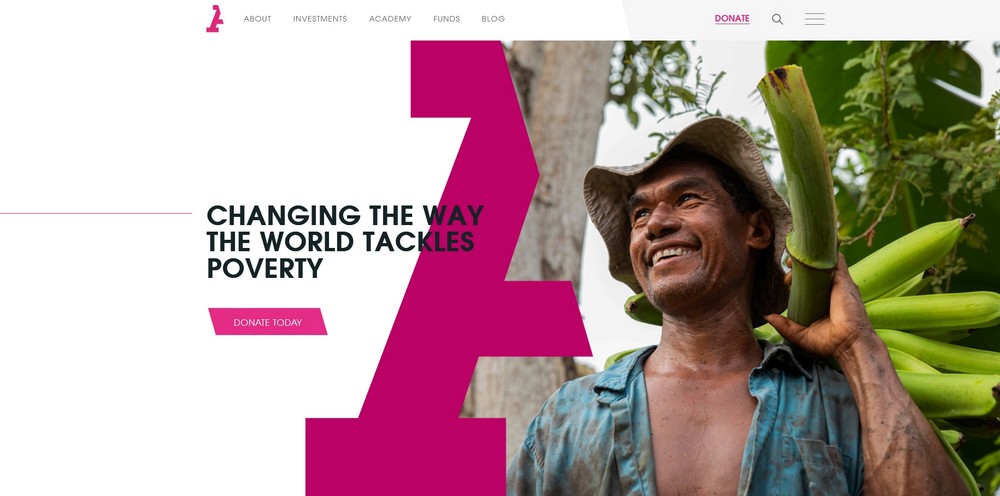
The Acumen website has a clean, modern design with bold colors and images that make you want to learn more.
If your approach is more corporate or has a modern appeal, this style can work amazingly well.
Amnesty International
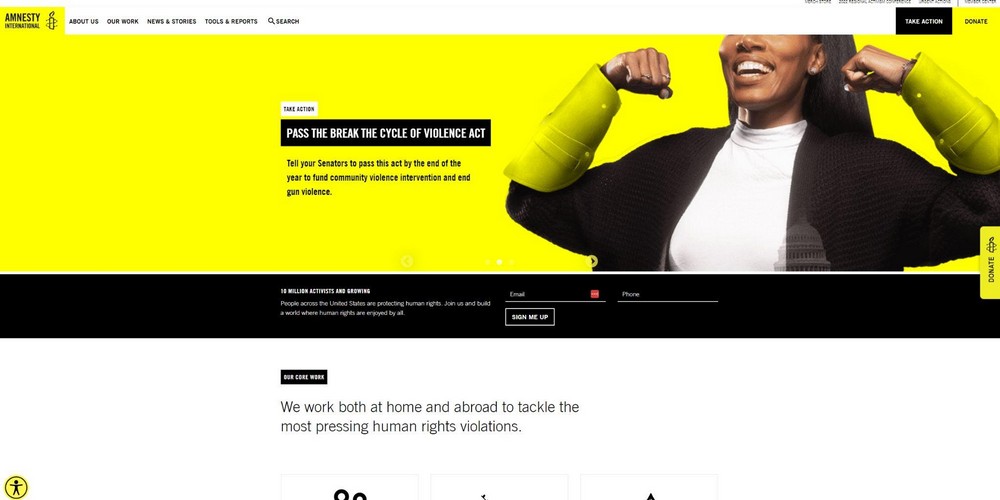
Amnesty International goes for bold, bright colors and design and uses a donation popup immediately as you land.
A combination of whitespace and bold black and yellow colors communicates immediately and works very well.
Marketing your nonprofit for free or for cheap
So, you have installed WordPress, set up the Astra theme, installed a Starter Template, installed essential plugins and have a donation form on your page.
You also wrote your first blog post announcing your new website. What’s next?
We hinted earlier that writing your blog post would be the first of many. Having a website is great, but if nobody knows it’s there, you won’t be a very successful nonprofit.
Here are a few ways to get the word out about your new website and your new nonprofit.
Create amazing content
Blogging and content creation is all part of marketing your website. It goes hand in hand with social media, creating videos, engaging with email outreach and newsletters and most promotion you’ll do.
Create content around what you do, who you help, where the money goes, the stories behind why you set up the nonprofit and anything else you can think of.
Keep the content flowing and the quality high and you’ll soon get noticed.
Social media engagement
Social is essential for nonprofits. It’s a quick and easy way to engage with a wide pool of people to get them interested in what you do.
Use social media on its own and to promote events, your amazing content, tell your story and anything else you can think of.
Email outreach
Even though everyone’s inboxes are bulging, email outreach can still be incredibly effective. Write engaging, high quality emails to qualified leads and make every single one count for something.
When you become known for quality and for not wasting people’s time with email, you’ll find your open rates increase steadily.
For some actionable tips, check out our guide to email marketing here.
Google Ads
You have to pay for Google Ads but you can set daily or weekly budgets if you need to. Google Ads are very effective at the very beginning of a marketing campaign.
They attract visitors while your organic actions like blog posting and social media engagement gain traction.
Yes, Google Ads cost money but it could be a solid investment if you do it right.
Building a nonprofit website FAQs
How do I create a non-profit website for free?
You can create a non-profit website for free using WordPress, the free Astra theme and the free GiveWP plugin. This will deliver a professional website that looks amazing and delivers the features you need.
You’ll need time to build everything but it shouldn’t cost anything aside from a domain name and web hosting.
What should a non-profit website include?
A non-profit website should include a main page to hook visitors, tell your story and engage them enough to stick around. The website should include the what, why and how of your charity, share success stories and provide reasons for someone to support you.
It should also contain a donation plugin so people can support you while they are engaged.
What makes a good nonprofit organization website?
A good nonprofit organization website tells a story. It shares the story of why you do what you do, how it all started, how it helps, success stories of that help and the positive benefits you make to society or the world at large.
Share all those things within a fast, responsive website that looks the part and you’re on the road to success!
Create an engaging nonprofit website
So that’s how to create an engaging nonprofit website using free tools. We hope you found it useful.
WordPress is an amazing free platform and the Astra theme is a powerful free theme. Along with the GiveWP donations plugin, you have all the ingredients you need to build an exceptional website for your nonprofit.
You’ll need to pay for a domain name and hosting but that can cost less than $70 per year, which isn’t bad considering what you get in return!
Did you follow this guide to set up your nonprofit website? Have any advice for others setting up a new website? Tell us your thoughts below!
Disclosure: This blog may contain affiliate links. If you make a purchase through one of these links, we may receive a small commission. Read disclosure. Rest assured that we only recommend products that we have personally used and believe will add value to our readers. Thanks for your support!
