It’s your big day! You’ve been dreaming about this moment for years and now it’s finally here.
We know wedding planning is in full swing, but to make it extra special, there’s one important task you can’t forget – creating a wedding website.
Creating a wedding website is a great way to keep all of your guests informed about the details of your big day.
Plus, it’s also a great way to share photos and memories during and after the event. What could be a better way than this to make your wedding memorable?
In this tutorial, we’ll show you how to create a wedding website with WordPress in a few hours without any coding knowhow.
By the end of this tutorial, you’ll be able to create a wedding website like this.
Now, let’s dive in!
What to include on your wedding website
If you’re using the Astra theme, you’re in good hands. Use one of our website templates and you don’t have to worry about adding sections or pages.
That’s because they include everything you need already.
However, to feel confident about the process and get a head start, we recommend you take a look at the following essential aspects of your wedding website.
1. Our story
The story section is one of the most important parts of your wedding website. Why? Because it’s an opportunity for you to connect with your guests.
It’s a chance to tell them your love story and give them a glimpse into who you are as a couple.
Your guests will appreciate getting to know you better, making them feel more connected to you and your relationship.
Plus, it’s a great way to get everyone excited about your big day!
2. Countdown timer
When it comes to wedding websites, the countdown timer section is one of the most important.
This section helps build anticipation and lets the guests track how much time is left before the big day. It also allows you to see how many days, hours, minutes, and seconds you have left until your wedding day.
The countdown timer is a great way for couples to stay organized and motivated as they plan their wedding.
It’s also a fun way for guests to check in on the wedding preparations progress.
3. Maps and address
When planning a wedding, it is important to consider the details that will make your big day perfect.
One detail that is often overlooked is the map and address section of your wedding website.
This section is important because it allows guests to find your venue and get directions to your wedding.
While the map and address section may seem like a small detail, it can be very helpful for your guests.
4. Travel and stay
If you’re planning a destination wedding, or if your wedding is a few hours away from where you and your guests live, it’s important to have a travel and stay section on your wedding website.
This way, guests can easily find information about hotels, transportation and anything else they need to know to make travel plans.
The travel and stay section is also a great place to share any special deals or discounts you’ve arranged with local hotels.
This can help save your guests money, give them options and can make their travel plans easier.
5. Gift section
The gift section of a wedding website is one of the most important. It’s where guests can go to find out your needs and wants for the big day.
The gift section’s importance lies in its ability to help guests pick out the perfect present for the happy couple.
After all, not everyone knows the couple well enough to know exactly what you would like. The gift section considers that problem by providing ideas based on the couple’s interests and personality.
6. RSVP and contact
The RSVP section of a wedding website is another important aspect.
It allows guests to RSVP to the wedding and provide their contact information. The RSVP section’s importance lies in its ability to help keep track of guests and ensure that everyone who is supposed to be at the wedding is accounted for.
While planning your wedding, it’s important to have a way for your guests to get in touch with you with any questions or concerns they might have.
That’s where the contact option section of your wedding website comes in!
7. Gallery
The gallery section is a great way to share photos of you, the wedding party, and the guests.
Its importance lies in its ability to capture memories of the big day that can be shared with others. So, consider adding a gallery section on your wedding website.
Create your wedding website in these 6 steps
Creating a website is easy if you use Astra. Just take your time and follow these steps:
Step 1: Get a domain name
The domain name is the URL of your website. For example, www.xyz.com or www.willieplusdonna.com. This is the unique address that will help your visitors find your website.
You can get your domain name from websites like Namecheap, Google Domains or your chosen web host.
Step 2: Get a hosting service
Now, it’s time to get a hosting service for your website. Hosting is where your website is stored and made available to the world.
It costs a little money but is well worth the investment.
Some popular hosting service providers include SiteGround, Cloudways, Kinsta, and Hostinger.

We recommend you get hosting from Cloudways. Why? Because you can get the Astra Pro for free for the first year.
In addition, their hosting service is super fast and includes lots of great features.
Step 3. Installing WordPress on your hosting platform
WordPress is a free and open-source content management system that will help build your wedding website faster and make the process fun.
Most hosting companies will install WordPress for you. But, if you are the DIY-type, you can follow our detailed article that describes how to install WordPress.
Step 4: Install and activate the Astra theme
A WordPress theme controls what your wedding website will look like. There are thousands of themes out there, both free and paid for. As we make the Astra theme, which is free, we’ll use that.
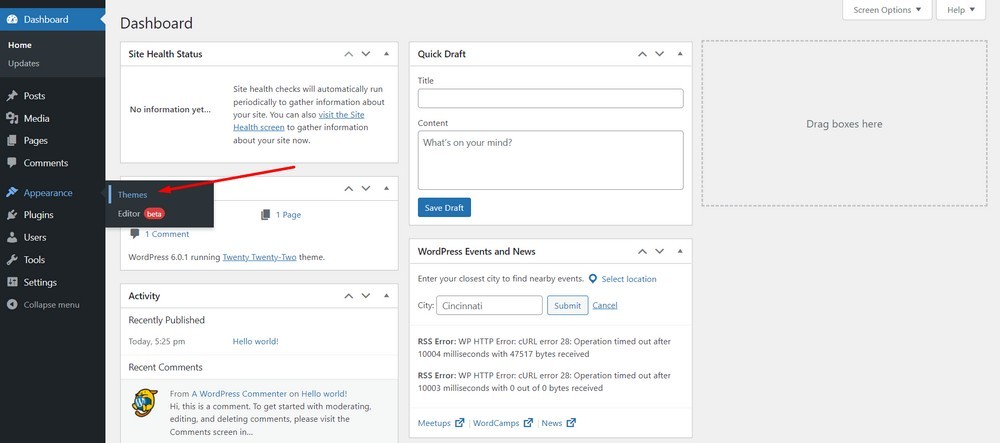
To install Astra, navigate to the WordPress admin dashboard and then go to the Appearance > Add New option.
Now, click on the Add New option.
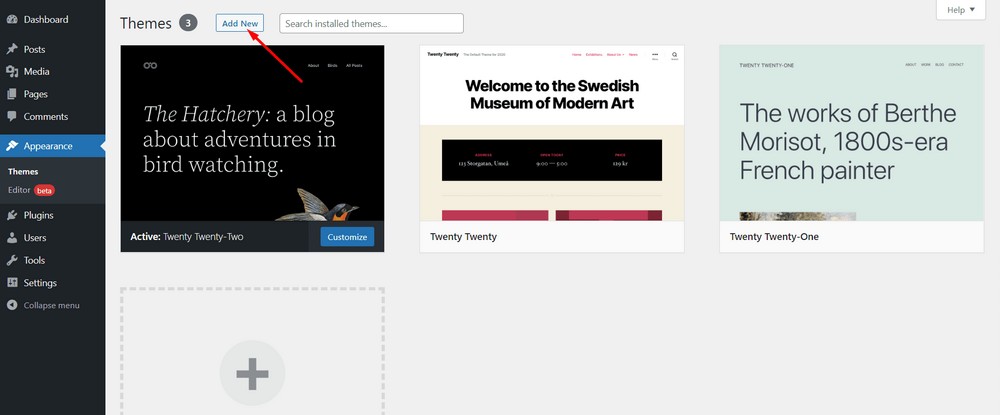
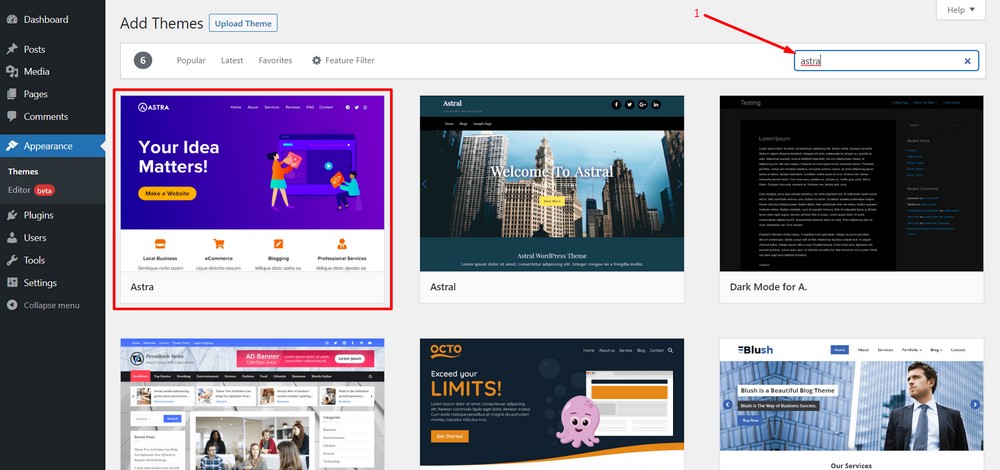
Search with the keyword “Astra”.
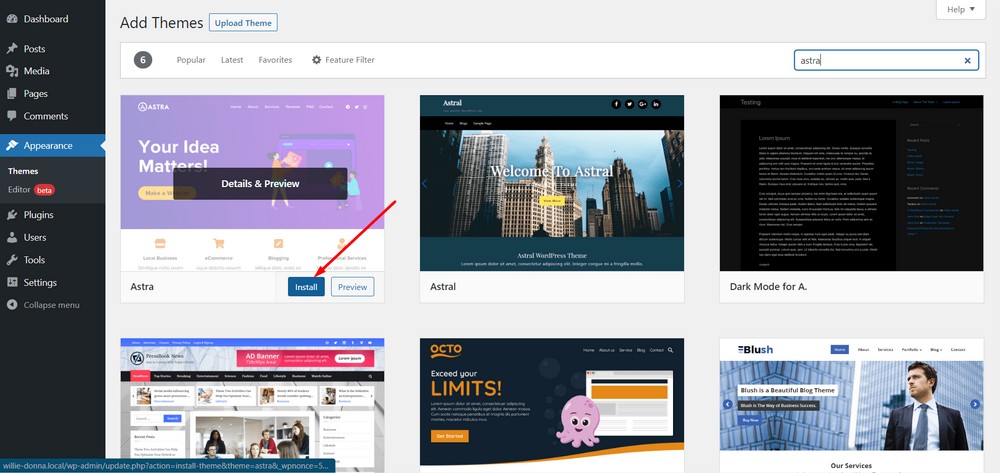
Hit “Install”.
Activate the theme.
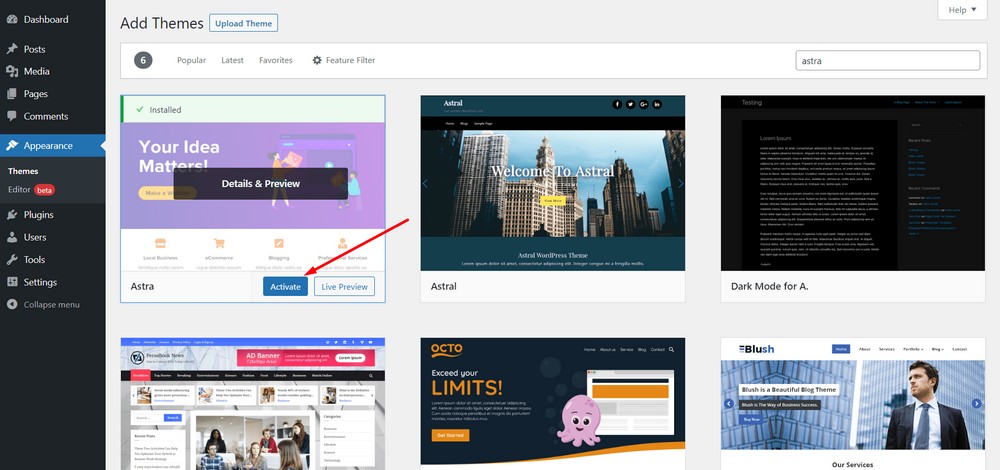
That’s it. You are through with installing the theme!
Similarly you can install a WordPress portfolio theme to showcase the past events you have conducted.
Step 5: Installing a wedding template
Now the Astra theme has been installed, it’s time to choose a template. There are a number of wedding website templates you can use, so let’s do that now.
Starter Templates offer:
- The largest pool of pre-designed templates.
- Compatible with any theme.
- Works best with Astra theme with 1M+ installations.
- Includes different templates for different page builders.
- Ships with a wide range of free and premium wedding templates.
- Drag and drop based editing experience.
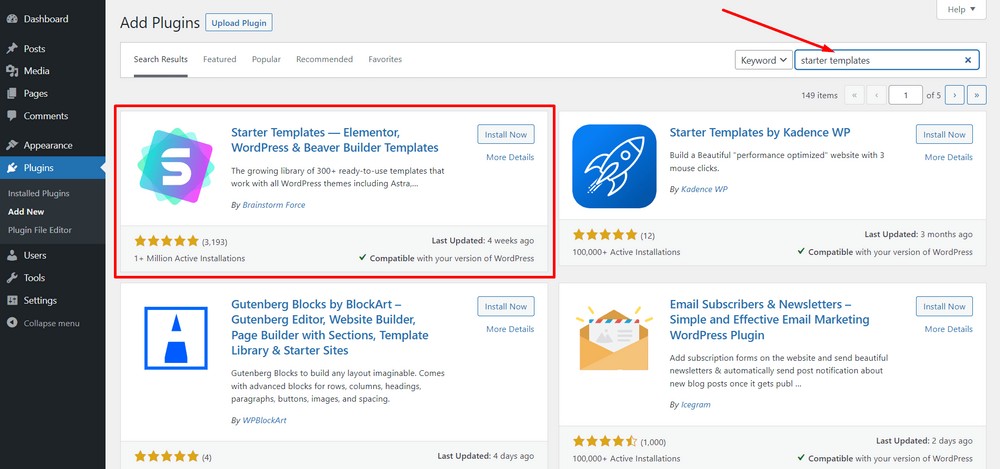
To install a wedding template, navigate to the Plugins > Add New section.
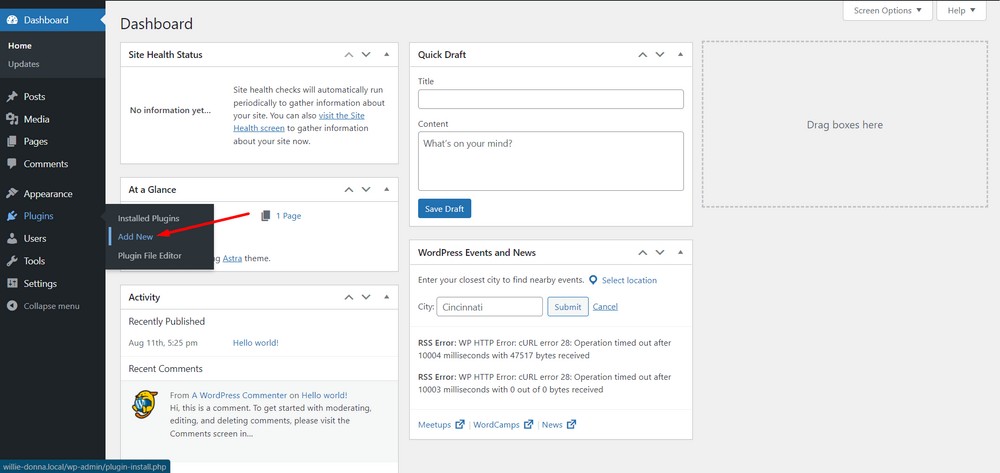
Search for the keyword, “starter templates”.
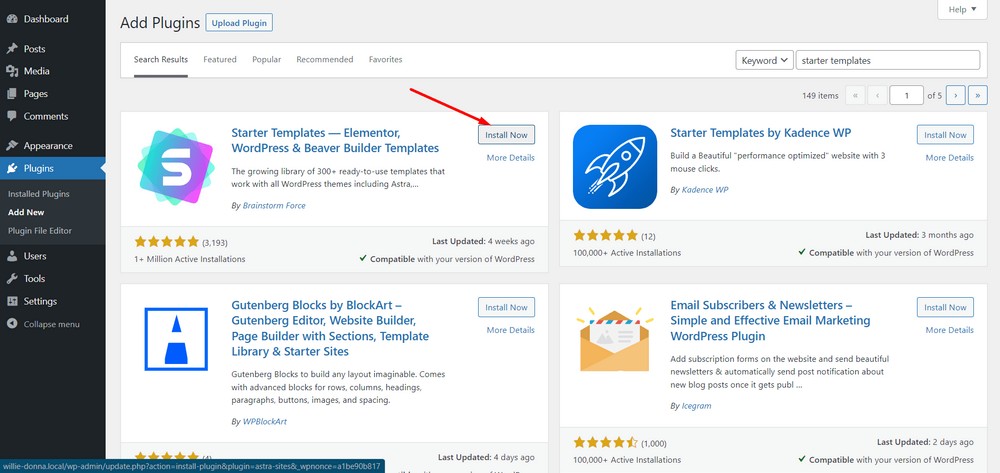
Hit the “Install Now” button.
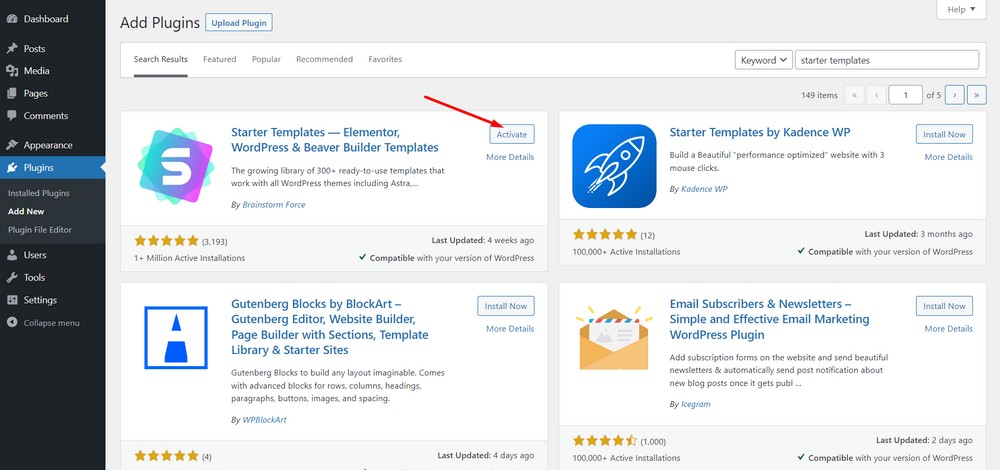
Finally, tap on the “Activate” button.
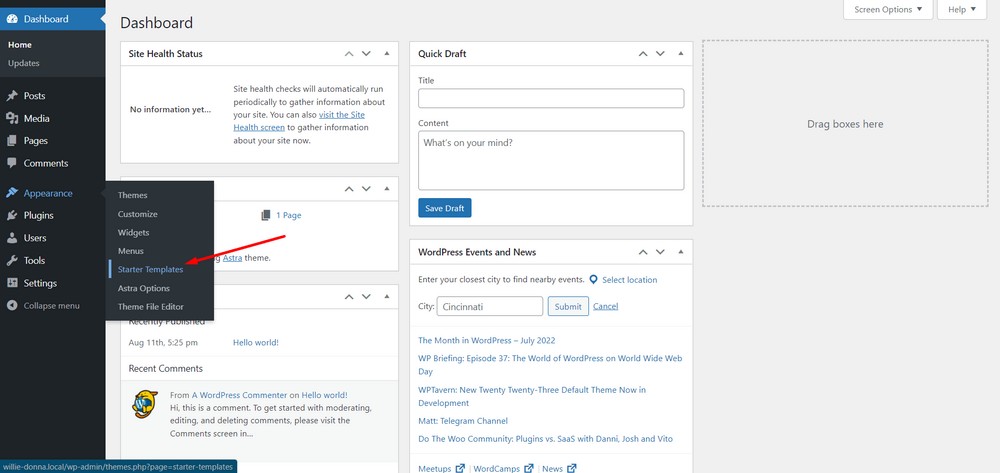
Next, head to the WordPress admin dashboard and then go to Appearance > Starter Templates.
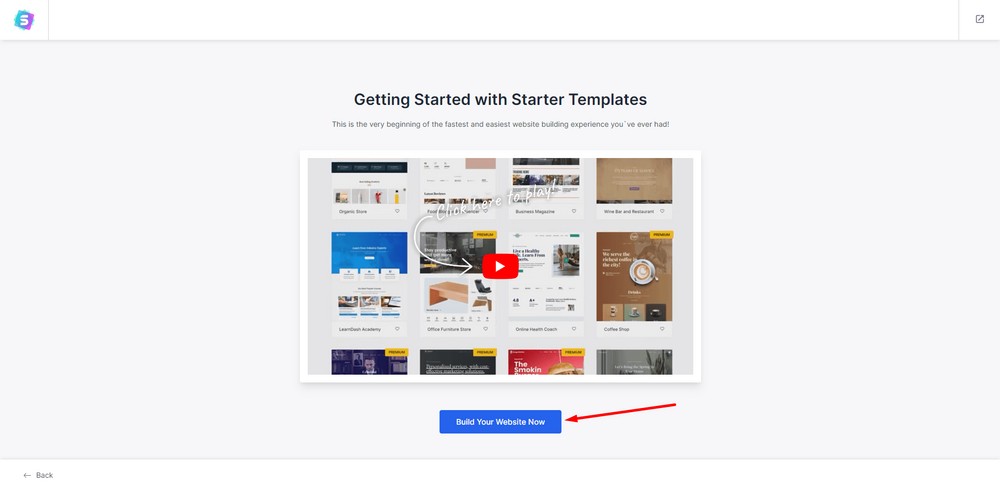
Now, hit the “Build Your Website Now” button on the next screen.
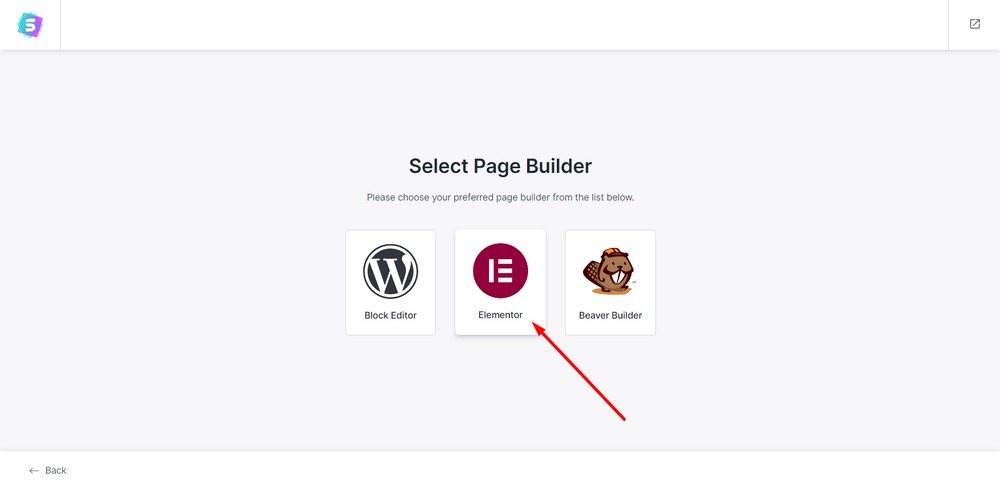
Now, you’ll find three page builders to choose from. Choose the one you feel comfortable with. We’re using Elementor for this tutorial.
(Please note that you’ll find different templates for different page builders. So, feel free to choose other page builders any time to find a suitable template for you.)
Step 6: Select a wedding template
Now that you have installed all the necessary themes and plugins, it’s time to select a free wedding template.
Now, search for the keyword “wedding”.
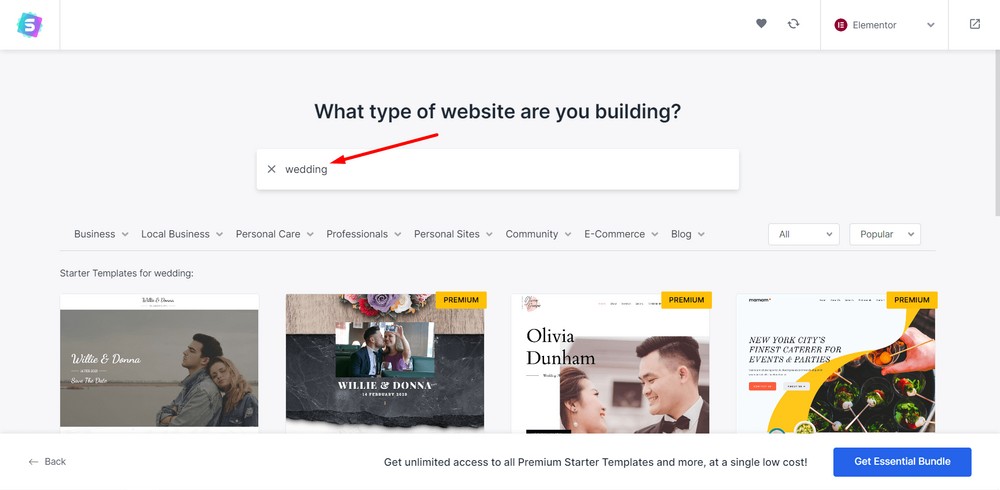
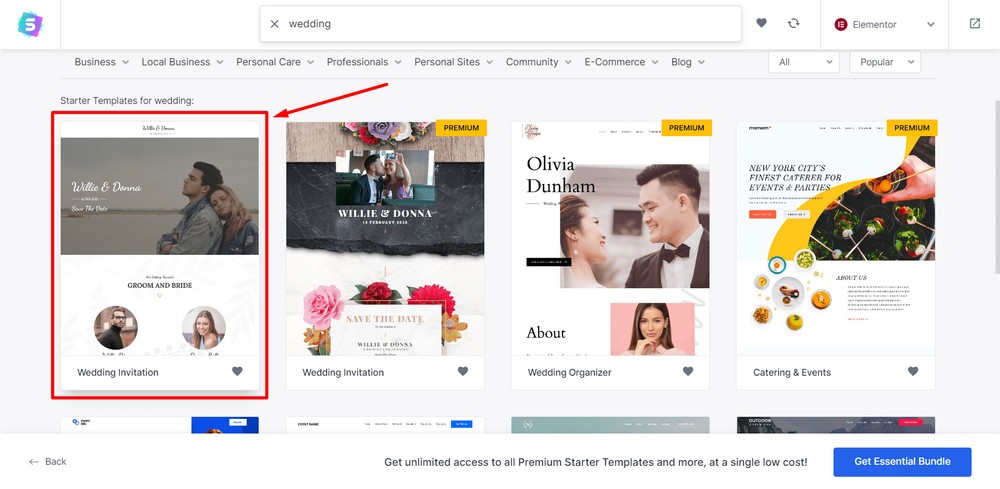
A number of free and premium wedding templates will pop up. If you are selecting Gutenberg or Beaver Builder, you’ll find different ones.
For now, we’re selecting this free Wedding Invitation template.
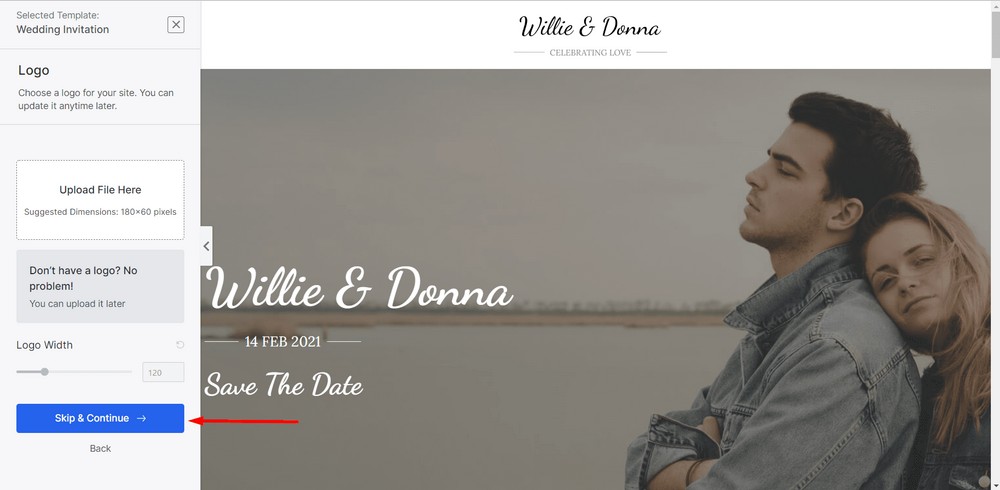
You can upload a logo for your wedding website or keep it as it is.
You can also play around with logo settings. For example, you can easily adjust the logo width.
After that, hit the “Skip & Continue” button.
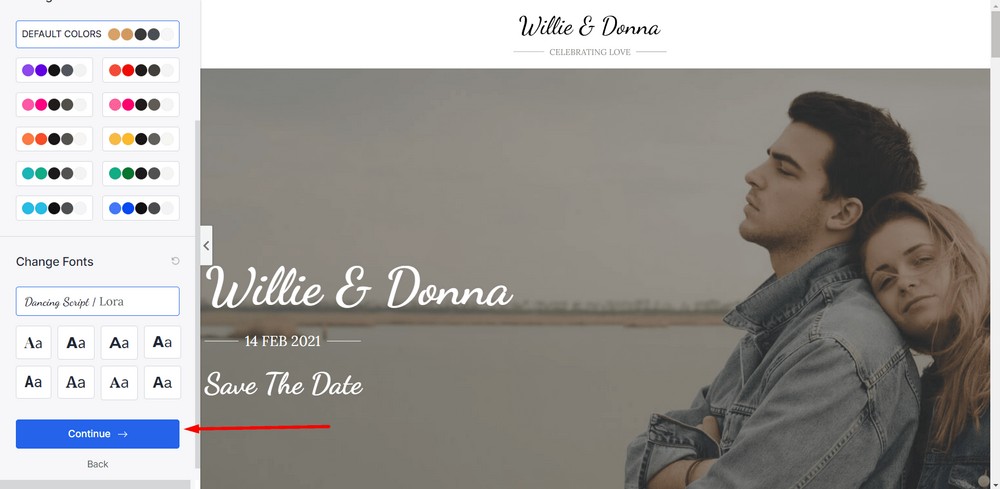
At this point, you can play around with the colors and fonts. Once you are done, click on the “Continue” button.
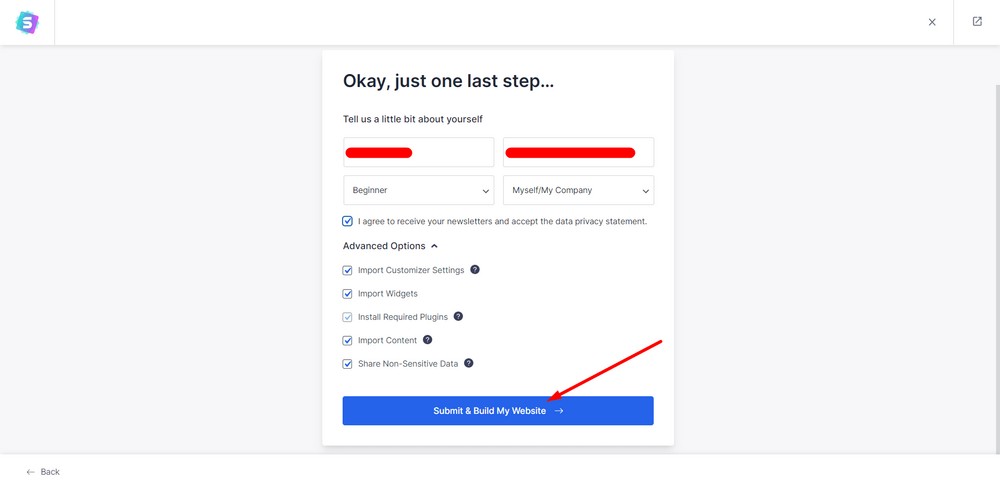
You can insert your name and other information on this screen using the dropdown options.
After that, hit the “Submit & Build My Website” to build your website.
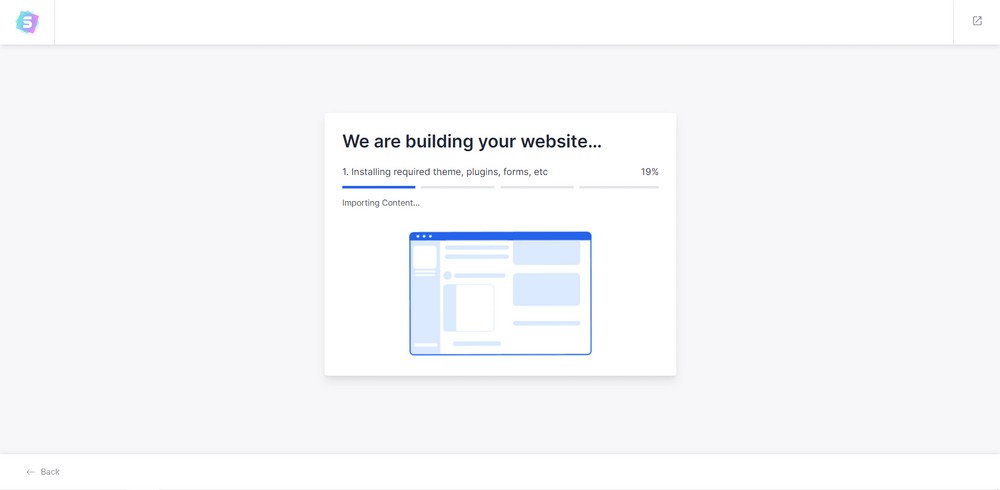
Now, the system will start creating your website in a few seconds.
That’s it. You’ve built your wedding website for your big day. It’s that easy!
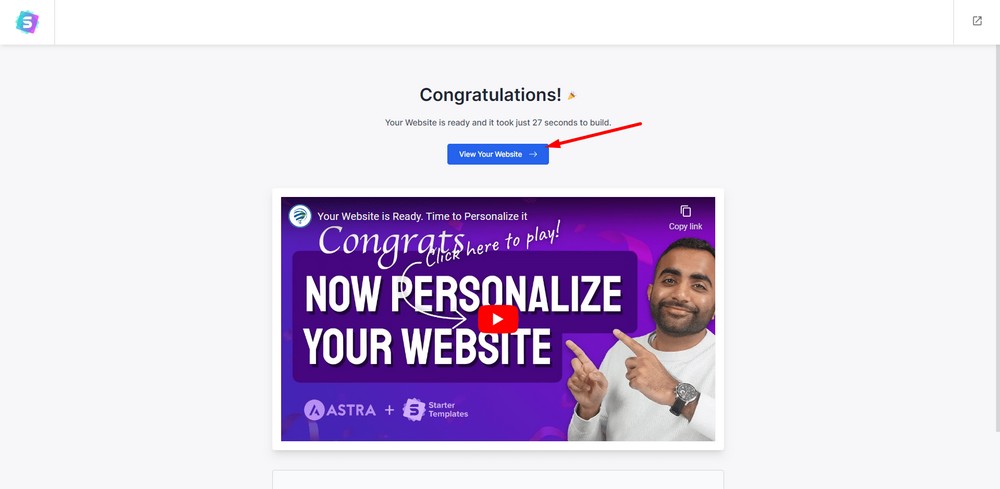
The “View Your Website” button should show your website. It should look like this:
Bonus tip: Customizing your wedding website
Now, let’s see how we can add extra options to the website.
Tip 1: Adding navigation menu
Navigation helps people identify what’s on your website and easily switch between pages. It’s an essential part of building a website.
For navigation to work, you’ll first need pages that can be added to the menu. Once done, you can link them all together within a simple menu.
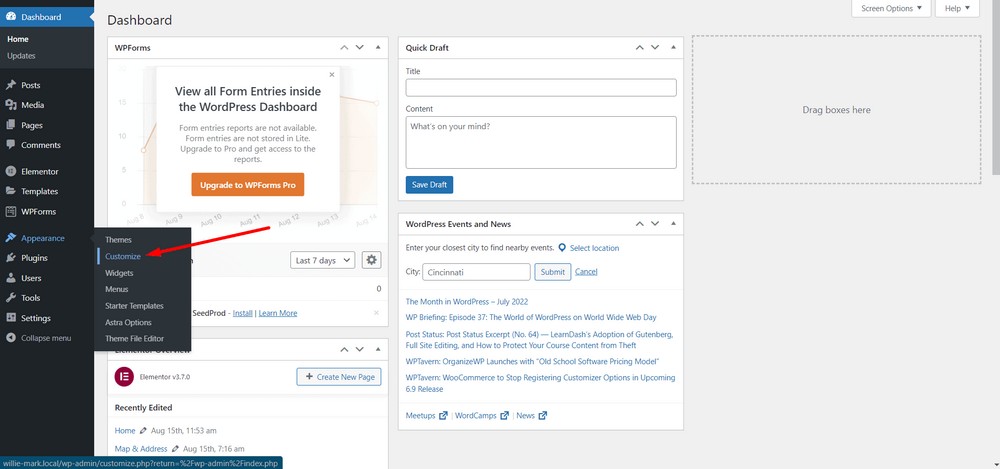
To do so, navigate to the WordPress admin dashboard and go to Appearance > Customize.
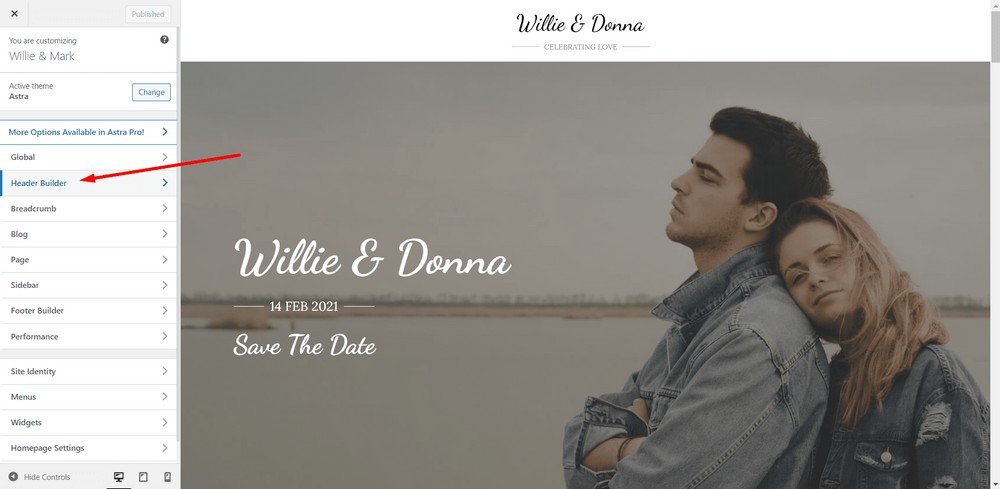
Next, you’ll be able to see the customization options. Select the “Header Builder” option.
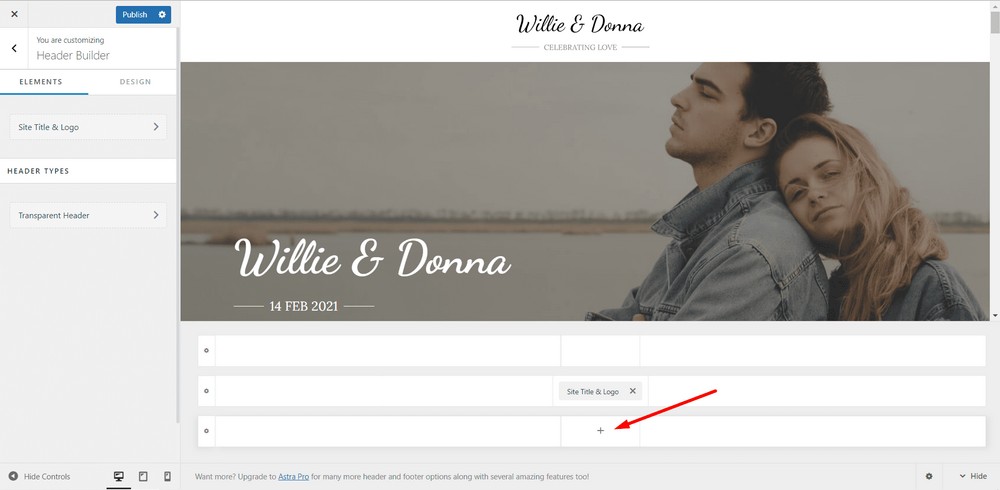
Now, click on the “+” icon from the third row.
Select the “Primary Menu” option from there.
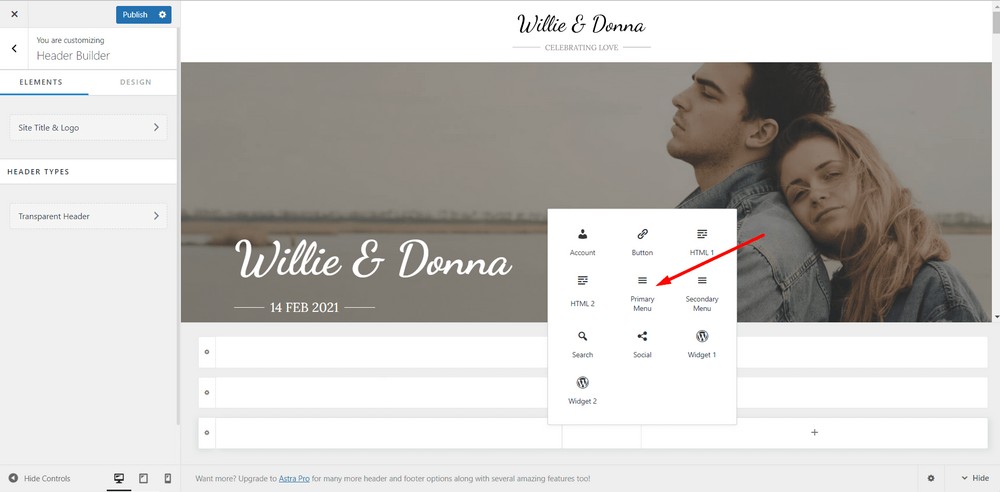
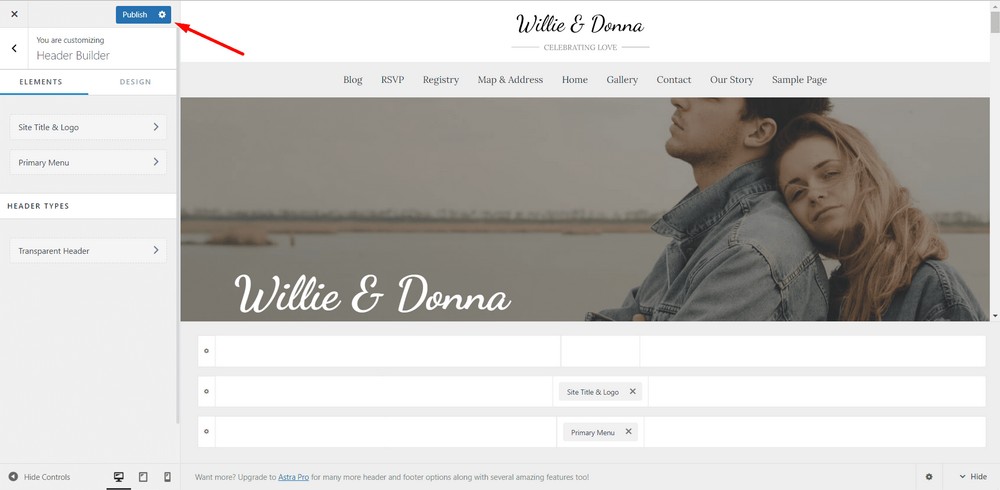
Now, the Primary Menu will automatically appear.
Hit Publish and you are done.
Tip 2: Adding pages
You can create either a one page website or a multiple page website or both. The template we use here creates a one-page website.
In this tutorial, we suggested creating some basic pages such as:
- Our story
- Contact us
- Maps and address
- RSVP
- Blog
- Home
- Gallery
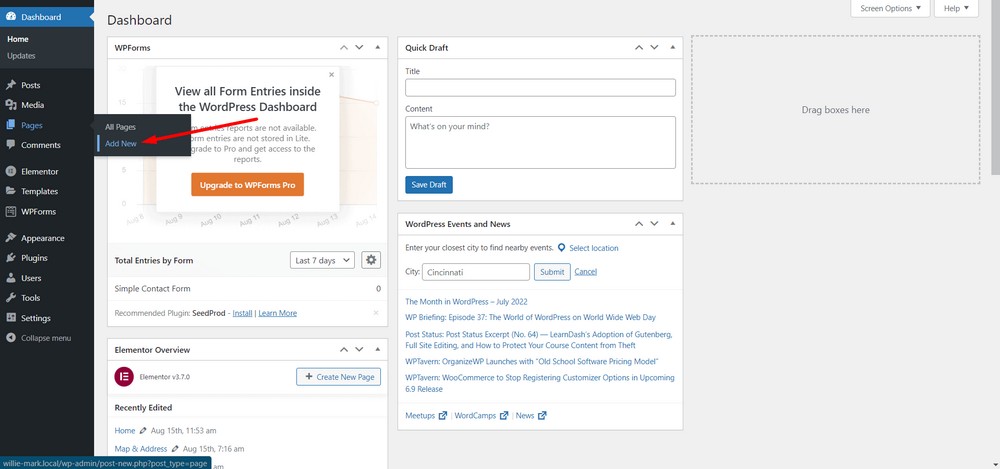
To add pages, go to the WordPress admin dashboard section and select Pages > Add New option.
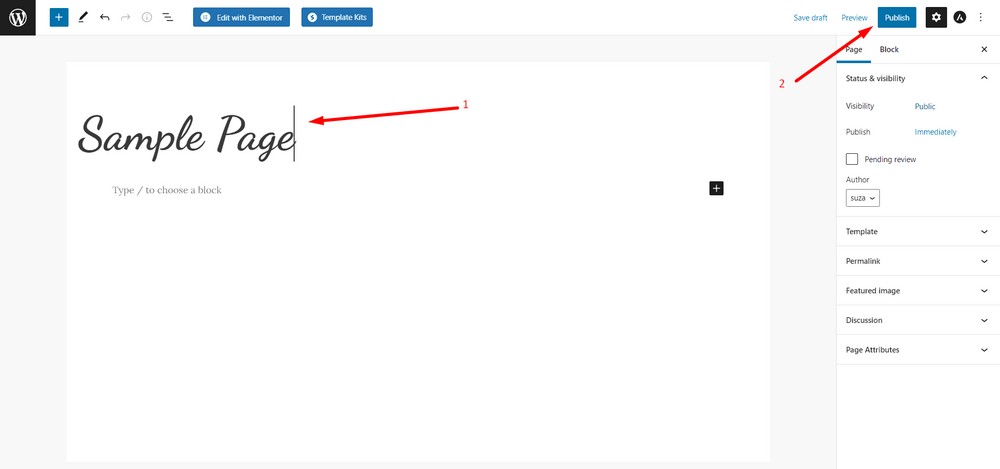
After creating the pages, hit Publish to make them publicly visible.
Tip 3: Editing the gallery page
To edit the gallery page, head to the WordPress admin dashboard and then go to Pages.
Select the Gallery page > Edit > Edit with Elementor.
You can use the Elementor gallery widgets or copy and paste the gallery section from a Starter Template.
Tip 4: Editing the contact or RSVP page
To edit the contact page, navigate to the WordPress admin dashboard.
Then go to the Pages > Select a Page > Edit > Edit with Elementor.
You can use the WPForms contact form widget from the Elementor Editor panel to let your guests contact you effortlessly.
As you selected Elementor earlier while we were installing the templates, you can hit the “Edit with Elementor” option to edit a page.
Tip 5: Editing the maps and address page
You can add a maps widget from the Elementor editor panel. You can also simply copy and paste the address section from the template.
Tip 6: Adding the countdown timer
The free template we’re using does not come with a countdown timer widget.
However, you can simply search with the keyword, “countdown timer for elementor” in the Elementor widgets panel and add it to a web page.
Just drag and drop it into place. It’s easy!
Once your wedding website is ready, you can create a blog to communicate with your followers, fans, and guests. You can use the blog to share wedding tips for people planning their weddings, travel-related stories and more.
Wrapping up
Creating a wedding website with Astra and Starter Templates is easy and fun!
With just a few clicks, you can have a stunning wedding website that will impress your guests and make wedding planning a breeze.
We’ve shown you the entire process with the free version of Astra and the free templates. But you can also consider the premium version in case you are not satisfied with the free ones.
Again, using the Starter Templates will save your time, money and effort. So what are you waiting for? Start creating your own wedding website today!
Disclosure: This blog may contain affiliate links. If you make a purchase through one of these links, we may receive a small commission. Read disclosure. Rest assured that we only recommend products that we have personally used and believe will add value to our readers. Thanks for your support!
