Whether growing plants for pleasure or running a nursery, a website will be an excellent option for creating an online presence.
Using your website, you can share gardening tips with your audience and help other botanists and plant lovers with their projects.
According to IBISWorld, the market size of the plant and flower growing industry in the United States is worth around $17.1 billion so far in 2022.
This industry has been growing over the years. Now it’s your time to sell plants online and be an impactful member of this industry.
How can you make your own website and set up your online store?
This article will show you how to launch your own eCommerce store to sell plants online.
This is how your online plant store will look once we’re done.
Let’s get started!
Before starting your online plant business
We recommend performing some research and preparation before starting any business. It concentrates the mind, helps you identify challenges and opportunities and helps you properly prepare for your new venture.
Consider the following points when planning to sell plants online:
Find your niche
The first step is to decide which plants to sell. There are hundreds of thousands of plant varieties available. But, as a beginner, we recommend starting with those plants which are easy to source, require little maintenance and can travel well.
Here are some plants to consider if you plan to sell online:
- Succulents
- Cactus
- Aloe Vera
- Orchids
- Herbs
- Ornamental grasses
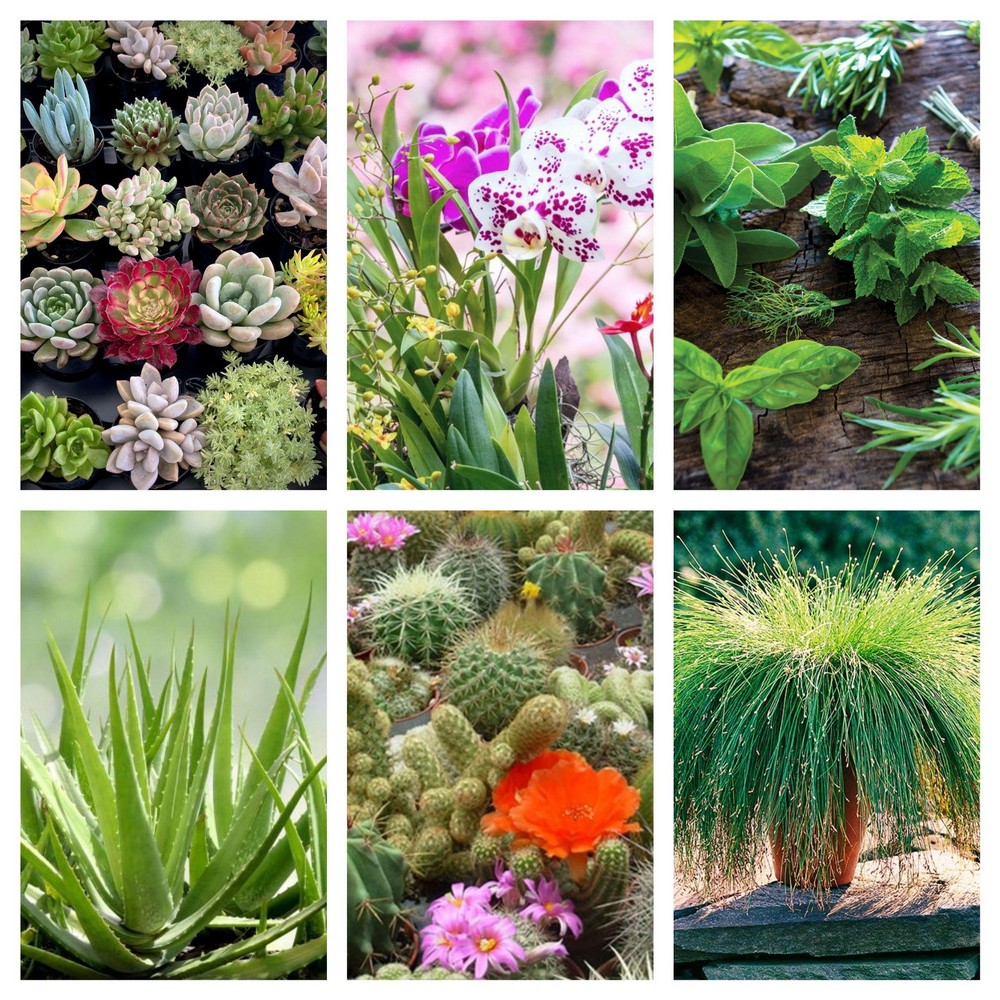
You can always add more plants to your store when you’re up and running.
Source your plants
Once you’ve found your niche, it’s time to source the plants. There are many ways to source plants. You can grow plants in your garden, create a greenhouse or rent somewhere to grow them yourself.
That may be difficult to sustain when you’re operating on a commercial scale so you may be better off finding a reliable supplier.
Contact local nursery owners to source plants or contact retailers or wholesalers.
Tennessee Wholesale Nursery is an example of a plant wholesaler. You can purchase plants from them at a reasonable price and resell them on your online store for a small profit.
Photograph your plants
Quality images are essential when you’re selling plants online. You should add natural and quality plant photos to your shop to help show as well as tell.
Quality images will give customers confidence enough to buy from you, which will make a huge difference to your success.
Plant photography tips you might like to follow:
- Shoot in natural light
- Use a quality smartphone
- Try 3D photography
- Use an image editing tool
Show and tell is a very effective way to sell. If you have the skills, consider adding plant videos to your shop too.
Price your plants
Plant pricing is another priority. You need to calculate each and every cost from growing a plant to delivery. You should also include store maintenance and marketing costs.
Focusing on your competitor’s shop plant pricing and clearly understanding customer demand will help you a lot.
Then set your own plant pricing accordingly.
Set up shipping for plants
Shipping is the key if you’re selling plants on your online store. Protecting plants from damage and keeping them alive is a high priority.
There are some legal guidelines for shipping plants.
For example, if you grow plants in the ground, you must remove soil from the roots. Check this article to learn more about plant packing and shipping rules.
It’ll be quite challenging for you to manage plant shipping so we recommend using third party shipping services.
They know everything about plant shipping and relevant laws and should be able to operate within regulations and protect you from risk. Try the United State Postal Service shipping service or one of a number of other local or national carriers.
How to create a plant selling website
Building a website is very easy if you have the right tools to hand. You don’t even require any coding skills.
We’ve shared 5 simple steps to get the job done. By the end of this guide, you’ll be able to create your own plant-selling website.
Follow the below steps to create your plant selling website:
- Step 1: WordPress website building prerequisites
- Step 2: Install and activate the Astra theme
- Step 3: Install and activate Starter Templates
- Step 4: Select a website template
- Step 5: Customize your plant website
- Step 6: Set up the WooCommerce store
Let’s get started.
Step 1: WordPress website building prerequisites
These are the prerequisites you’ll need before launching your website:
- Domain name
- Hosting
- WordPress installation
A domain name is the name of your website that people use to visit. Picking a domain name similar to your brand or company name will be great. For example, ‘wpastra.com’ is our domain name.
Follow our guide to learn more about domain names.
Web hosting is the second thing you require before launching your website. It’s where you store all of your website resources and the database so visitors can access your store.
You can buy a suitable hosting plan for your website from any hosting provider. We recommend using Kinsta, SiteGround and Cloudways. They are very popular!
Once you’ve successfully got your website’s domain name and hosting plan, you need to install WordPress.
WordPress is an open source content management system (CMS) that provides a platform for your website.
Note:
“43% of global websites are made with WordPress.” – Source: WordPress.com.
With this handy tool, you can efficiently create your online garden center.
Most hosting providers come with a single click WordPress installation feature. If you prefer to build everything yourself, check this handy article on how to install WordPress.
Step 2: Install and activate the Astra theme
Astra is a powerful WordPress theme chosen by 1.6 million users around the globe. You can create any type of professional website, including an eCommerce website.
Astra comes in two different versions free and premium and offers pre-built WooCommerce templates.
The good news is that you can create your plant selling website with the features offered by the free version of Astra.
For this article, we’re going to use the free Astra theme.
Let’s install it.
Go to Appearance > Themes in your WordPress dashboard.

Hit the Add New button or click Add New Theme.

Type ‘Astra’ into the search bar and click the Install button.

Next, hit the Activate button.

That’s it. You’ve installed and activated the Astra WordPress theme on your website!
Step 3: Install and activate Starter Templates
Stater Templates is a plugin that offers free and professional website templates. These templates are fully customizable and install in less than a minute.
Starter Templates are compatible with popular page builders such as Elementor and Beaver Builder.
The plugin comes with more than 280+ website templates, some are free, others you need to pay for. Using any readymade templates, you simply create your own website in minutes.
For this tutorial, we’ll select a premium template for building a plant selling website. You can also make your website using a free template if you prefer, the process will be exactly the same.
Let’s install and activate the premium version of Starter Templates called ‘Astra Premium Sites’.
After you’ve successfully completed the plugin purchase, you’ll get the confirmation email with the Astra premium sites ZIP file and license key.
Now, visit Plugins > Add New.

Click the Upload Plugin button.

Choose the plugin ZIP file and hit the Install Now button.

Then click the blue Activate Plugin button.

It’s time to activate the license key. To do this, you need to click the Activate link or green Activate License link.

Now, paste the license key and click the Activate License button.

Great job! You’ve successfully activated the license key!

Note:
Don’t forget to contact our support team if you get an error message or are facing any difficulties. They’ll be happy to help.
Step 4: Select a plant store website template
It’s time to choose a suitable template for your website.
Navigate to Appearance > Starter Templates.

Click the Build Your Website Now button to start the process.
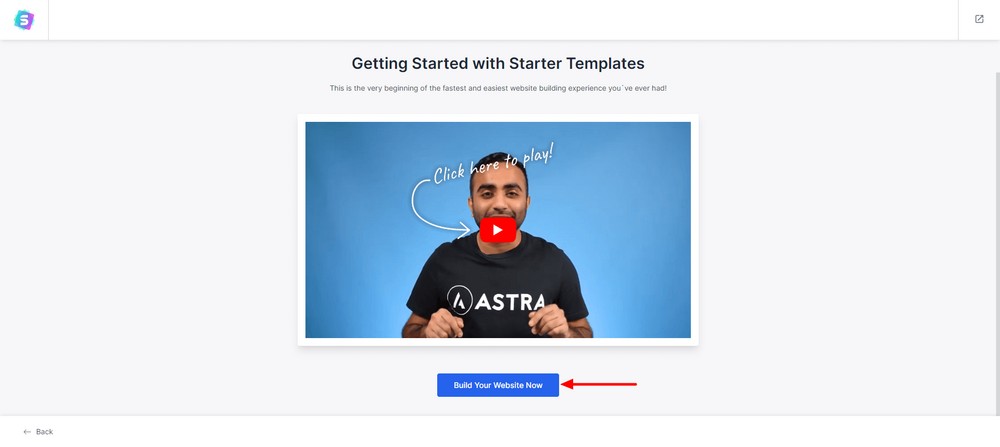
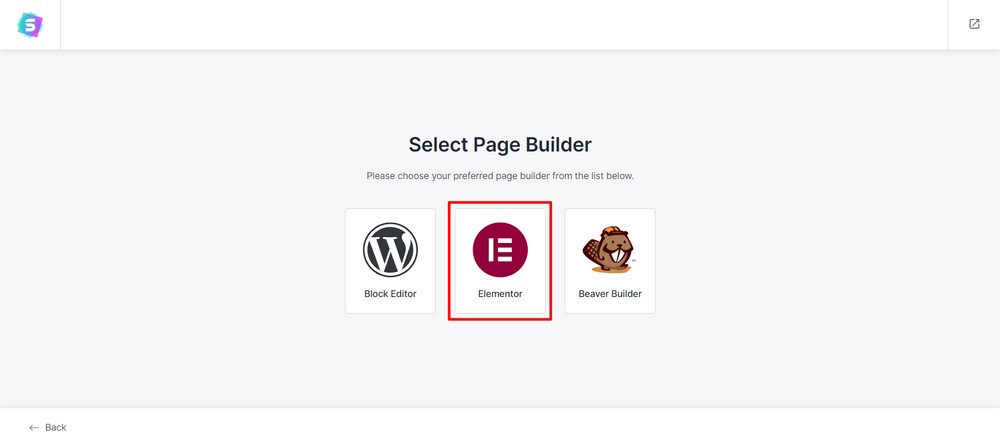
Now, select the Elementor page builder.
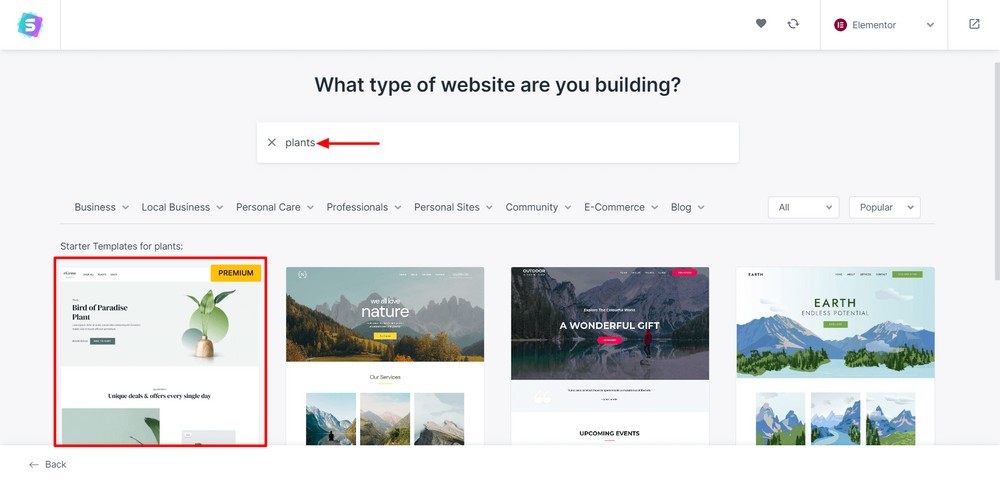
Type ‘plants’ into the search bar. Then select the first template named ‘eGrow Plants’.
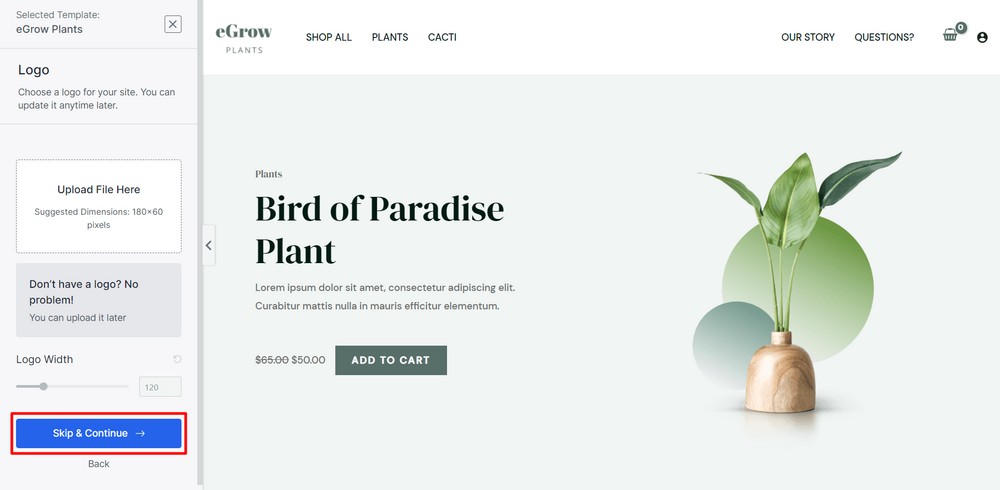
If you have a website logo then upload it here. Otherwise, you can leave this part and click the Continue button.
Don’t worry. You can add your website logo later if you prefer.
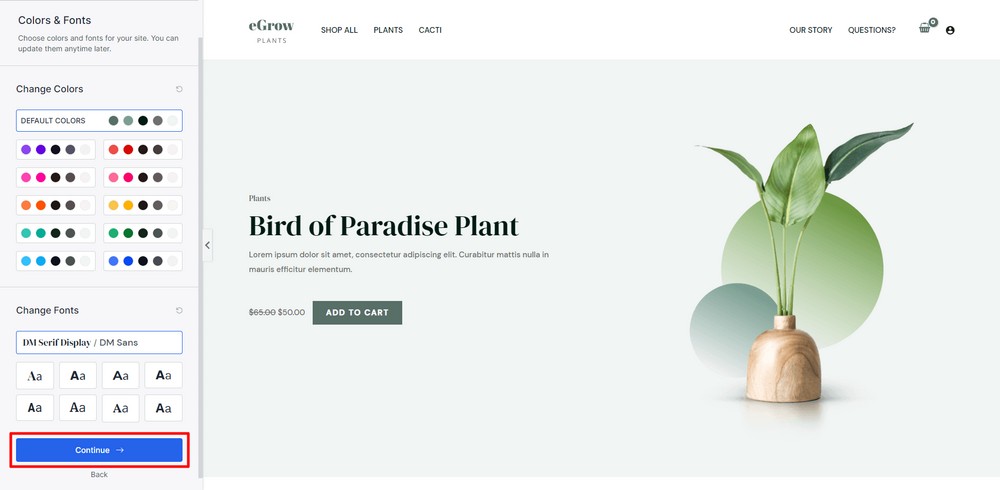
You can also change the fonts and colors of your website. After that, hit the Skip & Continue button.
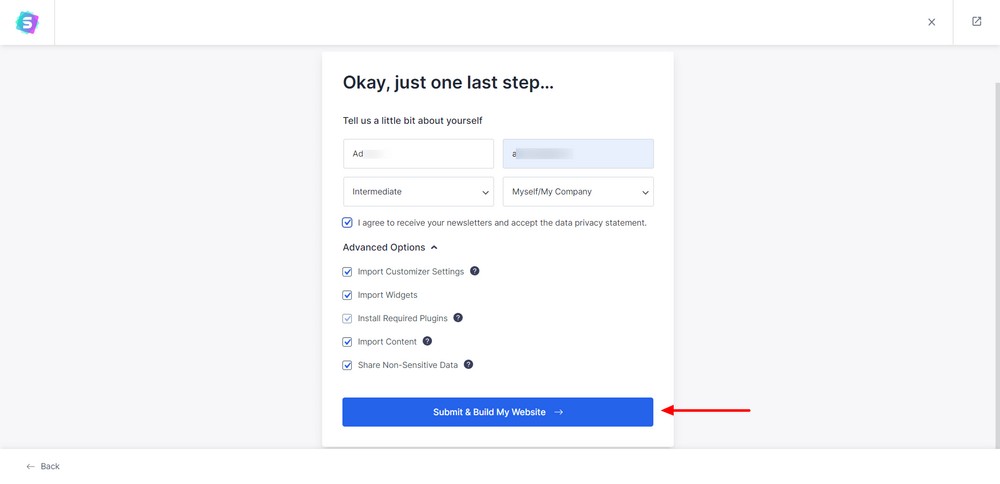
If you want to receive newsletters, share some of your basic information. Then click the Submit & Build My Website button to move forward.
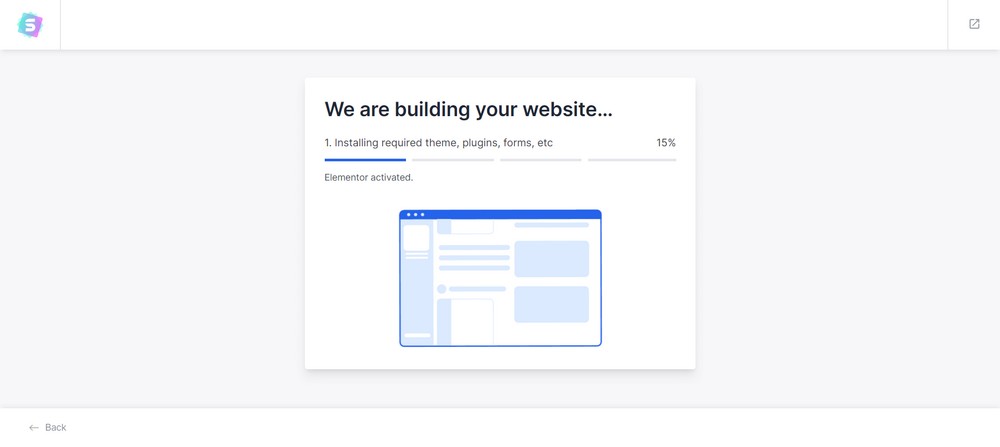
Now, the system will import all the essential files and plugins to your website.
Congratulations! You’ve successfully installed your Starter Template!
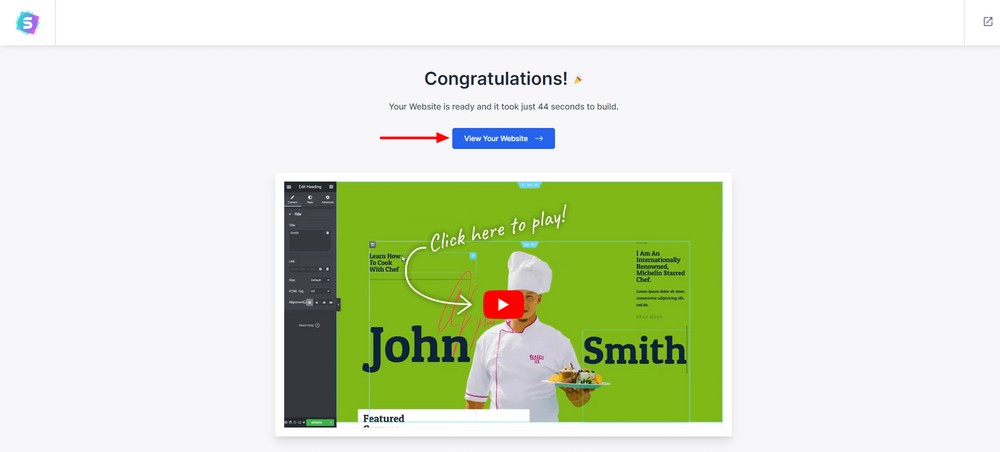
Let’s have a quick look at your website. Just hit the View Your Website button.
As you can see, the process imported all pages, images and placeholder content. All you need to do is customize them so they deliver what you need.
Step 5: Customize your plant website
Now you can customize your website in any way you like. This template has most of the essential features, so we’ll only customize the website a bit.
Open the page to the Elementor editor panel
Hover over the Edit with Elementor. Then click Site Settings.
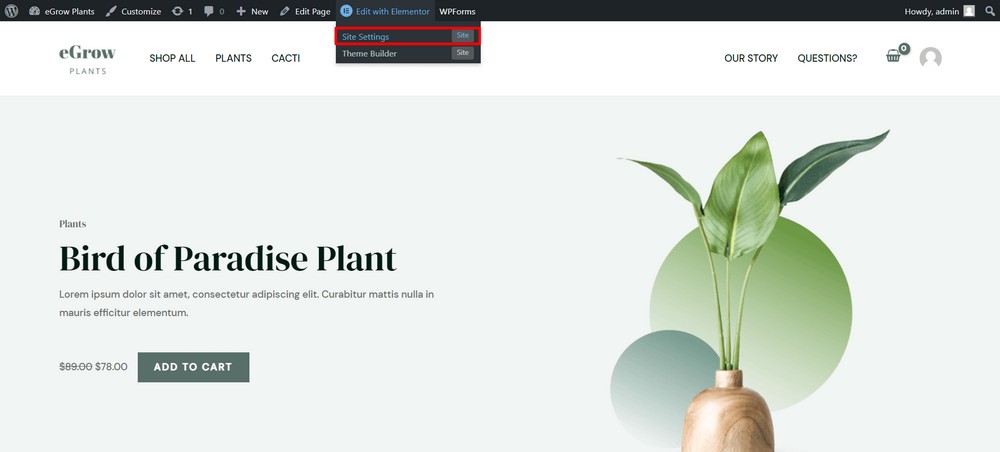
Next, hit the ‘X’ icon.
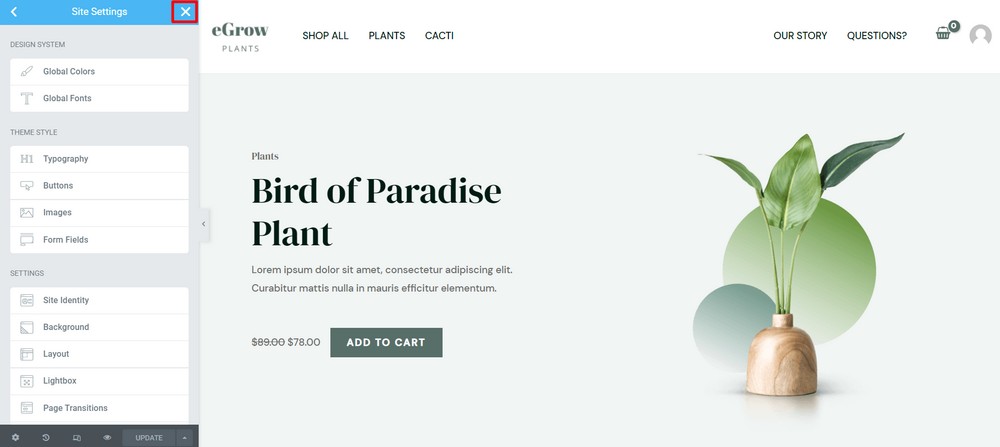
You will be taken to the Elementor editor panel.
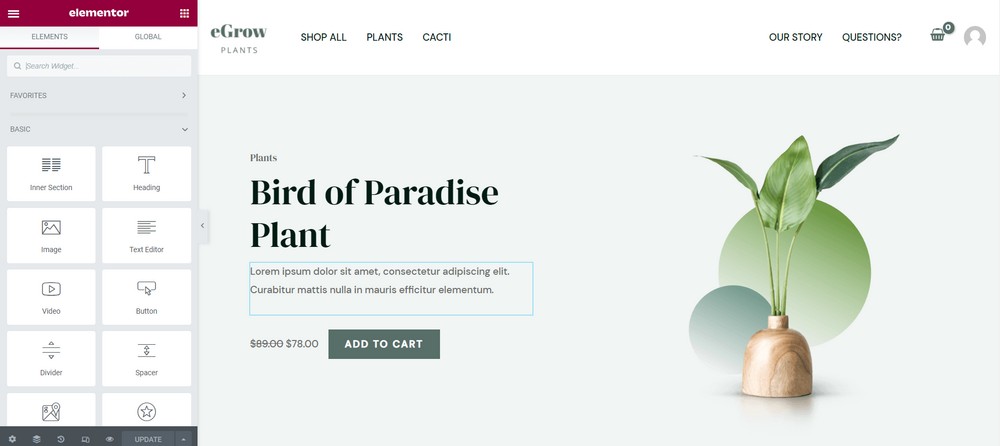
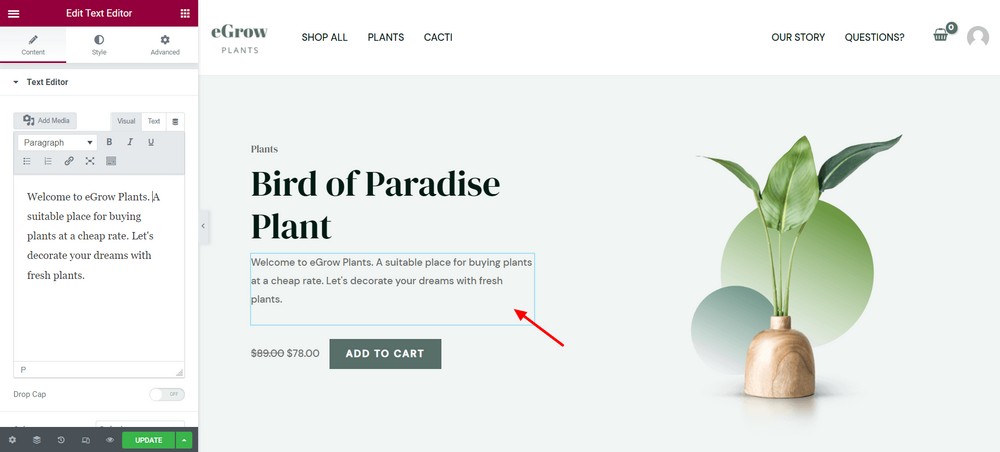
Change the hero area text
You can change the text of the hero area as you like.
Click the right text that you want to edit and insert the updated text into the left side Elementor Text Editor widget.
Add a new special product
This template has a layout displaying one featured product. But we want to display two featured products on the homepage.
To add a new one, click the current special product.
This product is added using the WooCommerce shortcode feature. You just need to edit the shortcode.
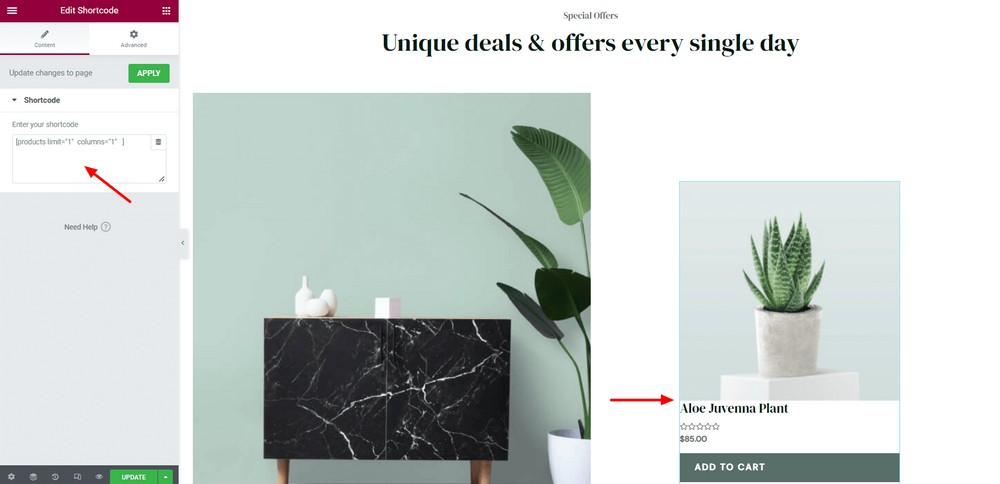
The current shortcode has a single product limit and shows the product in a single column.
We’ve increased the product limit from single to double and added two columns. Also, we’ve set the query order by descending.
You can use the below code to use the same functionality on your website.
[products limit="2" columns="2" orderby="DSC" ]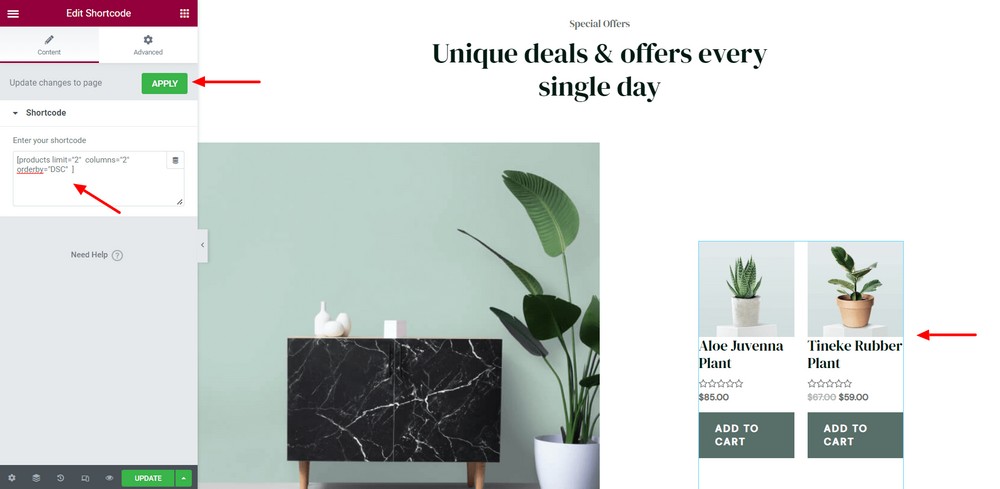
Note:
Please make sure that you hit the green Apply button to implement the current changes.
Then the green Update button at the bottom to save.
Show more popular plants
We want to add more popular plants in the Most Popular Plants area. Currently, we’re displaying just four.
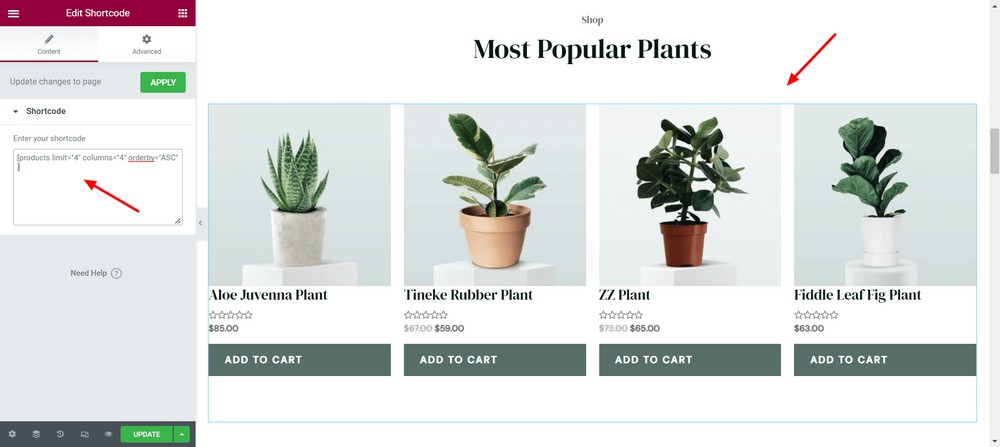
You can edit the shortcode to add more popular plants to the list. Just increase the number of products. We want to display eight plants, so we’ve set the product limit to 8.
You can use the following shortcode if you need to.
[products limit="8" columns="4" orderby="ASC" ]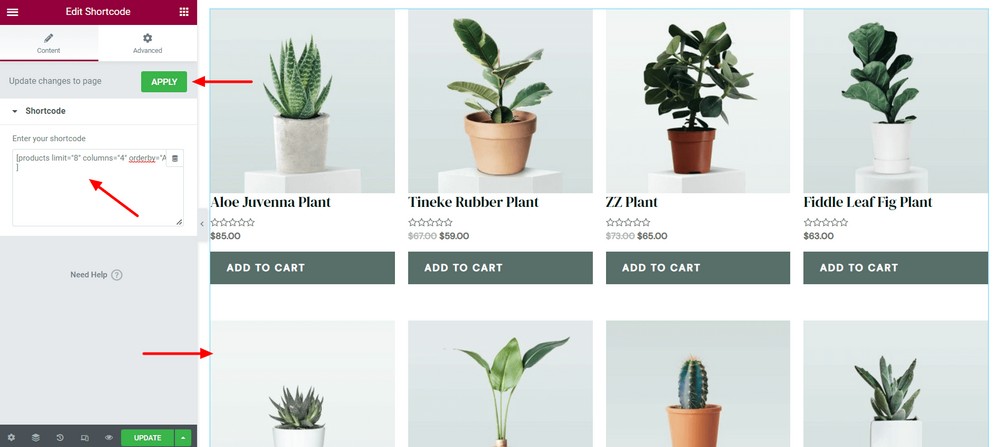
Add an FAQ section
The FAQs section is an easy option to answer important questions about your store, products or the ordering process.
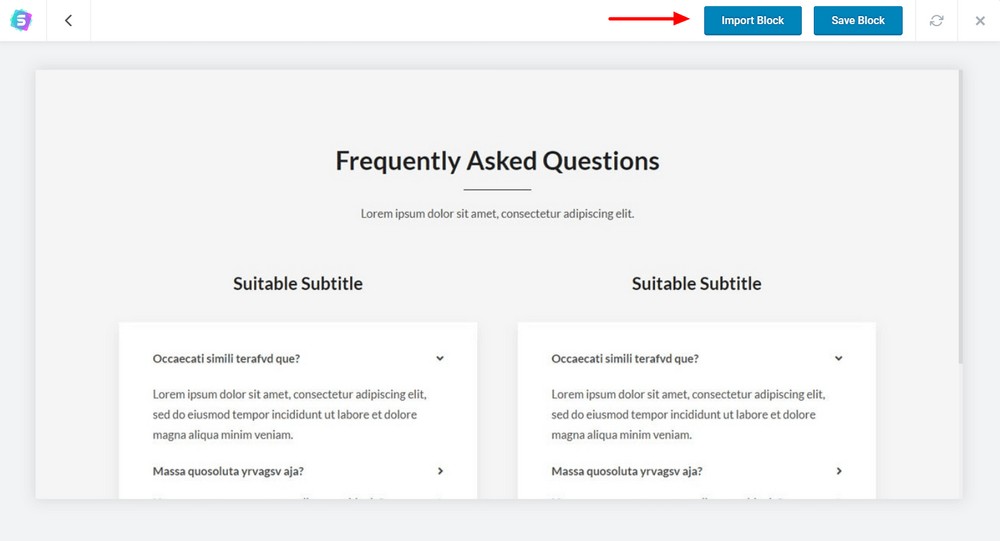
Use the free FAQs block offered by the Starter Templates to use this feature on your website.
Click the Starter Templates icon.
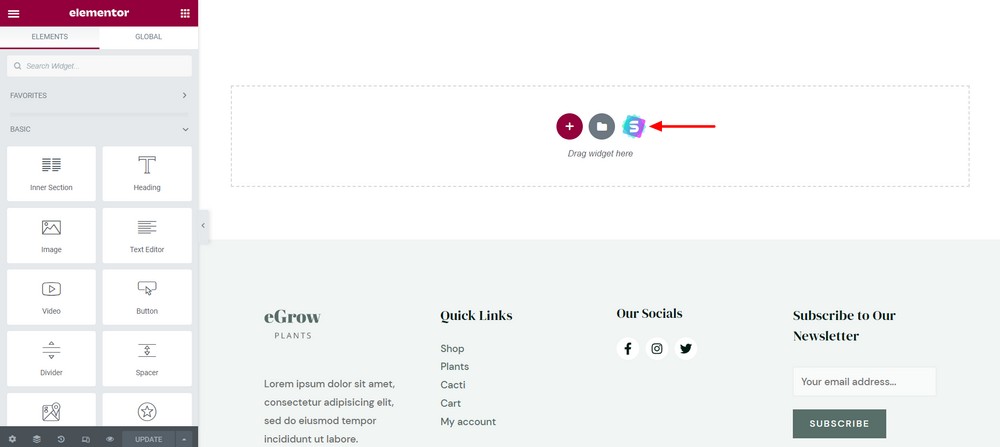
Go to the Blocks tab and find the FAQ block using the search bar or filter option.
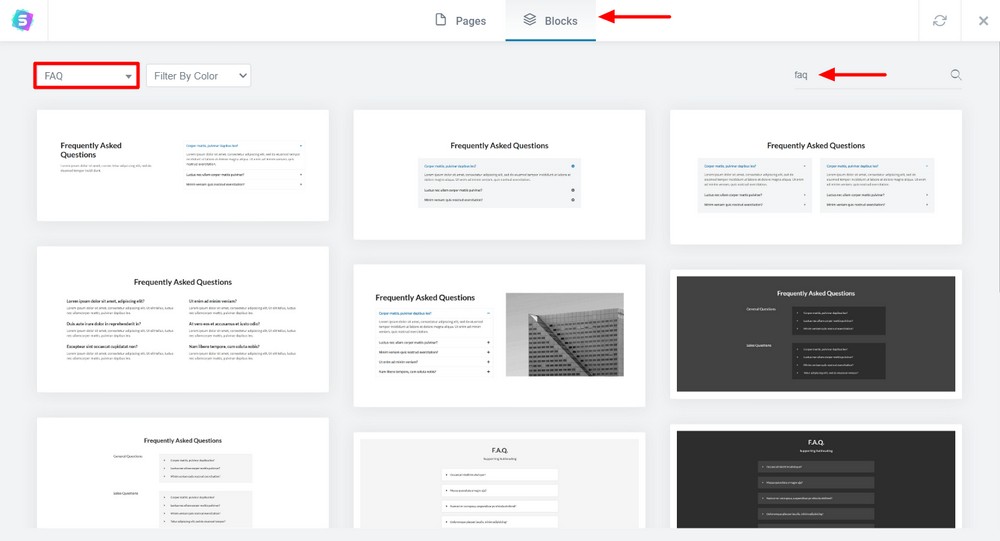
Select a suitable block.
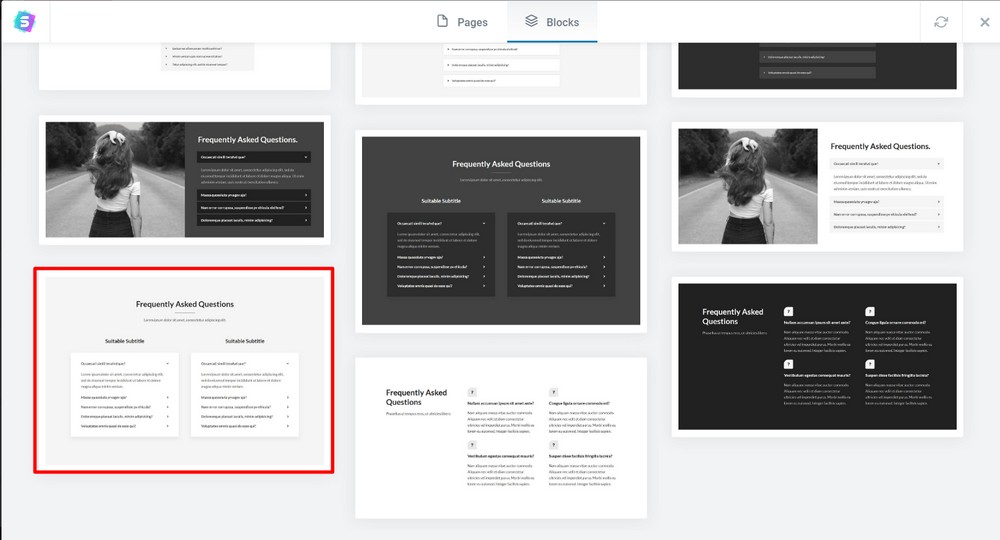
Hit the Import Block button to insert the block into your website.
Customize your questions and answers using the Elementor menu on the left.
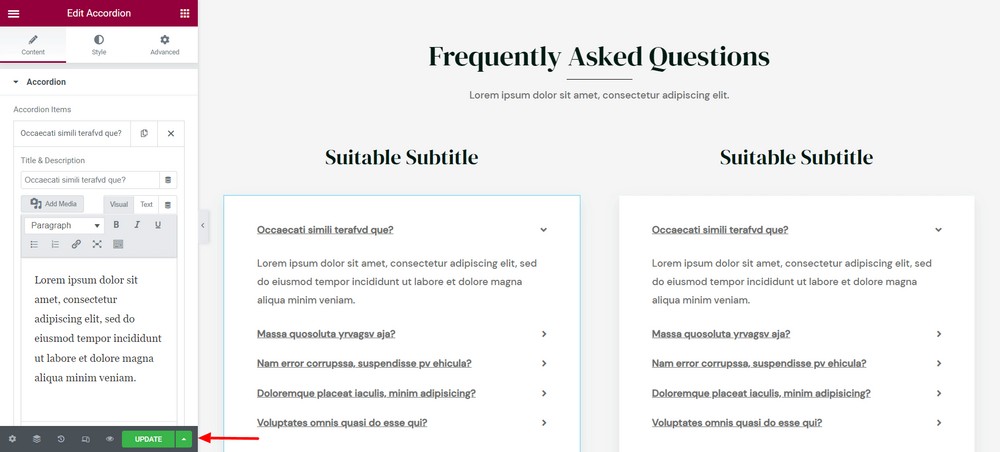
Finally, click the Update button to save all the changes you made.
Let’s see the final version of the website.
Step 6: Set up the WooCommerce store
Setting up a WooCommerce store is easy and fun. WooCommere is automatically installed on your website when you install and activate the eGrow Plants template.
Now you need to follow the following steps to set up your store.
- Access the setup wizard
- Choose the industry
- Select the product type
- Business details
- Add products
- Set up payments
- Set up shipping
- Set up tax
We’ve already written an article based on the WooCommerce store setup. So we don’t want to repeat the same things here.
We highly recommend you check out the guide on how to set up WooCommerce. It’s an ultimate guide where you’ll learn everything about the WooCommerce store setup.
How to boost sales to grow your online plant business
Setting up your store is just the beginning. Now you have to attract customers and grow your business.
We’re going to share some tips that may help you grow.
Sell related products
It’s fine that you’re selling plants in your store. But you can also consider selling related products as well. It creates a new opportunity to generate extra profit.
For example, you can sell:
- Seeds
- Compost
- Pots
- Stands
- Gardening accessories
You can also sell other gardening materials and tools, depending on what you see customers asking for or talking about on social media.
Use social media
Most of your target customers are using social media. It’s a good idea to create a page or a group on popular social channels to promote your product.
Identify what networks your target market uses and open accounts on each. Then use them to reach new customers and perhaps, new markets.
You can share gardening tips to attract customers and even use social media ads if you have a budget. This will help you reach new customers in a relatively short time.
Utilize email marketing
Email marketing is another effective way to reach new customers and retarget old ones. You can use your website to get potential leads. Add newsletter forms to different places on your website. You can also use popups to generate leads.
It’ll be easy for you to manage customers, lead and run an email campaign using a modern email automation system.
If you’re using WordPress, we recommend the Convert Pro plugin. This lead generation tool helps you to increase the number of subscribers and conversions with very little effort.
Join in local events
Events are a great opportunity to get involved with many people in the same place. You can talk about your business, ideas and gardening experience with others. You can share tips, showcase your plants and get your name out there.
Many countries arrange gardening events. For example, the National Garden Festival in New York is a very popular event. Join similar events where you easily promote your business and explore new markets.
Run free educational events
You can organize free education events in your local area to educate people about growing plants and gardening. It helps people to learn more about plants as well as build a positive reputation for you and your business.
You could also contact some institutions such as schools to educate children on the importance of plants and gardening.
Affiliate marketing
Allowing affiliate marketing can be a game changing strategy for an eCommerce business. It’s a digital marketing strategy that allows other content creators to promote your products by giving them a commission for every sale they make.
Apart from the above digital marketing tips, you may also use conventional offline marketing.
You can use banners, billboards and stickers to promote your business. There are thousands of ways to promote a business and we’re sure you can think of plenty more!
Wrapping up
In the above guide, we’ve shown you how to start a plant shop online. We covered everything, from what you need to how to build the site.
We also covered customizing a template, setting featured products and getting the basics ready.
We hope this article will help you create your own eCommerce website. If you want to add more advanced features like a mega menu or need a custom header footer builder for your eCommerce website, can try Astra Pro.
Do you run an eCommerce store? Want to set up your own online nursery? Share your story below!
Disclosure: This blog may contain affiliate links. If you make a purchase through one of these links, we may receive a small commission. Read disclosure. Rest assured that we only recommend products that we have personally used and believe will add value to our readers. Thanks for your support!




I loved your blog. It is very useful to me.
I own a nursery where I’m growing ornamental plants. It seems it was a good idea to sell plants online by creating a website for it. It is very useful for me to grow my small business to the next level. Thank you for sharing!